
Little Debbie Christmas Tree Cake Cheesecake Cups
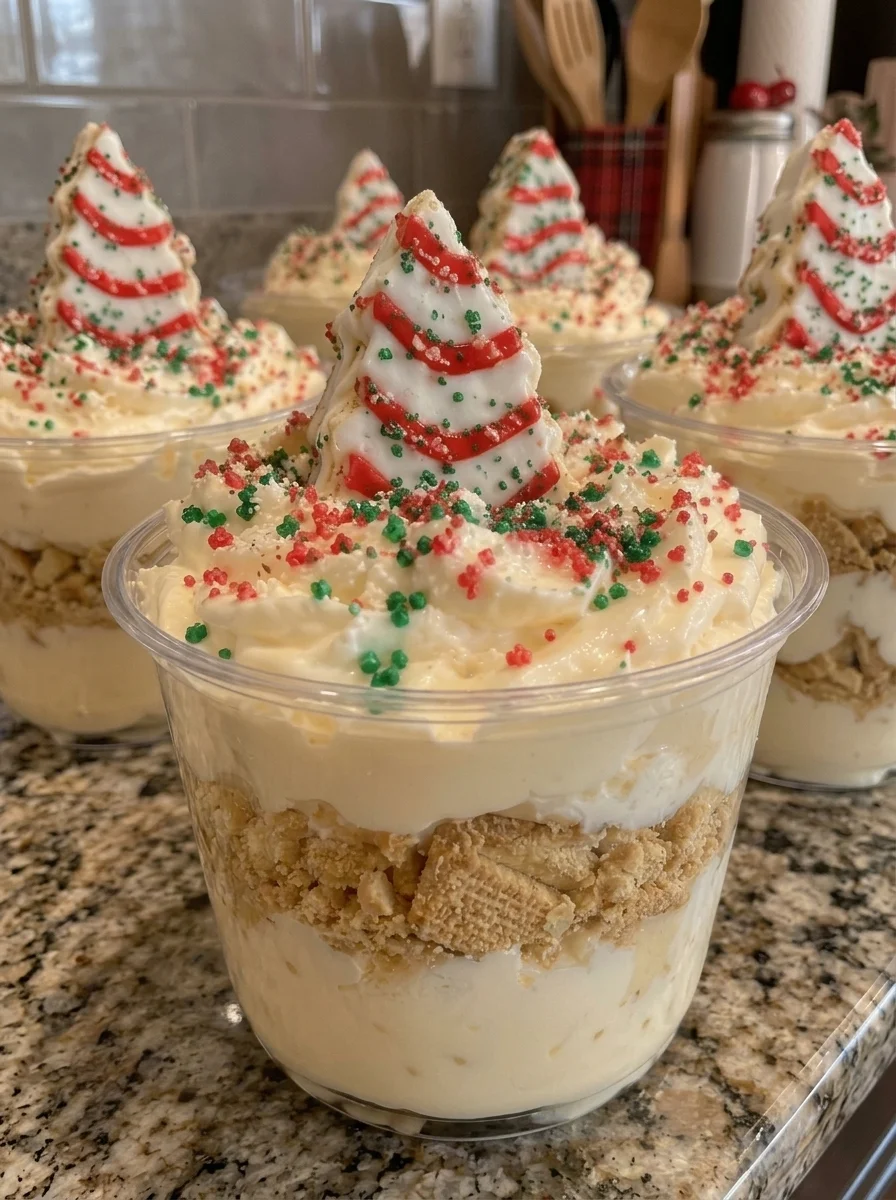
Little Debbie Christmas Tree Cake Cheesecake Cups combine a buttery Golden Oreo base, creamy vanilla filling, and pieces of frosted snack cake in a festive individual dessert. The cream cheese brings a little tang, the whipped topping lightens the filling, and the chopped cakes add soft vanilla cake and sweet frosting throughout. Finished with a white topping and red-and-green sprinkles, they make a colorful addition to a Christmas dessert table.
There is no baking or water bath to manage. Crush the cookies, mix the filling, fold in the cake pieces, and divide everything between small serving cups. Refrigeration gives the filling time to thicken and lets the cookie base settle beneath it.
These are spoon desserts rather than miniature cheesecakes designed to be unmolded. Keeping them in clear cups shows the layers and makes serving straightforward. Prepare the main layers ahead, then add the cake decorations and sprinkles shortly before serving for the freshest appearance.
Recipe note: This article expands the supplied recipe, which has not been kitchen-tested here. It also revises the mixing sequence: with only 3/4 cup milk, the instant pudding is incorporated into the cream cheese mixture rather than being left to set separately into a stiff paste. The proposed method needs a kitchen test before the recipe is presented as tested.
What These Cups Taste Like
Expect a sweet, vanilla-forward dessert with a cheesecake-inspired tang and a soft cookie-and-cake texture. The snack cakes and pudding mix already contain sweetener, and the whipped topping adds more. These cups are intended to be an indulgent holiday dessert, not a lightly sweetened yogurt-style treat.
The cookie layer starts with some crunch but softens as it sits beneath the filling. Cake pieces inside the cheesecake mixture become tender, while the decorations on top remain more distinct when added at the last minute.
Whipped topping makes the filling lighter than cream cheese alone, but the pudding mix and cake keep it substantial. It should be thick enough to mound on a spoon after chilling, without needing to become a sliceable cheesecake.
Ingredients
Golden Cookie Crust
- 1 1/2 cups finely crushed Golden Oreo cookies, including their cream filling
- 4 tablespoons unsalted butter, melted and cooled slightly
Christmas Tree Cake Cheesecake Filling
- 8 ounces block-style cream cheese, softened
- 1/2 cup powdered sugar
- 1 teaspoon vanilla extract
- 1 package instant cheesecake pudding mix, 3.4 ounces
- 3/4 cup cold whole milk
- 1 cup whipped topping, thawed in the refrigerator
- 5 Little Debbie Christmas Tree Cakes, chopped into small pieces
Topping
- 1 cup whipped topping, thawed in the refrigerator
- 2 Little Debbie Christmas Tree Cakes, cut into small decorative pieces
- Red and green holiday sprinkles
- Mini candy stars, optional
- A small amount of melted white chocolate for drizzling, optional
Yield: Eight small dessert cups. Have eight containers of roughly 6 to 8 ounces available, with an extra cup if needed. Final volume depends on cake size and how much air remains in the filling. The containers do not have to be filled to the rim.
Ingredient Notes
Golden Oreo Cookies
Crush the whole cookies with their cream filling. Removing the centers changes the amount of sweetness, fat, and crumb needed for this recipe.
Measure the crumbs after crushing. Cookie counts vary with product size, and loosely broken pieces occupy more space than fine crumbs. A food processor gives an even texture, but a sturdy food-safe bag and rolling pin can also work.
The melted butter should coat the crumbs, not collect in a puddle beneath them. Because the cookies already contain filling, avoid pressing the crust hard enough to create a dense, difficult-to-scoop layer.
Cream Cheese
Use block-style cream cheese for the intended filling. Spreadable tub products can contain different moisture levels and may produce a softer result.
Soften the cream cheese just enough that a mixer can beat it without leaving hard lumps. Cut it into smaller pieces to shorten the softening time rather than leaving the entire block out for hours.
Once milk and pudding mix are added, lumps become harder to remove without overworking the filling. Starting with smooth cream cheese is more useful than trying to beat a lumpy finished mixture indefinitely.
Instant Cheesecake Pudding Mix
Use instant pudding mix, not cook-and-serve pudding and not a boxed no-bake cheesecake kit. The 3.4-ounce package size is part of the supplied formula.
The manufacturer’s ordinary pudding directions use more milk than this recipe. Here, the smaller amount is intended to work with cream cheese, whipped topping, and cake in a thicker dessert filling. This is a recipe-specific use of the powder, not a claim that 3/4 cup is the standard package instruction.
Do not substitute an entire sugar-free package by weight or assume another package size behaves the same way. Different mixes can have different formulas and concentrations.
Milk
Use cold whole milk as specified. It helps hydrate the pudding mix and loosen the cream cheese enough to combine evenly.
A non-dairy milk substitution may not set the pudding in the same way. If you need an alternative, consult the pudding manufacturer’s guidance and treat the dessert as a separate test rather than assuming an identical result.
Whipped Topping
Thaw frozen whipped topping in the refrigerator according to its package instructions. It should be soft enough to fold but still cold and able to hold shape.
The recipe uses two measured cups total: one in the filling and one for the topping. Check the container’s volume information rather than assuming a particular tub weight equals exactly the amount required.
Fresh whipped cream changes the stability and sweetness of the filling. It is a possible separate variation, but it is not a verified equal substitution in this proposed formula.
Christmas Tree Cakes
Use the vanilla-style frosted Christmas Tree Cakes intended in the supplied recipe. Package formats and cake sizes can vary, so record which product you use when testing.
Chop the five filling cakes into small bite-sized pieces. Large chunks make the filling harder to divide evenly, while very fine crumbs can disappear into the cheesecake and make it heavier.
Reserve the two decoration cakes until close to serving. You can cut them into eight or more small pieces; they do not need to become eight perfect miniature trees. A few neat triangles or recognizable frosted pieces are enough.
Equipment
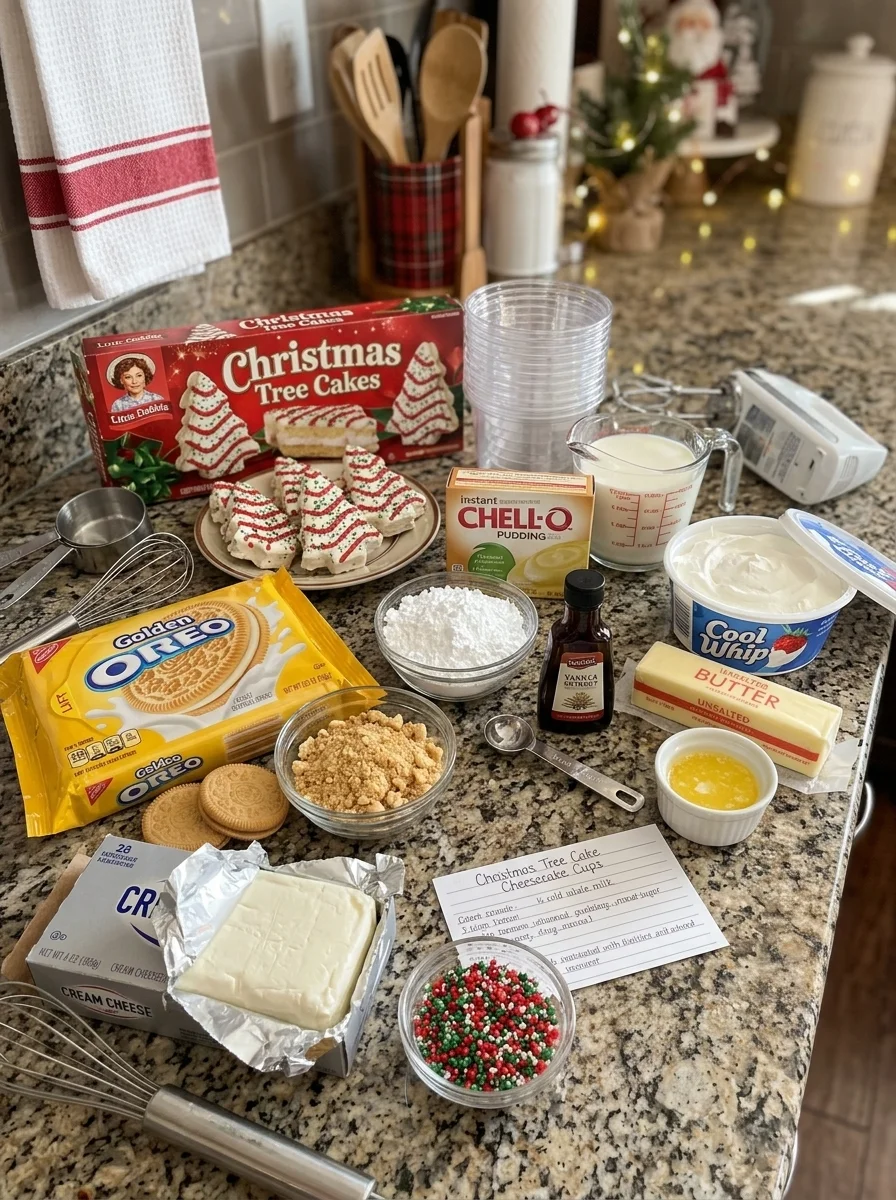
You will need a food processor or bag and rolling pin, two mixing bowls, an electric mixer, a spatula, measuring tools, and eight serving cups with suitable covers.
A piping bag can make neat layers, but a spoon is perfectly practical. If you pipe the filling after adding cake pieces, use a wide plain opening. A narrow star tip can clog or crush the cake.
Set the cups on a tray before filling. Moving one supported tray into the refrigerator is easier than carrying eight uncovered portions individually.
Step-by-Step Instructions
1. Make the Cookie Crumbs
Crush the Golden Oreos until finely ground with no large cookie chunks. Transfer the measured crumbs to a bowl and stir in the melted, slightly cooled butter.
Mix until the crumbs are evenly moistened. A small pinch should hold together lightly, but the mixture should still be easy to distribute.
Do not pour very hot butter directly into delicate plastic serving cups. Let the crumb mixture cool briefly if necessary before portioning.
2. Divide the Crust
Spoon the crumb mixture among eight cups. Press gently with the back of a spoon to form an even base.
Keep the pressure light. These desserts will be eaten cold with a spoon, so a compacted crust can be frustrating to break through. You want a settled crumb layer, not a hard disc.
Place the cups in the refrigerator while preparing the filling. This is a convenient holding step rather than a separate required setting period.
3. Beat the Cream Cheese
Place the softened cream cheese in a large bowl. Beat until smooth, pausing to scrape the sides and bottom.
Add the powdered sugar and vanilla and mix until creamy. Begin slowly so the sugar stays in the bowl, then beat just long enough to remove visible lumps.
The mixture should look uniform before the pudding is introduced. Small firm cream cheese pieces will not magically dissolve during chilling.
4. Incorporate the Milk and Pudding Mix
With the mixer on low, gradually add the cold milk to the smooth cream cheese mixture. Add a little at first, beat until incorporated, then continue in several additions.
Sprinkle in the dry instant pudding mix gradually while mixing on low. Scrape the bowl and mix only until the powder is evenly incorporated and the filling begins thickening.
Do not prepare a separate bowl of pudding with the small milk quantity and leave it to stand before combining. That can create a very stiff mixture that is difficult to blend smoothly into the cream cheese.
The filling may thicken quickly. Move on to folding as soon as it is uniform rather than continuing to beat for a fixed extended period.
5. Fold in the Whipped Topping
Add one cup of cold thawed whipped topping. Fold with a flexible spatula, lifting from the bottom and turning the mixture over itself.
A small initial spoonful can loosen the base, making the rest easier to incorporate. Stop once there are no large white streaks.
Avoid using the electric mixer for this step. Gentle folding helps retain more of the topping’s light texture.
6. Add the Chopped Cakes
Chop five cakes into small pieces and scatter them over the filling. Fold gently until reasonably distributed.
Some frosting may blend into the cream, which is expected. Stop before the cake breaks down completely; visible soft pieces are part of the appeal.
Check the bottom of the bowl while folding so the first cups do not receive mostly cream and the last cups mostly cake.
7. Fill the Dessert Cups
Divide the filling evenly over the cookie bases. Use a spoon or a piping bag with a wide opening.
If you are using clear cups, keep the spoon close to the center and spread outward to reduce smears on the glass. Wipe any drips from the rim with a clean towel.
Smooth the tops gently and leave room for the whipped topping and decoration. If the batch volume is larger than expected, use an extra cup rather than overfilling the original eight.
8. Chill the Main Layers
Cover the cups and refrigerate for at least 3 to 4 hours. The filling should become thicker and remain supported by its container.
This recipe has no baking stage, but chilling still matters for the intended texture. Freezing briefly is not an equivalent shortcut for a properly chilled creamy filling.
For make-ahead preparation, leave the decorations off during this stage. They will look fresher when added close to serving.
9. Decorate
Divide the remaining cup of whipped topping among the chilled desserts, spooning or piping it on top. Add the reserved cake pieces, holiday sprinkles, and optional candy stars.
If using white chocolate, melt it gently, let it cool until just fluid, and drizzle a small amount over the topping. Hot chocolate can melt or deflate the whipped finish.
Add colorful sprinkles shortly before serving because some varieties bleed into moist toppings. Use only edible decorations and tell guests if any non-edible supports have been used; the recipe itself does not require them.
10. Serve Cold
Keep the cups refrigerated until serving and provide spoons. A chilled filling with softened cookie crumbs and tender cake is the intended finished texture.
For a buffet, set out a small number and replenish from the refrigerator. The cakes’ original shelf-stable packaging does not make the assembled cream cheese dessert shelf-stable.
Tips for Neat Layers and Smooth Filling
Measure crumbs after crushing and press lightly. A thick, firmly packed base can be harder to eat than the creamy top.
Remove cream cheese lumps before adding liquid. Gradual milk additions are easier to incorporate than pouring the entire amount into a stiff base.
Work efficiently after adding pudding powder. It begins thickening as it hydrates, so have the whipped topping and chopped cakes ready.
Fold instead of beating after the light ingredients are added. Overmixing can make the filling dense and turn cake pieces into crumbs.
Use a wide piping opening. Cake chunks and narrow decorative tips are a poor combination.
Decorate after the main chill. This preserves the appearance of cake pieces, sprinkles, and whipped topping.
Make-Ahead Plan
The day before serving, prepare the cookie bases and filling, portion into cups, cover, and refrigerate. Keep the decoration cakes in their original packaging until you need to cut them.
Shortly before serving, add whipped topping, cake pieces, and sprinkles. If you must finish the cups earlier, expect the top decorations to soften and some colors to bleed.
Transport the chilled cups upright in a supported tray inside an insulated cooler with ice packs. Do not rely on lids alone to keep them cold. Refrigerate them when you arrive if possible.
If serving outdoors, keep the desserts at 40°F or below until needed. A short display window and small batches are more practical than leaving every portion out at once.
Storage and Freezing
Store covered in the refrigerator at 40°F or below and enjoy within three days, provided the dairy and topping were fresh and properly handled. Follow any earlier storage limit from the ingredients you used.
The cookie layer and cake pieces will soften with time. That is expected, but the dessert will not have exactly the same texture on the third day as it did after its first chill.
For freezing, the supplied recipe suggests up to one month without delicate top decorations. Treat that as a quality option rather than a guarantee of unchanged texture: pudding, cream cheese, and whipped topping can release moisture or become softer after thawing.
Freeze covered portions in freezer-safe containers, then thaw overnight in the refrigerator. Add the whipped topping and decorations after thawing. Do not use thin disposable cups unless they are suitable for freezer storage.
Do not leave the assembled dairy dessert at room temperature for more than two hours, or more than one hour when temperatures exceed 90°F. Discard portions that have exceeded safe cold-holding limits rather than returning them to storage for another day.
Variations
Chocolate Christmas Tree Cakes
Chocolate snack cakes give a different dessert with a cocoa flavor. Use an appropriate instant pudding flavor if you want to develop that variation, but do not assume every package size replaces the cheesecake mix by weight.
Golden Cookie Crumble Finish
Reserve a small amount of extra plain cookie crumbs for sprinkling on the topping just before serving. Keep the original crust quantities unchanged unless you are intentionally changing the layers.
Smaller Party Portions
Divide the batch among more, smaller cups for a dessert table with several choices. Reduce the decoration size and remember that the serving count changes the nutrition per cup.
Simple Vanilla Decoration
Skip the candy stars and white chocolate and finish with whipped topping, one small cake piece, and a few sprinkles. The cake in the filling already provides plenty of holiday flavor.
These variations are suggestions for presentation and future testing, not a claim that every substitution has been verified.
Troubleshooting
The Filling Is Lumpy
The cream cheese may have been too cold, or too much milk may have been added at once. Beat the cream cheese smooth first and add the milk gradually. Once cake and whipped topping are folded in, aggressive beating will damage their texture.
The Filling Becomes Very Stiff
The low milk quantity makes this a concentrated pudding mixture. Avoid letting separately prepared pudding sit until rigid before combining. Fold in the measured topping promptly after the base is smooth.
The Filling Is Too Soft
Check that you used instant pudding, block cream cheese, whole milk, and the listed quantities. Allow the full chilling time. If it remains spoonable, serve it in its cup rather than adding unmeasured dry powder and creating lumps.
The Cookie Base Is Hard
It may have been pressed too firmly or made too thick. Use light pressure and an even layer in the next batch. The chilled butter will firm without heavy compacting.
The Sprinkles Bleed
Some colors dissolve when they sit against a moist topping. Add them near serving time or choose a sprinkle product intended for moist desserts.
Frequently Asked Questions
Can I Use Cook-and-Serve Pudding?
Not directly. It requires a different preparation method and heating stage. Use the instant product specified for this formula.
Are These Actual Baked Cheesecakes?
No. They are no-bake cheesecake-style cups with cream cheese, pudding, whipped topping, and snack cakes. They are served with spoons in their containers.
Can I Replace Whipped Topping With Whipped Cream?
That would change sweetness, volume, and stability. A freshly whipped cream variation needs separate testing rather than an automatic cup-for-cup promise.
Can I Make One Large Dessert?
You can layer it in a serving dish, but the required dish size and portion yield depend on the final volume. Serve by spoon rather than promising clean cheesecake slices.
Is This Allergy-Friendly?
The recipe contains milk and wheat and may contain egg, soy, or other allergens from the packaged products. Check the snack cakes, cookies, pudding, topping, and decorations individually.
Print
Little Debbie Christmas Tree Cake Cheesecake Cups
Description
Yield: Eight dessert cups, with additional space as needed
Prep time: Approximately 25 minutes
Chill time: 3–4 hours
Total time: Approximately 3 hours 25 minutes to 4 hours 25 minutes
Method: No-bake, refrigerated
Ingredients
Golden Cookie Crust
- 1 1/2 cups finely crushed Golden Oreo cookies, including their cream filling
- 4 tablespoons unsalted butter, melted and cooled slightly
Christmas Tree Cake Cheesecake Filling
- 8 ounces block-style cream cheese, softened
- 1/2 cup powdered sugar
- 1 teaspoon vanilla extract
- 1 package instant cheesecake pudding mix, 3.4 ounces
- 3/4 cup cold whole milk
- 1 cup whipped topping, thawed in the refrigerator
- 5 Little Debbie Christmas Tree Cakes, chopped into small pieces
Topping
- 1 cup whipped topping, thawed in the refrigerator
- 2 Little Debbie Christmas Tree Cakes, cut into small decorative pieces
- Red and green holiday sprinkles
- Mini candy stars, optional
- A small amount of melted white chocolate for drizzling, optional
Yield: Eight small dessert cups. Have eight containers of roughly 6 to 8 ounces available, with an extra cup if needed. Final volume depends on cake size and how much air remains in the filling. The containers do not have to be filled to the rim.
Instructions
- Mix 1 1/2 cups finely crushed whole Golden Oreos with 4 tablespoons melted butter. Divide between eight cups and press lightly.
- Beat 8 ounces softened block cream cheese until smooth. Mix in 1/2 cup powdered sugar and 1 teaspoon vanilla.
- Gradually beat in 3/4 cup cold whole milk, then gradually incorporate one 3.4-ounce package instant cheesecake pudding mix on low speed until smooth.
- Fold in 1 cup thawed whipped topping, followed by 5 chopped Christmas Tree Cakes.
- Divide over the crusts, cover, and refrigerate for 3–4 hours.
- Before serving, divide 1 cup whipped topping over the cups. Decorate with pieces cut from 2 additional cakes, sprinkles, and optional stars or white chocolate.
Storage: Refrigerate covered at 40°F or below for up to three days. Keep cold during transport and serving. Freeze undecorated portions only if you accept a possible texture change after thawing.
Nutrition: The supplied 440-calorie figure is unverified and may be low when all seven snack cakes, the cookie filling, butter, pudding mix, sugar, and both cups of whipped topping are counted. A rough planning range is approximately 450–600 calories per eight-way portion before optional chocolate and candy decorations. Use your actual product labels and cake sizes for a reliable calculation.