
High-Protein Peanut Butter Brownie Batter Cheesecake Cups
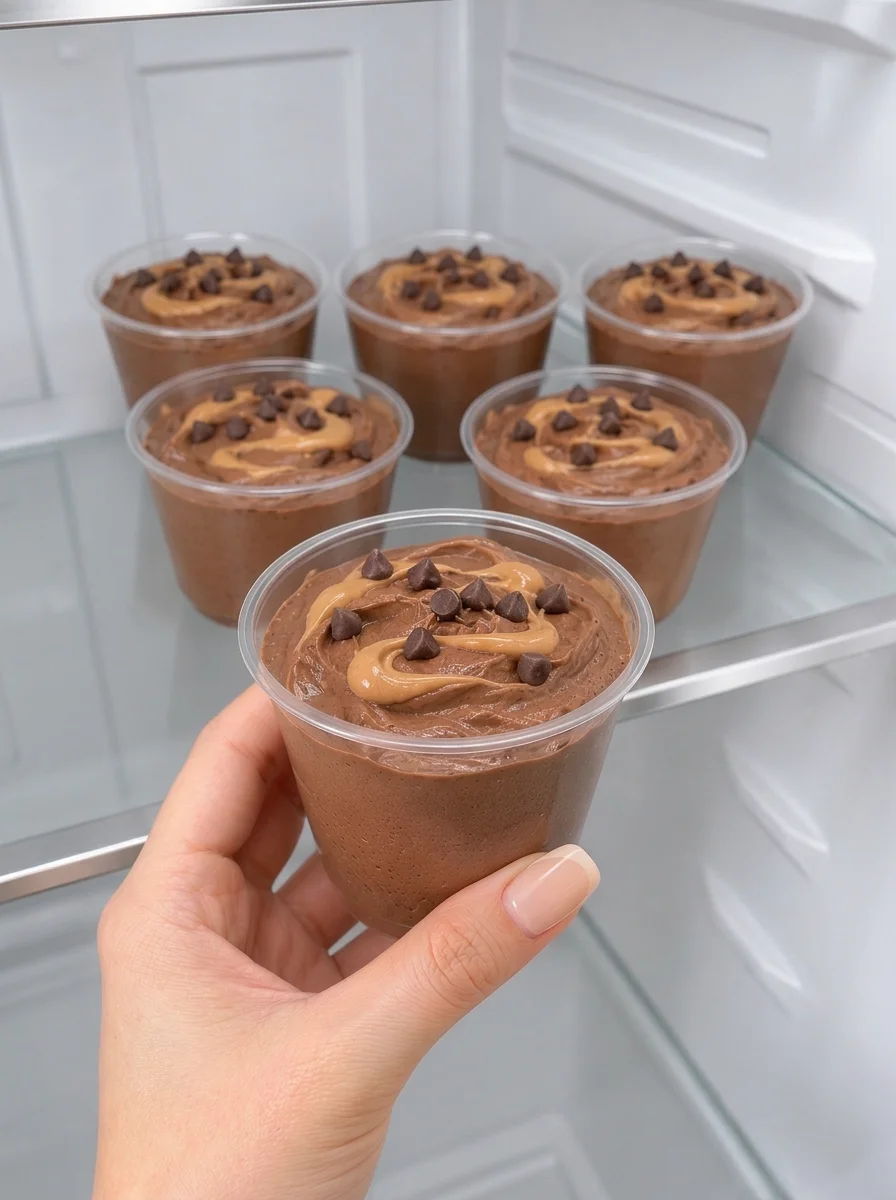
These High-Protein Peanut Butter Brownie Batter Cheesecake Cups combine rich chocolate, smooth peanut butter, and tangy cheesecake flavor in an easy, no-bake dessert. Blended cottage cheese and Greek yogurt create the creamy base, while cream cheese, cocoa powder, and chocolate protein powder give the filling its thick, brownie-inspired texture.
Each cup gets a peanut butter swirl and a sprinkle of miniature chocolate chips. After chilling, the filling becomes rich and spoonable, with a soft, fudgy consistency. There’s no crust to prepare, no oven to preheat, and no raw flour or egg in the mixture.
The individual portions make these cups convenient for preparing ahead. Keep them covered in the refrigerator for an afternoon snack, an after-dinner dessert, or a chocolate treat that’s ready when you are.
Yield: 6 servings
Equipment: Six 8-ounce dessert cups and a food processor or high-powered blender
Prep Time: 20 minutes
Cook Time: None
Chill Time: At least 2 hours
Total Time: 2 hours 20 minutes
What Are Brownie Batter Cheesecake Cups?
These dessert cups bring together the flavors of chocolate cheesecake and peanut butter brownies in a chilled, creamy filling.
Cocoa powder provides the deep chocolate flavor, while softened cream cheese adds the familiar tang and richness of cheesecake. Cottage cheese, Greek yogurt, and chocolate whey protein powder contribute protein and help create a substantial filling.
The name “brownie batter” describes the chocolate flavor and thick texture. These cups contain no brownie mix or uncooked baking ingredients, and they don’t bake into brownies. The finished dessert stays soft enough to eat with a spoon.
Because there’s no gelatin or baked egg filling, the cups won’t set into a firm, sliceable cheesecake. Chilling helps the mixture thicken while keeping it creamy.
Why You’ll Love This Recipe
- No baking required: Everything comes together in a blender or food processor.
- Rich chocolate flavor: Cocoa and chocolate protein powder work together to flavor the filling.
- Creamy cheesecake texture: Thorough blending turns the cottage cheese into a smooth base.
- Chocolate and peanut butter in every serving: Peanut butter flavors the filling and finishes the top.
- Easy individual portions: Divide the mixture among six cups before chilling.
- Convenient preparation: The covered cups keep in the refrigerator for up to three days.
Ingredients 🛒
For the Chocolate Cheesecake Filling
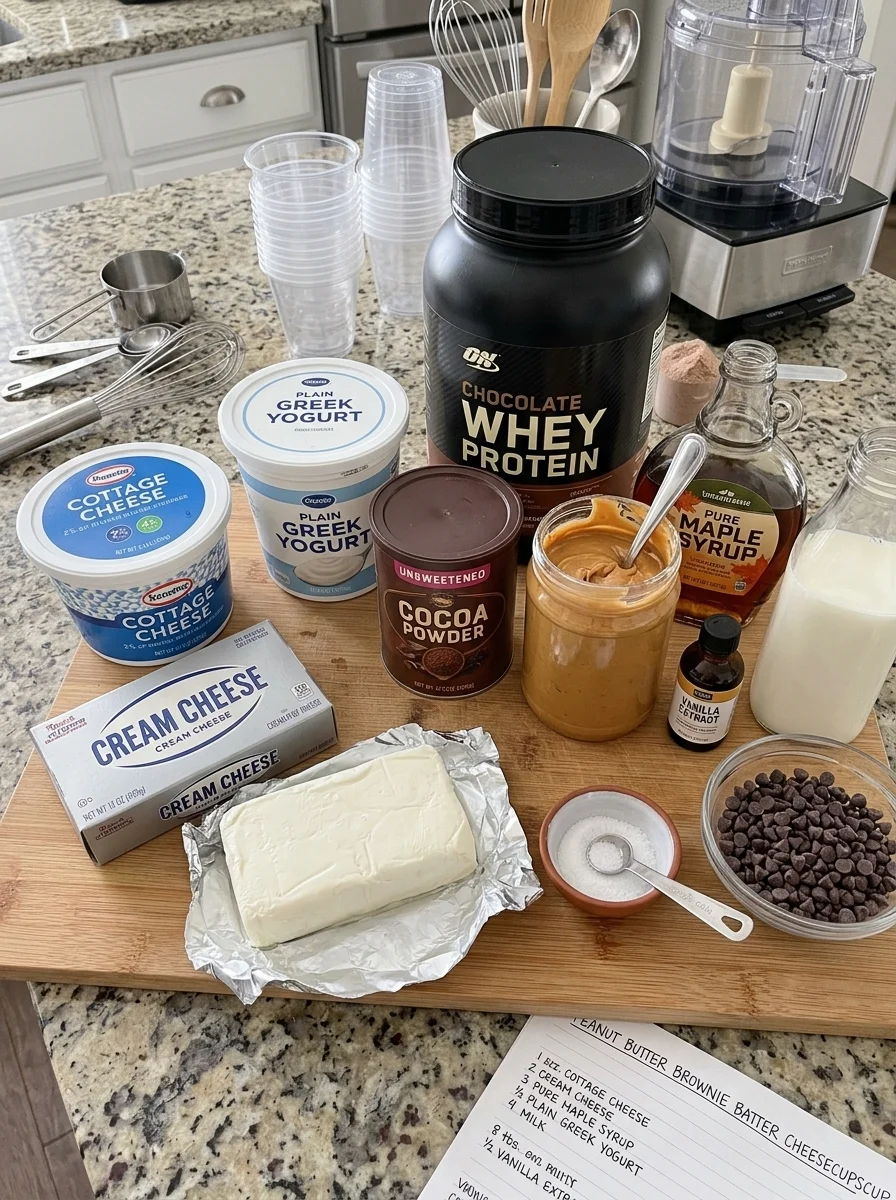
- 2 cups (450 g) cottage cheese, preferably 2% or 4%
- 1 cup (245 g) plain Greek yogurt
- 4 ounces (113 g) cream cheese, softened
- 40 g chocolate whey protein powder, measured by weight
- ¼ cup (25 g) unsweetened cocoa powder
- 2 tablespoons (32 g) smooth peanut butter
- 2 tablespoons (30 ml / 40 g) maple syrup
- 2 teaspoons vanilla extract
- ⅛ teaspoon fine salt
- 1–3 tablespoons milk, only as needed for blending
For the Topping
- 2 tablespoons (32 g) smooth peanut butter
- 2 tablespoons (22 g) miniature semisweet chocolate chips
Choosing Your Ingredients
Cottage cheese: A 2% or 4% variety gives the filling a creamy base. If there’s a noticeable pool of liquid on top, pour off that excess before measuring, without draining the cheese completely.
Greek yogurt: Use thick, plain Greek yogurt. Regular yogurt has a looser consistency and can make the filling thinner.
Cream cheese: Full-fat block cream cheese provides a rich texture. Let it soften enough to blend easily so small lumps don’t remain in the chocolate mixture.
Chocolate whey protein powder: Measure out 40 g rather than relying on a scoop, since scoop sizes vary. Choose a powder whose flavor you enjoy; it will be noticeable in the finished dessert.
Cocoa powder: Unsweetened cocoa adds chocolate intensity without adding more sweetness. Sifting it helps prevent dry pockets.
Peanut butter: Smooth peanut butter blends easily and makes a neat topping. If using a natural variety, stir it thoroughly before measuring so the oil and solids are evenly combined.
Maple syrup: This adds sweetness to balance the cocoa and tangy dairy ingredients. The final sweetness also depends on your protein powder.
How to Make High-Protein Peanut Butter Brownie Batter Cheesecake Cups 👩🍳
1. Prepare the Dessert Cups
Arrange six clean, food-safe 8-ounce cups on a tray.
The cups provide room for the filling and toppings; they won’t necessarily be filled to the rim. Have lids or reusable covers ready so the desserts can chill without drying out.
2. Blend the Cottage Cheese and Yogurt
Add the cottage cheese and Greek yogurt to a food processor or high-powered blender.
Blend for 60–90 seconds, stopping to scrape down the sides as needed. Continue until the mixture looks smooth and no visible curds remain.
Take your time with this step. A smooth dairy base makes the finished chocolate filling noticeably creamier.
3. Add the Cheesecake Ingredients
Add the softened cream cheese, 2 tablespoons peanut butter, maple syrup, vanilla, and salt.
Blend until evenly combined. Stop and scrape around the bottom and sides of the bowl, where small pieces of cream cheese can collect.
The mixture should look creamy before you add the dry ingredients.
4. Add the Cocoa and Protein Powder
Sift the cocoa powder into the mixture, then add the measured chocolate whey protein powder.
Blend briefly until uniformly chocolate brown. Scrape the sides again to incorporate any powder that clings above the filling.
If your appliance struggles with the thick mixture, stop and scrape it down before adding extra liquid.
5. Let the Mixture Hydrate
Let the filling stand for 5 minutes.
Protein powders absorb moisture at different rates, so this short pause gives you a better idea of the final consistency.
The filling should resemble thick cheesecake cream and hold soft spoon marks. If it’s too stiff to blend or portion, add milk 1 tablespoon at a time, blending briefly after each addition.
Use only as much as needed. A pourable mixture won’t have the same thick, spoonable texture after chilling.
6. Divide Among the Cups
Spoon the filling evenly into the six prepared cups.
For consistent servings, alternate spoonfuls among the cups, then distribute any remaining filling. Smooth each surface with the back of a spoon, leaving gentle swirls.
Keep a little space below the rims for the peanut butter and chocolate chips.
7. Prepare the Peanut Butter Topping
Stir the remaining 2 tablespoons peanut butter until smooth.
If it’s too thick to drizzle, microwave it in a microwave-safe bowl for 5–10 seconds. Stir, then let it cool until barely warm.
It should be fluid enough to spread without being hot.
8. Swirl and Add Chocolate Chips
Divide the peanut butter among the cups, using approximately 1 teaspoon per cup.
Draw a toothpick through the surface in one or two shallow curves. Avoid stirring deeply, which would mix the topping into the chocolate filling.
Sprinkle the miniature chocolate chips evenly over all six cups.
9. Chill Before Serving
Cover without touching the toppings and refrigerate for at least 2 hours.
Serve cold, once the filling has thickened into a creamy, scoopable consistency. You can also refrigerate the cups overnight.
Tips for a Smooth, Creamy Filling 💡
Blend the Cottage Cheese First
Blending the cottage cheese and yogurt before adding the other ingredients makes it easier to eliminate curds. Once the mixture thickens with cocoa and protein powder, smoothing out remaining pieces becomes more difficult.
Soften the Cream Cheese
Cold cream cheese can leave small lumps. It should yield easily when pressed, while still feeling cool rather than melted.
Measure the Protein Powder
A scoop can contain a different amount from one brand to another. Using 40 g keeps the recipe more consistent and helps prevent an overly thick or powdery filling.
Add Milk Gradually
Extra liquid is easy to add and difficult to remove. Wait through the five-minute hydration period before deciding whether the filling needs thinning.
Taste Before Portioning
Taste a small spoonful after blending. If your protein powder is particularly sweet, the filling may already be sweet enough. If it’s less sweet, you can adjust with a little additional maple syrup, remembering that extra syrup also loosens the mixture.
Keep the Peanut Butter Swirl Shallow
A light swirl leaves distinct ribbons of peanut butter on top. Too much stirring blends the colors and makes the topping less defined.
Easy Variations
Add a Little Coffee Flavor
Dissolve ¼ teaspoon instant espresso powder in a teaspoon of the optional milk before blending it into the filling. It adds a subtle coffee note alongside the chocolate.
Use Almond Butter
Replace the peanut butter in the filling and topping with smooth almond butter. Stir it well before measuring, especially if the oil has separated.
Add Chopped Peanuts
For extra crunch, sprinkle a few chopped roasted peanuts on top just before serving. Keeping them separate until serving helps preserve their texture.
Make Smaller Dessert Portions
Divide the mixture among eight smaller cups instead of six. Spread the toppings evenly across the additional portions.
Try a Darker Chocolate Finish
Use miniature dark chocolate chips or finely chopped dark chocolate in place of the semisweet chips. The filling itself stays the same.
Serving Suggestions 🍫
These cheesecake cups are designed to be served chilled, straight from their individual containers.
For a simple finish, keep the peanut butter swirl and miniature chocolate chips as written. For a dessert platter, arrange the cups on a tray with small spoons and offer fresh strawberries on the side.
A few raspberries also pair well with the rich chocolate filling. Add fresh fruit shortly before serving so it stays fresh and doesn’t release juice into the topping.
If you’re packing a cup to take with you, use a secure lid and keep it cold in an insulated bag with an ice pack.
Storage and Make-Ahead Instructions 🥡
Refrigerator
Store the covered cups in the refrigerator for up to 3 days.
Keep them chilled until serving. Individual lids are convenient, but reusable covers or carefully placed food wrap also work.
Make Ahead
Prepare the cups the evening before serving and refrigerate overnight. The filling may become slightly thicker as the protein powder continues to hydrate.
The peanut butter swirl and chocolate chips can be added before chilling, as directed. Add any fresh fruit or chopped nuts shortly before serving.
Freezing
Freezing can change the texture of the dairy mixture, leaving it slightly grainy or watery after thawing. Refrigeration gives the most consistent creamy result.
If you want to try freezing, start with one small portion. Thaw it in the refrigerator and check whether you enjoy the texture before freezing a larger batch.
Frequently Asked Questions ❓
1. Can you taste the cottage cheese?
Thorough blending removes the curds, while cocoa, peanut butter, and vanilla flavor the mixture. Some dairy tang remains, which fits the cheesecake style of the dessert.
2. Can I use low-fat cottage cheese?
Yes. The recipe works with 2% cottage cheese, while 4% generally provides a richer texture. Fat-free varieties may produce a less creamy result.
3. Can I leave out the protein powder?
Omitting it changes both the flavor and thickness. The filling may be softer and less sweet, so it would need adjustment. For the intended result, use the measured amount of chocolate whey protein powder.
4. Can I use plant-based protein powder?
Plant-based powders can absorb liquid differently and may have a more noticeable texture. They aren’t a guaranteed direct substitute here. If using one, add it gradually and assess the filling after the hydration rest.
5. Why is my filling grainy?
Possible causes include cottage cheese that needs more blending, cold cream cheese, or a protein powder with a gritty texture. Smooth the dairy ingredients thoroughly before adding the powders.
6. Why is my filling too thick?
Protein powders vary in thickening power. After the five-minute rest, blend in milk one tablespoon at a time until the mixture holds soft spoon marks.
7. Why is my filling too thin?
Thin yogurt, watery cottage cheese, or too much added milk can loosen the mixture. Chill it for the full two hours before assessing it; it should thicken, although it won’t become a firm cheesecake.
8. Can I use powdered peanut butter?
Powdered peanut butter behaves differently from smooth peanut butter and won’t provide the same fat or creamy texture. It would require adjustments, especially for the topping.
9. Do these cups contain raw brownie batter?
No. The brownie batter description refers to their rich chocolate flavor and thick texture. The recipe contains no raw flour, raw eggs, or brownie mix.
10. Can I prepare them without a blender?
A blender or food processor is strongly recommended. Hand mixing won’t remove the cottage cheese curds, so the texture will be substantially different.
11. Will they become firm enough to unmold?
No. These are soft cheesecake cups intended for spooning. Serve them in their containers.
12. Can I double the recipe?
Yes. Double all ingredients and use 12 cups. Blend in batches if necessary so the appliance has enough room to make the filling completely smooth.
Print
High-Protein Peanut Butter Brownie Batter Cheesecake Cups
Description
Yield: 6 servings
Prep: 20 minutes
Chill: At least 2 hours
Total: 2 hours 20 minutes
Ingredients
Ingredients
Chocolate cheesecake filling
- 2 cups (450 g) cottage cheese, preferably 2% or 4%
- 1 cup (245 g) plain Greek yogurt
- 4 ounces (113 g) cream cheese, softened
- 40 g chocolate whey protein powder
- ¼ cup (25 g) unsweetened cocoa powder
- 2 tablespoons (32 g) smooth peanut butter
- 2 tablespoons (30 ml / 40 g) maple syrup
- 2 teaspoons vanilla extract
- ⅛ teaspoon fine salt
- 1–3 tablespoons milk, only as needed
Topping
- 2 tablespoons (32 g) smooth peanut butter
- 2 tablespoons (22 g) miniature semisweet chocolate chips
Instructions
Instructions
- Arrange six 8-ounce dessert cups on a tray.
- Blend the cottage cheese and Greek yogurt for 60–90 seconds, scraping down the sides, until smooth.
- Add the cream cheese, filling peanut butter, maple syrup, vanilla, and salt. Blend until evenly combined.
- Sift in the cocoa, add the protein powder, and blend briefly until uniformly chocolate brown.
- Rest for 5 minutes. If needed, blend in milk 1 tablespoon at a time, keeping the filling thick and spoonable.
- Divide evenly among the six cups and smooth the tops.
- Stir the topping peanut butter until fluid. If necessary, microwave for 5–10 seconds and cool until barely warm.
- Add approximately 1 teaspoon peanut butter to each cup and make a shallow swirl. Sprinkle evenly with chocolate chips.
- Cover and refrigerate for at least 2 hours. Serve cold.
Storage: Refrigerate covered for up to 3 days.
Nutrition note: Protein and calorie amounts depend on the brands and dairy fat levels used. For an accurate estimate, calculate the complete recipe using your ingredient labels and divide by six.