
High-Protein Chocolate Peanut Butter Swirl Fluff Cups
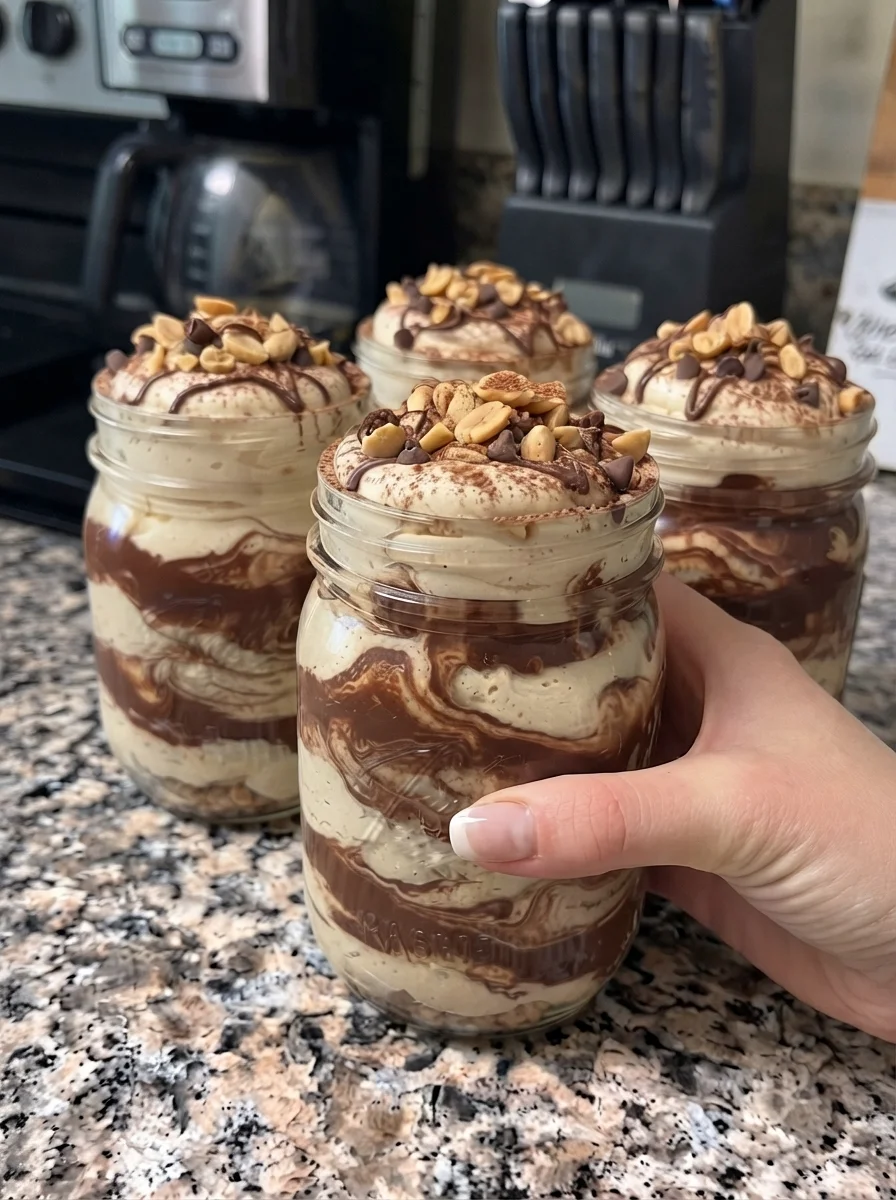
Vanilla, chocolate, and peanut butter come together in these creamy individual dessert cups. A blended cottage cheese and Greek yogurt base provides a tangy, vanilla-flavored filling, while a separate chocolate peanut butter mixture creates rich ribbons through each serving. The contrast gives you a little of both flavors in every spoonful without turning the entire dessert uniformly chocolate brown.
There is no baking, crust, or cooked custard. Blend the vanilla base, stir the chocolate mixture, layer them in small cups, and chill. The recipe is convenient for a short batch of make-ahead snacks or an easy dessert when you want something creamy without preparing a full cheesecake.
The word “fluff” describes a smooth, softly mounded filling rather than a truly whipped mousse. Cottage cheese and yogurt blend into a thick cream, but the recipe contains no whipped cream, beaten egg whites, or other ingredient that creates a strongly aerated texture. Expect a spoonable dessert that stays in its serving cup.
Recipe note: This article expands the supplied recipe, which has not been kitchen-tested here. Brands affect thickness, sweetness, and nutrition. The original protein estimate of 23–26 grams per cup appears high for four portions of this ingredient list and should be checked against the actual labels before publication.
What to Expect
The vanilla layer is mildly tangy, creamy, and sweetened to taste. Cottage cheese gives it body, Greek yogurt provides a fresh dairy flavor, and vanilla protein powder contributes both protein and sweetness.
The swirl is more concentrated. Peanut butter supplies richness, cocoa adds chocolate flavor, and a little milk makes the mixture easier to spread through the base. The two mixtures should have reasonably similar softness so the chocolate ribbon stays visible without sinking as one heavy lump.
After an hour in the refrigerator, the dessert should be cold and somewhat thicker. The amount of thickening depends on the protein powder and dairy products. It will not reliably become firm enough to unmold, slice, or hold like a peanut butter cup candy.
Ingredients
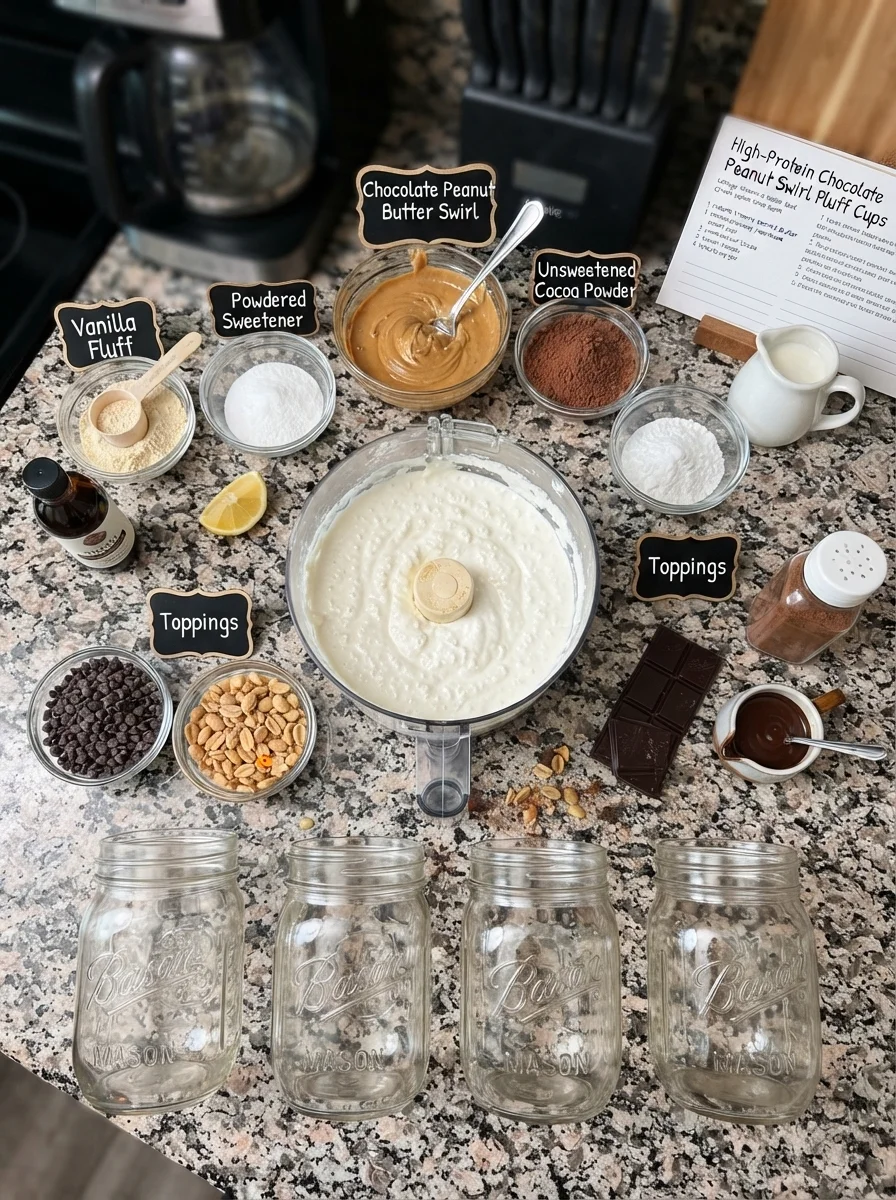
Vanilla Protein Base
- 1 cup cottage cheese
- 1/2 cup plain Greek yogurt
- 1 scoop vanilla protein powder, approximately the label’s 30-gram serving
- 2 tablespoons powdered sweetener, or an amount adjusted to the product and your taste
- 1 teaspoon vanilla extract
- 1/4 teaspoon lemon juice, optional
Chocolate Peanut Butter Swirl
- 3 tablespoons natural creamy peanut butter, thoroughly stirred
- 1 tablespoon unsweetened cocoa powder
- 1 tablespoon powdered sweetener, adjusted to taste
- 1 to 2 tablespoons milk, only as needed
Optional Toppings
- 1 tablespoon mini chocolate chips, divided among the cups
- 1 tablespoon chopped roasted peanuts, divided among the cups
- A small drizzle of melted dark or sugar-free chocolate
- A light dusting of cocoa powder
Yield: Four small dessert cups. Choose containers with room for one-quarter of the batch plus a little topping. The finished volume varies with the ingredients, so you do not need to fill every cup to the rim.
Ingredient Notes
Cottage Cheese
Use cottage cheese with a taste you enjoy before blending. Some brands are saltier or tangier than others, and blending changes the texture rather than removing those flavors.
Low-fat cottage cheese gives a lighter base, while a fuller-fat version can taste richer. Either changes the nutrition, so record your choice if you want to repeat a calculation. The supplied recipe does not specify a fat percentage.
If there is a small pool of loose liquid on the surface, pour off the excess before measuring. Do not squeeze the curds completely dry, which would create a different moisture balance. The aim is a consistent spoonful of cottage cheese rather than an unusually watery or pressed-dry ingredient.
Greek Yogurt
Choose thick plain Greek yogurt. Regular yogurt is usually looser and can make the filling less substantial. Vanilla-flavored yogurt introduces additional sweetness and flavor, so it is not a neutral replacement.
Stir the yogurt to an even consistency before measuring. Begin without adding extra liquid to the base; the listed formula does not need milk unless your particular equipment or products make blending difficult.
Vanilla Protein Powder
One scoop is not a universal amount. Check the label and use approximately the serving amount specified rather than assuming that every scoop has the same weight or protein content.
Whey, casein, plant-based, and mixed powders behave differently. Some become very thick after sitting, while others leave a looser or slightly gritty texture. This recipe has not been tested with every kind.
A powder you already enjoy is the safest flavor choice. Many products are sweetened, so the two tablespoons of additional sweetener should be treated as a starting quantity for a comparable product, not a requirement to add regardless of taste.
Sweetener
Powdered sugar and powdered sugar substitutes are not equally sweet by volume. Concentrated monk-fruit or stevia products may require far less than a tablespoon, while some blended products are formulated for a closer sugar-style measure.
Follow the product’s conversion guidance and start conservatively. You can add sweetness after blending, but removing it from an overly sweet filling is difficult.
Powdered sugar adds sugar and calories. Sugar alcohol blends may affect the cold dessert’s aftertaste and can cause digestive discomfort for some people in larger amounts. Choose according to your preferences without assuming that one option suits everyone.
Lemon Juice
The optional quarter teaspoon is a very small addition. It may subtly brighten the dairy flavor, but it will not turn the mixture into cheesecake or make it distinctly lemony.
Do not increase it substantially to chase a cheesecake taste without considering texture and flavor. The yogurt and cottage cheese already provide tang.
Peanut Butter
Stir natural peanut butter thoroughly in its jar before measuring. Taking mostly oil from the top creates a loose swirl, while a dry scoop from the bottom can be difficult to soften.
Creamy peanut butter produces the cleanest ribbon. Crunchy peanut butter can be enjoyable, but it creates a different texture and is harder to pipe or swirl neatly.
The three tablespoons are divided between all four cups. A generous extra drizzle can change both the balance and the nutrition more than it appears to.
Cocoa and Milk
Unsweetened cocoa brings chocolate flavor to the peanut butter. Natural or Dutch-process cocoa can be used in this no-bake preparation, though their flavor differs. There is no baking reaction here that requires a specific cocoa acidity.
Milk loosens the swirl, not the entire recipe. Add it gradually and stop as soon as the chocolate mixture spreads in a thick ribbon. Dairy milk or an appropriate unsweetened alternative can work, but allergies and nutrition vary.
Equipment
A food processor or blender designed for thick mixtures is useful. A smaller blending container often handles this quantity better than a large pitcher, where the blades may spin below the mixture without moving it.
Have a flexible spatula, small mixing bowl, measuring tools, four food-safe cups or jars, and covers ready. A teaspoon and toothpick or thin skewer are enough to create the marbling.
Clear jars show the layers, but ramekins work equally well. A piping bag is optional. If using one, choose a wide opening that allows the filling to move without excessive pressure.
Step-by-Step Instructions
1. Smooth the Cottage Cheese
Place the cottage cheese in the processor or blender. Blend until creamy, stopping to scrape the sides and beneath the lid as needed.
Check a small amount on a spoon for remaining curds. It is easier to remove them now than after the protein powder thickens the mixture.
If the blender cannot circulate the cottage cheese, add a spoonful of the measured yogurt. Stop the machine before scraping, and follow its instructions for thick foods. Do not push a spoon toward moving blades.
2. Make the Vanilla Base
Add the remaining yogurt, vanilla protein powder, vanilla extract, optional lemon juice, and an initial amount of your chosen powdered sweetener.
Blend until the color and texture are uniform. Pause to scrape rather than overheating the appliance with a mixture that is not moving.
Let the base stand briefly so the powder can absorb moisture, then taste. Add more sweetener only if needed. The peanut butter layer and toppings may provide additional sweetness, so the vanilla base does not need to taste intensely sugary.
3. Assess the Thickness
The filling should mound softly on a spoon and spread with gentle pressure. It should not pour like a drink or stand as a dry, stiff paste.
If it is unusually thick, first confirm that you used the intended amount of powder rather than an oversized scoop. A small additional spoonful of yogurt may help a very stiff mixture, but note that this changes the original formula.
Avoid adding several tablespoons of milk to the vanilla base simply to make blending easier. Excess liquid will not disappear in the refrigerator.
4. Prepare the Chocolate Peanut Butter Mixture
Combine the well-stirred peanut butter, cocoa powder, and the appropriate amount of powdered sweetener in a small bowl. Stir until the cocoa is evenly distributed.
Add milk a teaspoon at a time, stirring thoroughly after each addition. Begin with less than the full listed amount. Different peanut butters need different amounts of liquid.
The mixture may initially thicken when a little liquid is added. Keep stirring before deciding it needs more. Stop when it forms a thick ribbon that can be spread through the vanilla filling without tearing it.
5. Add the First Layers
Divide half of the vanilla base among four cups. Smooth it lightly, keeping the rims clean.
Add about half of the chocolate peanut butter mixture in small spoonfuls divided evenly between the cups. You do not need a perfectly flat chocolate layer; a few ribbons or small dollops create a more interesting pattern.
If exact nutrition portions matter, weigh the base and swirl separately and divide each into four equal amounts. Equal-looking cups can contain different amounts of peanut butter if the swirl is not portioned carefully.
6. Add the Remaining Vanilla
Spoon the remaining vanilla filling over the first chocolate additions. Work gently so the layers remain distinct.
For a clear jar, add the filling near the center and spread it toward the sides. This helps avoid smearing chocolate over the entire interior surface before you have finished the pattern.
Leave room at the top for the remaining swirl and any toppings. The cups are serving containers, so there is no benefit to packing them completely full.
7. Make the Swirl
Divide the remaining chocolate mixture across the tops. Use a toothpick or skewer to make two or three shallow curves through the filling.
Stop while the colors are still clearly separate. Continuous stirring combines them into a tan chocolate-peanut butter cream and removes the marbled appearance.
For a deeper ribbon, make one gentle pass down the side of a dollop, then lift the skewer out. Avoid repeatedly scraping the bottom or beating the mixture inside the cup.
8. Chill
Cover and refrigerate for at least one hour. This gives the powders time to hydrate and lets the flavors settle.
The filling may thicken further overnight depending on the protein powder. That is a product difference rather than proof that a longer chill always produces a fluffier dessert.
Keep the cups supported on a tray during chilling if they are small or easily tipped. Use covers that do not press directly onto the decorative tops.
9. Add Toppings and Serve
Sprinkle with a little chopped peanut or mini chocolate chips shortly before serving for the best crunch. Divide the listed tablespoon quantities among all four cups rather than treating them as per-cup amounts.
If adding melted chocolate, let it cool slightly before drizzling. A thin line is easier to eat after chilling than a thick solid cap.
Serve cold with a spoon. These cups are not designed to be peeled out of molds or eaten as freestanding candies.
Tips for Visible Chocolate Ribbons
Match the softness of the two mixtures. A chocolate paste much firmer than the base sits as a lump, while a very thin sauce runs through it and loses definition.
Add the swirl in several small placements. This gives more control than pouring all the chocolate onto one side.
Use a light touch. A skewer needs only a short path through the filling to create a ribbon.
Keep some chocolate at the surface. The first layer provides flavor inside the cup, while the top layer supplies the visible pattern.
Choose clear containers if presentation matters, but do not sacrifice lid space or portion consistency for the appearance of a completely full jar.
Make-Ahead and Storage
Prepare four individual portions and keep them covered in the refrigerator at 40°F or below for up to four days, provided the ingredients were fresh and handled properly. Follow an earlier opened-storage limit if a dairy product requires it.
Keep crunchy toppings separate until eating. Chocolate chips added early may soften slightly, and peanuts can lose some crispness against a moist filling.
A small amount of separation can occur during storage. If the cups are otherwise within their storage window and have remained properly refrigerated, stir gently before serving. That will blend the pattern, but it may improve the texture.
Discard any portion with mold, an unusual odor, or an uncertain time out of refrigeration. Do not rely on tasting to decide whether questionable dairy food is safe.
For transport, use an insulated lunch bag or cooler with enough ice packs to maintain refrigeration temperature. Refrigerate on arrival when possible. Do not leave the cups out for more than two hours, or more than one hour when the temperature is above 90°F.
Freezing is not recommended for the intended creamy texture. Cottage cheese and yogurt can become grainy or release liquid after thawing, and this formula is not developed as frozen fudge or ice cream.
Variations
More Chocolate Flavor
Use a slightly darker-tasting cocoa in the swirl or add a small amount of chocolate shavings on top. Adding a large amount of extra cocoa changes thickness and bitterness, so begin modestly.
Vanilla and Peanut Butter
Omit the cocoa for a peanut butter ribbon without chocolate. That removes a dry ingredient, so the swirl will generally need less milk.
Peanut Crunch
Add the measured chopped peanuts immediately before serving. Salted peanuts contribute additional salt, so taste the complete bite before adding any extra seasoning.
Chocolate Drizzle Finish
A thin melted-chocolate drizzle can firm in the refrigerator and provide a little contrast. It adds calories and does not make the entire filling suitable for unmolding.
Alternative Nut or Seed Butter
Another creamy butter changes flavor, thickness, allergens, and nutrition. It is a variation to evaluate rather than an identical substitution. For allergy needs, check every ingredient, including the protein powder and chocolate.
Nutrition: Check the Four-Cup Yield
Protein comes mainly from the cottage cheese, yogurt, and powder, with a smaller amount from peanut butter. A typical combination might supply roughly 26 grams from the cottage cheese, around 12 grams from the yogurt, approximately 20 to 25 grams from the powder, and about 10 grams from the peanut butter. Those illustrative amounts total roughly 68 to 73 grams before small contributions from other ingredients.
Divided into four servings, that example gives about 17 to 18 grams of protein per cup. Products with higher protein can increase the figure, so a broad planning range of about 16 to 20 grams per cup is more realistic than automatically claiming 23 to 26.
To provide 23 to 26 grams in each of four cups, the complete batch would need 92 to 104 grams of protein. Check that your actual labels support that total before using the original claim.
Calories may fall roughly around 160 to 220 per cup before toppings when using a low-calorie sweetener, but this is not a verified analysis. Full-fat dairy, powdered sugar, added chocolate, and extra peanuts change the result. The original 230-calorie estimate may fit some combinations with toppings, but it should not be treated as universal.
A recipe can be protein-rich without being sugar-free or low-carb. Dairy contains naturally occurring carbohydrate, and powder, sweetener, and chocolate labels differ. Calculate from the products you use if you need a specific dietary figure.
Troubleshooting
The Vanilla Base Is Grainy
Blend the cottage cheese more thoroughly before adding the powder. If curds are gone but a gritty texture remains, the protein powder may be responsible. Additional blending does not always eliminate that product’s texture.
The Base Is Too Soft
The dairy may be watery or extra liquid may have been added. Allow the full chill before assessing. If it remains loose, serve as a creamy pudding-style dessert and use thicker yogurt and less liquid next time.
The Base Is Chalky
Give the powder a little time to hydrate. A small amount of yogurt can help if it is too dry, but adding more powder is likely to worsen the problem.
The Peanut Butter Mixture Seizes
Stir patiently as you add small amounts of milk. Do not assume the first thickening means the mixture is ruined. Use gentle warming only if needed, and let it cool before layering with dairy.
The Swirl Looks Muddy
It was probably stirred too much or made too thin. Use fewer movements and a thicker ribbon in the next batch. The flavor remains usable even if the pattern is less distinct.
Frequently Asked Questions
Can I Eat the Cups Without Chilling?
Yes, when prepared from properly handled ready-to-eat ingredients. The chill improves the intended flavor and thickness rather than cooking anything.
Can I Make Two Larger Cups?
Yes. Each portion will contain twice the ingredients of a four-way serving. Adjust the nutrition per portion accordingly.
Can I Leave Out the Protein Powder?
That changes sweetness, protein, and the way the base absorbs moisture. A powder-free version needs a separately balanced formula rather than a simple omission with the same promised texture.
Can I Use Regular Yogurt?
It is generally thinner than Greek yogurt and may produce a looser filling. Use the listed thick Greek yogurt for the intended starting point.
Does It Taste Exactly Like Cheesecake?
It is cheesecake-inspired because of the tangy dairy and vanilla. Without cream cheese, crust, or a traditional cheesecake formula, it will have its own flavor and texture.
Print
High-Protein Chocolate Peanut Butter Swirl Fluff Cups
Description
Yield: Four small dessert cups
Prep time: Approximately 15 minutes
Chill time: At least one hour
Total time: Approximately one hour 15 minutes
Method: Blended, no-bake, refrigerated
Ingredients
Vanilla Protein Base
- 1 cup cottage cheese
- 1/2 cup plain Greek yogurt
- 1 scoop vanilla protein powder, approximately the label’s 30-gram serving
- 2 tablespoons powdered sweetener, or an amount adjusted to the product and your taste
- 1 teaspoon vanilla extract
- 1/4 teaspoon lemon juice, optional
Chocolate Peanut Butter Swirl
- 3 tablespoons natural creamy peanut butter, thoroughly stirred
- 1 tablespoon unsweetened cocoa powder
- 1 tablespoon powdered sweetener, adjusted to taste
- 1 to 2 tablespoons milk, only as needed
Optional Toppings
- 1 tablespoon mini chocolate chips, divided among the cups
- 1 tablespoon chopped roasted peanuts, divided among the cups
- A small drizzle of melted dark or sugar-free chocolate
- A light dusting of cocoa powder
Yield: Four small dessert cups. Choose containers with room for one-quarter of the batch plus a little topping. The finished volume varies with the ingredients, so you do not need to fill every cup to the rim.
Instructions
- Blend 1 cup cottage cheese until smooth.
- Add 1/2 cup Greek yogurt, 1 scoop vanilla protein powder, powdered sweetener to taste, 1 teaspoon vanilla, and optional 1/4 teaspoon lemon juice. Blend, let hydrate briefly, and taste.
- Stir 3 tablespoons well-mixed peanut butter with 1 tablespoon cocoa and powdered sweetener to taste. Add milk by the teaspoon, using only enough to make a thick ribbon, up to 1–2 tablespoons.
- Divide half the vanilla base into four cups and add half the chocolate mixture in small spoonfuls.
- Add the remaining vanilla, then the remaining chocolate. Swirl gently with a skewer.
- Cover and refrigerate at least one hour. Add optional chips, peanuts, or chocolate drizzle shortly before serving.
Storage: Refrigerate covered at 40°F or below for up to four days, subject to ingredient freshness. Freezing is not recommended for the intended texture.
Estimated nutrition: Approximately 160–220 calories and 16–20 grams protein per cup before toppings, depending on products and sweetener. Verify with your ingredient labels and equal portion weights.