
High-Protein Peanut Butter Cup Cheesecake Fluff
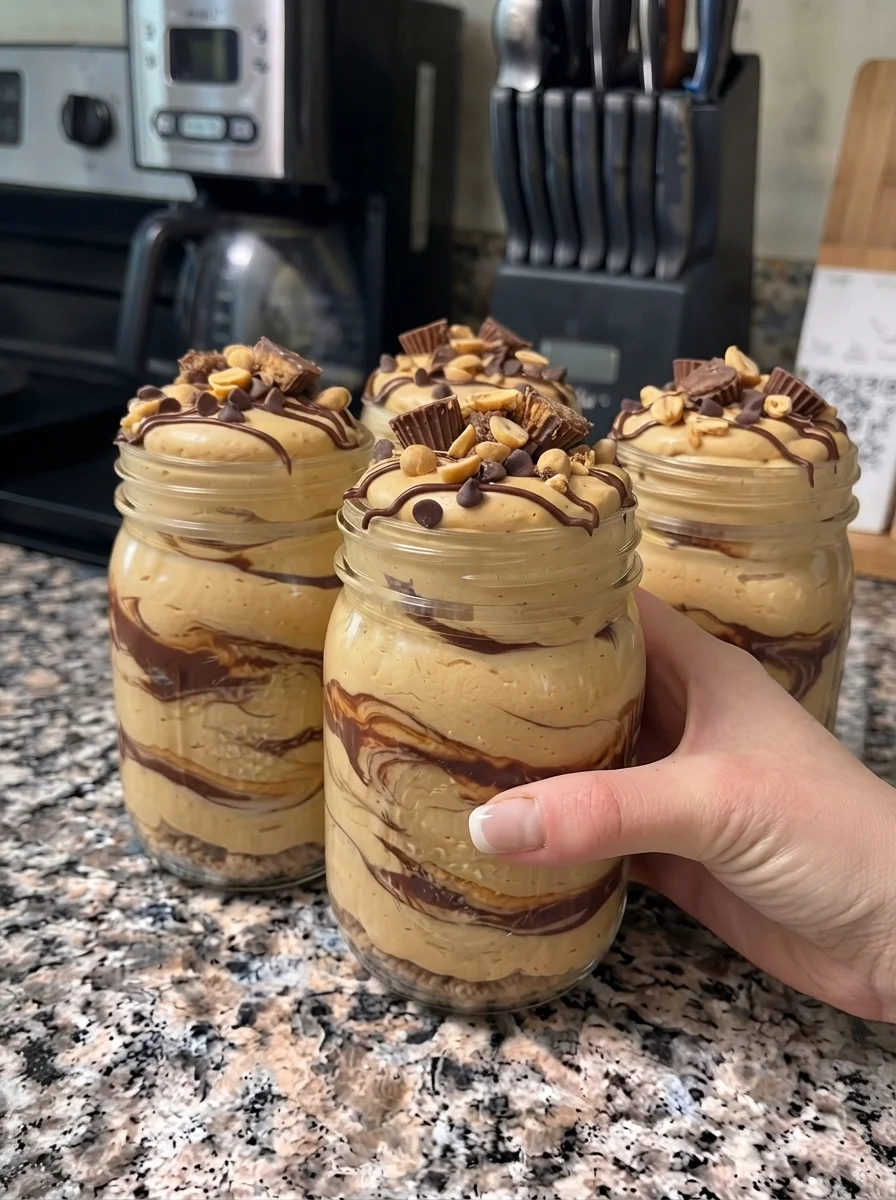
High-Protein Peanut Butter Cup Cheesecake Fluff combines a smooth peanut butter filling with ribbons of chocolate and a little tang from cottage cheese and Greek yogurt. It is a no-bake, spoonable dessert that gives you the familiar chocolate-and-peanut-butter pairing without preparing a crust or an entire cheesecake.
The base is blended until the cottage cheese curds disappear, then flavored with vanilla protein powder, peanut butter, and a small amount of lemon juice. A separate cocoa-peanut butter mixture adds a darker chocolate contrast. Serve it in individual jars with a few chocolate chips or chopped peanuts for a convenient make-ahead treat.
The name is cheesecake-inspired rather than a description of a traditional cheesecake formula. There is no cream cheese in the supplied recipe, and the mixture is not whipped like a mousse. Expect a thick, creamy filling with a soft mound on the spoon, not a freestanding dessert that you can remove from its container.
Recipe note: This article expands the supplied recipe, which has not been kitchen-tested here. Texture depends on your dairy products, peanut butter, and protein powder. The original protein estimate needs checking: four portions require substantially more total batch protein to reach 22–25 grams each than many standard versions of these ingredients provide.
What Makes This Version Different
Peanut butter appears in both parts of the recipe. Two tablespoons go into the vanilla dairy base, giving the whole dessert a mild peanut flavor. Another two tablespoons form the chocolate swirl, which provides a richer ribbon in every portion.
Keeping those mixtures separate makes the contrast more noticeable than blending cocoa into everything. The pale base stays visible, the chocolate mixture looks darker, and each spoonful can include both flavors.
The recipe also uses a modest amount of lemon juice. That adds a little brightness alongside the yogurt, but it will not create a strong lemon flavor or replace the flavor of cream cheese. If you prefer less tang, you can omit it without treating the dessert as a different kind of cheesecake.
Ingredients
Peanut Butter Cheesecake-Style Base
- 1 cup cottage cheese
- 1/2 cup plain Greek yogurt
- 1 scoop vanilla protein powder, approximately the label’s 30-gram serving
- 2 tablespoons powdered sweetener, or an amount adjusted to taste and product strength
- 1 teaspoon vanilla extract
- 2 tablespoons creamy peanut butter
- 1/2 teaspoon lemon juice
- A small pinch of salt, only if needed
Chocolate Peanut Butter Swirl
- 2 tablespoons creamy peanut butter
- 1 tablespoon unsweetened cocoa powder
- 1 tablespoon powdered sweetener, adjusted to taste
- 1 to 2 tablespoons milk, only as needed
Optional Toppings
- 2 tablespoons mini chocolate chips, divided among the four cups
- 1 tablespoon chopped roasted peanuts, divided among the four cups
- A small drizzle of melted dark or sugar-free chocolate
- A small amount of chopped sugar-free peanut butter cups
Yield: Four small dessert portions. Choose cups or jars with enough space for one-quarter of the filling, its share of the swirl, and a little topping. Container size does not determine the portion; divide the batch evenly rather than filling different jars to the same height.
Ingredient Notes
Cottage Cheese
Cottage cheese supplies body and much of the protein in the base. Blending changes its curd texture into a smoother cream, but its original flavor remains. Choose a brand you enjoy rather than expecting vanilla to hide strong saltiness.
The recipe does not specify a fat percentage. Low-fat cottage cheese produces a lighter starting point, while a higher-fat product may feel richer. Your choice changes the nutrition and can affect thickness.
If the container has a small pool of loose liquid on top, pour off that excess before measuring. Do not press all the moisture out of the curds; that would produce a different ingredient balance.
Greek Yogurt
Use thick, plain Greek yogurt. Regular yogurt generally adds more free liquid and can produce a softer filling. Flavored yogurt introduces sweetness that is harder to account for when combined with sweetened protein powder.
Stir the yogurt to an even consistency before measuring. A very thick yogurt may require a little more scraping during blending, but it is easier to manage than a watery base that never thickens as intended.
Protein Powder
One scoop is a manufacturer-specific measure. Use approximately the serving amount named in the recipe, and check the label rather than assuming that a large scoop from another product has the same weight.
Vanilla flavor varies from mild to strongly sweet. Taste the powder in a preparation you already know you enjoy before using it in a dessert where its flavor will be prominent.
Different protein types absorb moisture differently. Casein-heavy blends may thicken considerably after standing; whey and plant-based powders can behave differently. This formula has not been tested with every type, so the thickening instructions are cues rather than a guarantee of identical results.
Peanut Butter
Stir natural peanut butter thoroughly before measuring, including the firmer portion near the bottom of the jar. A scoop of separated oil makes a much looser swirl than a scoop of dry peanut solids.
Smooth peanut butter is easiest for a clean ribbon. Crunchy peanut butter changes the texture and can make the swirl harder to spread, though it may still suit your taste.
The full recipe uses four tablespoons, or one-quarter cup, of peanut butter before toppings. Extra spoonfuls or drizzles increase calories and richness quickly, so measure additions when nutrition matters.
Sweetener
The listed tablespoons are not universal across sweeteners. Powdered sugar, a powdered erythritol blend, and a concentrated stevia product can differ greatly in sweetness per spoonful.
Follow the product’s conversion guidance and add cautiously. Many protein powders already contain sweetener, so you may need less than the full listed quantity in the base.
Powdered sugar adds sugar and calories. Sugar alcohol products may have a cooling aftertaste, and some people find larger quantities uncomfortable. A preferred sweetener should be chosen for taste and suitability rather than described as automatically healthier for everyone.
Cocoa, Milk, and Salt
Unsweetened cocoa creates the chocolate flavor in the swirl. Natural and Dutch-process cocoa both work in this no-bake mixture, with different flavor profiles. Break up lumps before mixing.
Milk is an adjustment for the swirl, not a requirement to use the full two tablespoons. Add it by the teaspoon so the chocolate mixture stays thick enough to remain visible in the filling.
A pinch of salt can sharpen the peanut flavor, but cottage cheese and peanut butter may already be salted. Taste before adding it automatically.
Equipment
Use a food processor or blender capable of handling thick mixtures. A compact blending container may work better than an oversized pitcher for this quantity.
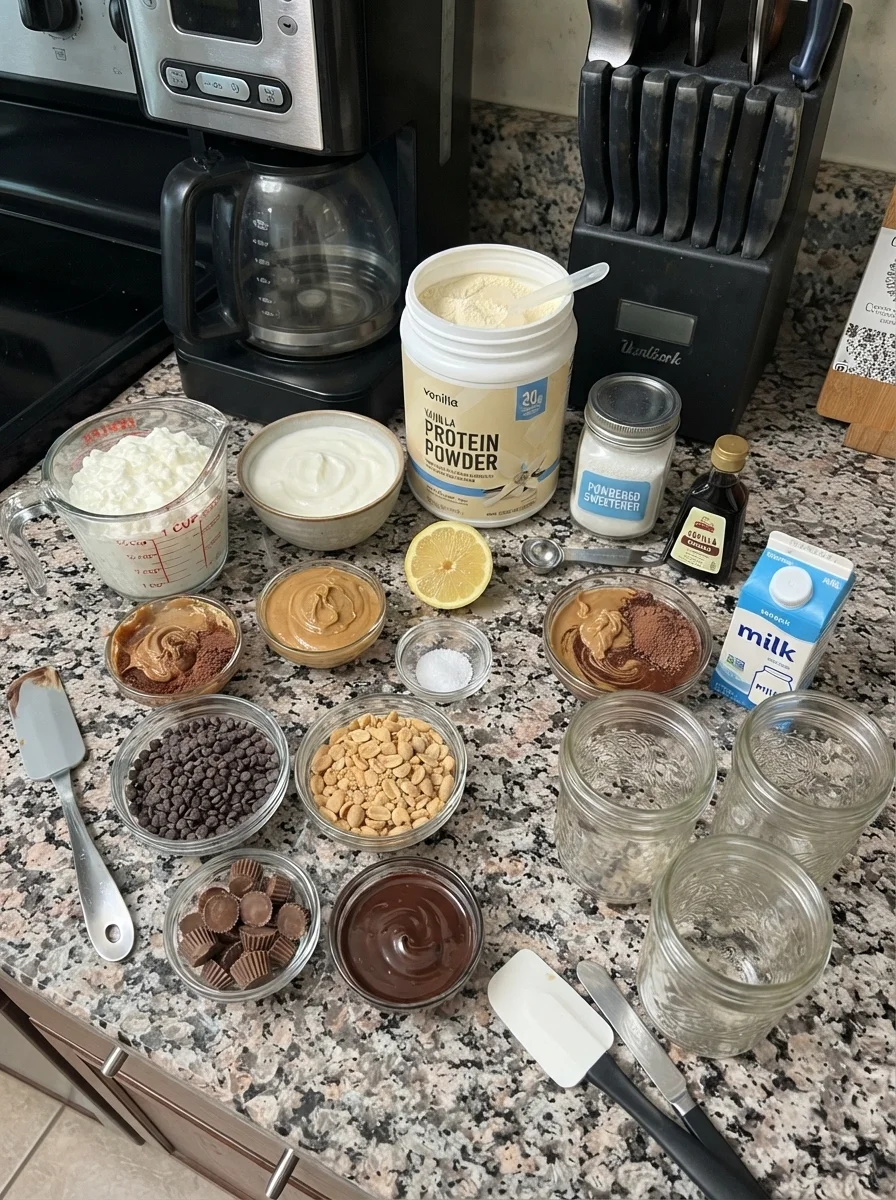
You will also need a flexible spatula, a small bowl, measuring tools, four covered serving containers, and a toothpick or thin skewer for marbling. A wide-opening piping bag is optional.
Keep the containers on a tray while filling and chilling. Clear jars show the layers, but ramekins are equally useful if you care more about easy storage than a visible pattern.
How to Make Peanut Butter Cup Cheesecake Fluff
1. Blend the Cottage Cheese Smooth
Add the cottage cheese to the processor or blender. Blend, pause, and scrape until the mixture no longer shows obvious curds.
Check a little on a spoon before proceeding. A smooth beginning is easier to achieve than trying to remove curds after protein powder thickens the mixture.
If the appliance cannot circulate the cottage cheese, add a spoonful of the measured yogurt. Stop the motor before scraping and follow the appliance’s guidance for thick mixtures.
2. Build the Peanut Butter Base
Add the remaining yogurt, vanilla protein powder, an initial amount of sweetener, vanilla extract, two tablespoons peanut butter, and lemon juice.
Blend until creamy and uniform. Scrape the sides and bottom so there are no hidden pockets of peanut butter or dry powder.
Let the mixture stand briefly to hydrate, then taste. Adjust sweetness and add the small pinch of salt only if the base needs it. The chocolate swirl and toppings will contribute more flavor later.
3. Check the Texture
The base should spread easily while holding a soft mound. It should not run like a smoothie, and it should not be so dry that it breaks into stiff clumps.
If unusually thick, first check that the scoop of powder was not oversized. A small additional spoonful of yogurt can loosen a very stiff base, but note that this is a texture adjustment outside the original measured formula.
Avoid pouring extra milk into the base simply to make the blender work faster. More liquid can make the filling softer than intended, and refrigeration will not remove it.
4. Mix the Chocolate Swirl
In a small bowl, combine the remaining two tablespoons peanut butter, cocoa, and an appropriate amount of powdered sweetener.
Add milk one teaspoon at a time and stir thoroughly. The mixture may briefly become thicker when liquid first touches the peanut butter. Keep stirring before deciding that it needs a larger addition.
Stop once it forms a thick, smooth ribbon. It should be soft enough to move through the base but firm enough to remain distinct. You may not need all the milk.
5. Portion the Filling
Divide the base evenly among four cups. If you want an interior chocolate ribbon, reserve a little base in each portion until after adding the first spoonful of swirl.
Use a spoon to smooth the surface without packing it down. A piping bag can produce cleaner sides, but the recipe does not require one.
Leave room for the swirl and toppings. A jar filled to the rim is harder to cover and more likely to smear when you make the pattern.
6. Add and Marble the Chocolate
Divide the chocolate peanut butter mixture evenly among the cups in a few small dollops or lines. For an internal layer, add part of the chocolate, cover with the reserved base, and finish with the rest on top.
Use a skewer to make two or three gentle curves through the surface. Stop while the lighter and darker mixtures remain clearly visible.
Do not stir continuously. That creates a single chocolate-peanut butter filling, which may taste good but loses the ribbon effect.
7. Chill
Cover the cups and refrigerate for at least one hour. The chilling period makes the dessert cold and allows some powders to thicken further as they absorb moisture.
Do not expect a rigid set. There is no gelatin or other dedicated setting ingredient, and the recipe is meant to be eaten from its container.
A longer chill may change the consistency, but it will not create additional air or make a dense mixture automatically fluffy.
8. Finish and Serve
Add mini chocolate chips, chopped peanuts, or a little chopped peanut butter cup shortly before eating. Divide the listed topping amounts among the batch rather than treating them as per-serving quantities.
If adding melted chocolate, let it cool slightly before drizzling. A thin layer is easier to break with a spoon than a thick chilled cap.
Serve cold. If the filling has become thicker than you prefer, stir your portion gently; this will mix the pattern but may improve its spoonability.
Tips for a Smooth Base and Attractive Swirl
Blend the cottage cheese first. The protein powder and peanut butter make the mixture thicker, so smoothing curds is easier before they are added.
Give the powder time to hydrate. A short pause can prevent unnecessary liquid additions.
Match the softness of the base and swirl. A very stiff chocolate paste can drag through the filling, while a watery sauce can sink or blur.
Use several small chocolate additions instead of one large mound. This distributes the flavor and gives more control over the appearance.
Swirl briefly. Two or three deliberate passes are usually more effective than repeated stirring.
Save crunchy toppings for serving. They retain a better contrast when they have not spent hours in contact with moist dairy.
Make-Ahead and Storage
The recipe makes four portions, which is a manageable short meal-prep batch. Cover individually and refrigerate at 40°F or below for up to four days, provided the ingredients were fresh and properly handled.
Respect any earlier storage limit from an opened dairy product. Making a dessert from older ingredients does not reset their age or establish a new four-day window.
Store toppings separately when practical. Peanuts can soften against the filling, and chopped candies may lose their texture or color definition.
A little liquid separation can occur. If the dessert has remained properly refrigerated and is otherwise within its storage window, stir gently before eating. Mold, an unusual odor, or uncertain handling is a reason to discard it rather than taste it for safety.
For transport, use an insulated cooler or lunch bag with enough ice packs to keep the cups cold, and refrigerate on arrival. Do not leave the dessert without cold holding for more than two hours, or more than one hour when the temperature is above 90°F.
Freezing is not recommended for the intended creamy texture. The cottage cheese and yogurt can become grainy or release water after thawing. A formula designed for frozen cups is a better starting point if you want a freestanding frozen treat.
Serving Ideas
For an everyday dessert, keep the finish simple with a few chocolate chips and chopped peanuts. The base and swirl already provide the main flavors.
For a more decorative serving, use clear cups and keep some chocolate ribbons close to the inside surface. Add a small drizzle of melted chocolate and a few neat peanut pieces on top.
For a shared dessert table, divide the batch into eight smaller tasting cups. Each portion will contain half the ingredients of the four-way serving, so adjust nutrition and topping quantities accordingly.
For a snack, pack one chilled jar and a spoon with toppings in a small separate container. Avoid treating the room-temperature shelf life of peanut butter or chocolate as if it applies to the assembled dairy dessert.
Variations
Darker Chocolate Swirl
Use Dutch-process cocoa for a different chocolate profile, or add a few dark chocolate shavings on top. More cocoa absorbs more liquid, so do not add several extra tablespoons without rebalancing the swirl.
Vanilla Cheesecake-Style Base
Omit the two tablespoons peanut butter from the base while keeping the swirl. This creates a stronger contrast between vanilla and chocolate peanut butter, but it changes richness, texture, and nutrition.
Peanut Crunch
Use the measured chopped peanuts immediately before serving. If they are salted, taste the complete bite before adding salt to the filling.
Thin Chocolate Shell
Spread a little melted chocolate over the chilled top and let it set. This adds a crisp contrast but does not firm the rest of the dessert enough for unmolding.
Different Nut or Seed Butter
A different creamy butter changes the flavor, allergens, texture, and nutrition. It is a separate variation, not an assurance that the same result will follow. Check the protein powder and toppings as well when accommodating allergies.
Nutrition: A More Realistic Starting Estimate
The batch gets protein from cottage cheese, Greek yogurt, protein powder, and peanut butter. As an illustrative example, those ingredients might contribute about 26 grams, 12 grams, 20–25 grams, and roughly 14 grams of protein respectively across the full batch.
That example totals about 72–77 grams, or around 18–19 grams in each of four cups before small contributions from cocoa and milk. A reasonable broad estimate is approximately 17–21 grams per serving with common products, not an automatic 22–25 grams.
To reach the original claim, the batch would need 88–100 grams of protein in total. Check your chosen labels and weighed quantities before publishing that higher range.
Calories may fall roughly around 190–250 per portion without toppings when using a low-calorie sweetener, though this is not a verified analysis. Full-fat dairy, powdered sugar, melted chocolate, and candy toppings can raise the total. The supplied 250-calorie figure may fit some combinations, but it should specify whether toppings are included.
The recipe is not automatically sugar-free, low-carb, or suitable for a specific dietary plan. Dairy contains naturally occurring carbohydrate, and powder and chocolate labels vary. Calculate the complete recipe if you need a precise figure.
Troubleshooting
The Base Still Has Curds
Blend the cottage cheese longer before adding the other ingredients, using pauses and scraping. A blender poorly suited to small thick batches may struggle regardless of blending time.
The Filling Is Too Thin
The dairy may be watery or the powder may absorb less moisture than expected. Allow the full chill, then serve as a softer creamy dessert if needed. Use thicker yogurt and avoid extra liquid in the next batch.
The Filling Tastes Chalky
The powder may need a little more hydration, or its texture may not suit this preparation. A small spoonful of yogurt can help dryness, but adding more powder is likely to worsen it.
The Swirl Is Too Thick
Add milk in small increments and stir well. Gentle warming can soften cold peanut butter, but let the mixture cool before adding it to the dairy base.
The Flavor Is Too Tangy
Omit the small lemon addition next time and choose milder dairy products. Adjust sweetness gradually rather than adding several tablespoons at once.
The Pattern Disappears
The swirl may have been too thin or overmixed. Use thicker ribbons and fewer skewer movements. The dessert remains usable even if the colors blend more than intended.
Frequently Asked Questions
Can I Eat It Right Away?
Yes, when made from properly handled ready-to-eat ingredients. The one-hour chill is for temperature, flavor, and consistency rather than a cooking stage.
Does It Need Cream Cheese?
The supplied formula does not use cream cheese. It is cheesecake-inspired because of the tangy dairy and vanilla. Adding cream cheese would change the recipe and its nutrition.
Can I Skip the Protein Powder?
That changes sweetness, protein, and moisture absorption. A powder-free version needs a separately balanced formula rather than the same promised texture after an omission.
Can I Use Chocolate Protein Powder?
It would make the base chocolate-flavored and reduce the visual contrast with the swirl. Sweetness and thickness may also differ, so taste and assess before adding extra sweetener or liquid.
Can I Make Two Large Portions?
Yes. Each would contain twice the ingredients of the original four-way serving. Use the same factor when calculating calories and protein per portion.
Print
High-Protein Peanut Butter Cup Cheesecake Fluff
Description
Yield: Four small cups
Prep time: Approximately 15 minutes
Chill time: At least one hour
Total time: Approximately one hour 15 minutes
Method: Blended, no-bake, refrigerated
Ingredients
Peanut Butter Cheesecake-Style Base
- 1 cup cottage cheese
- 1/2 cup plain Greek yogurt
- 1 scoop vanilla protein powder, approximately the label’s 30-gram serving
- 2 tablespoons powdered sweetener, or an amount adjusted to taste and product strength
- 1 teaspoon vanilla extract
- 2 tablespoons creamy peanut butter
- 1/2 teaspoon lemon juice
- A small pinch of salt, only if needed
Chocolate Peanut Butter Swirl
- 2 tablespoons creamy peanut butter
- 1 tablespoon unsweetened cocoa powder
- 1 tablespoon powdered sweetener, adjusted to taste
- 1 to 2 tablespoons milk, only as needed
Optional Toppings
- 2 tablespoons mini chocolate chips, divided among the four cups
- 1 tablespoon chopped roasted peanuts, divided among the four cups
- A small drizzle of melted dark or sugar-free chocolate
- A small amount of chopped sugar-free peanut butter cups
Yield: Four small dessert portions. Choose cups or jars with enough space for one-quarter of the filling, its share of the swirl, and a little topping. Container size does not determine the portion; divide the batch evenly rather than filling different jars to the same height.
Instructions
- Blend 1 cup cottage cheese until smooth.
- Add 1/2 cup Greek yogurt, 1 scoop vanilla protein powder, powdered sweetener to taste, 1 teaspoon vanilla, 2 tablespoons peanut butter, and 1/2 teaspoon lemon juice. Blend, let hydrate briefly, and taste before adding salt.
- Stir 2 tablespoons peanut butter with 1 tablespoon cocoa and powdered sweetener to taste. Add milk by the teaspoon until it forms a thick ribbon, using only as much as needed from the listed 1–2 tablespoons.
- Divide the base between four cups and distribute the chocolate mixture evenly. Layer some inside if desired and swirl the top gently.
- Cover and refrigerate for at least one hour. Add optional toppings just before serving.
Storage: Refrigerate at 40°F or below for up to four days, subject to the freshness and storage limits of your ingredients. Freezing is not recommended for the intended texture.
Estimated nutrition: Approximately 190–250 calories and 17–21 grams protein per serving before toppings, depending on products and sweetener. These are illustrative estimates; verify using your own ingredient labels and equal portions.