
High-Protein Reese’s-Inspired Peanut Butter Cheesecake Cups
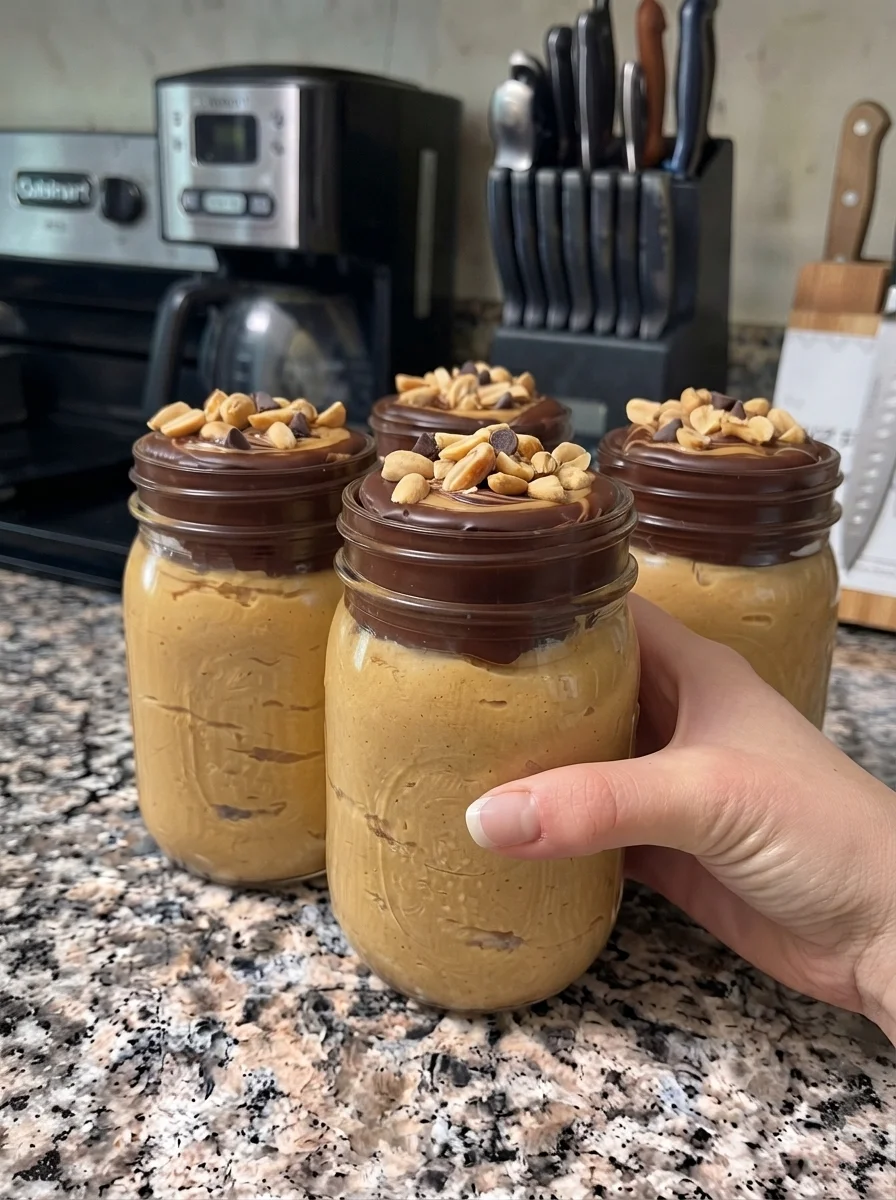
These peanut butter cheesecake cups pair a creamy, tangy filling with a thin chocolate peanut butter topping. Cottage cheese and Greek yogurt form the base, while creamy peanut butter, powdered peanut butter, and vanilla protein powder add flavor and protein. The result is a no-bake, spoonable dessert inspired by the familiar combination of chocolate and peanut butter cups.
The filling comes together in a blender or food processor, and the topping needs only gentle melting. Divide everything into six small dishes, chill, and finish with a few chopped peanuts. There is no crust to bake or large cheesecake to slice.
The Reese’s reference describes the flavor inspiration; this is not a copycat of the branded candy or an affiliated recipe. It also differs from traditional cheesecake because the supplied filling contains no cream cheese. Expect a blended dairy dessert with a cheesecake-style tang rather than a baked cheesecake texture.
Recipe note: This article expands the supplied recipe, which has not been kitchen-tested here. Ingredient brands affect consistency and nutrition. The original claim of 18–21 grams of protein per cup should be checked carefully against the six-serving yield; many standard ingredient combinations will provide less.
What to Expect
The filling should be thick and creamy, with peanut butter throughout and a mild tang from the dairy. Blending removes the cottage cheese curds, but it does not remove the flavor of the cottage cheese itself. Starting with a brand you enjoy makes a noticeable difference.
The topping contains chocolate, coconut oil, and peanut butter. It should firm in the refrigerator, but the added fats can make it softer than a plain chocolate shell. A thin layer is easier to eat with a spoon and gives a better contrast than a thick, hard cap.
These cups are served in their dishes. Chilling does not necessarily make the filling firm enough to unmold, and it should not be described as a freestanding peanut butter candy.
Ingredients
Peanut Butter Cheesecake-Style Filling
- 1 cup low-fat cottage cheese
- 1/2 cup plain Greek yogurt
- 1/4 cup creamy peanut butter
- 1 scoop vanilla protein powder, approximately the label’s 30-gram serving
- 2 tablespoons powdered peanut butter
- 2 to 3 tablespoons powdered sweetener or powdered sugar, adjusted to taste and product strength
- 1 teaspoon vanilla extract
- Up to 1 tablespoon milk, only as needed
- A small pinch of salt, only if needed
Chocolate Peanut Butter Topping
- 1/2 cup semisweet or sugar-free chocolate chips
- 1 teaspoon coconut oil
- 1 tablespoon creamy peanut butter
Optional Garnishes
- 2 tablespoons chopped roasted peanuts, divided among the cups
- A few mini chocolate chips
- Small pieces of peanut butter cup candy
- A light peanut butter drizzle
Yield: Six small dessert portions. Use food-safe cups or ramekins with room for one-sixth of the filling and topping. Four-ounce containers are a useful starting size, but final volume varies; have an extra dish available rather than overfilling.
The tablespoon of peanut butter in the topping is separate from the quarter cup in the filling. Additional decorative peanut butter or candy pieces are extras and should be counted separately in nutrition estimates.
Ingredient Notes
Cottage Cheese
Low-fat cottage cheese provides much of the body and protein. Choose one with a mild flavor you like before blending; vanilla and peanut butter cannot reliably hide an unpleasantly salty or strongly sour product.
If there is loose liquid pooled on top, pour off that excess before measuring. Do not press or drain the curds completely dry, which changes the ingredient balance.
Small-curd and large-curd varieties can both be blended. Equipment and moisture level matter more than the initial curd size. The important step is smoothing the cottage cheese before the powders make the mixture thicker.
Greek Yogurt
Use thick, plain Greek yogurt. Regular yogurt can add more free liquid and produce a softer filling.
Nonfat, low-fat, and full-fat Greek yogurts have different nutrition and mouthfeel. The supplied recipe does not specify one fat level, so record which you use when testing or calculating nutrition.
Flavored yogurt also changes sweetness. If using it as a separate variation, begin with less added sweetener and assess the complete filling before making further adjustments.
Creamy Peanut Butter
Natural peanut butter should be thoroughly stirred in its original container before measuring. A scoop taken from a layer of separated oil behaves differently from one taken from dry solids at the bottom.
Smooth peanut butter makes the filling and topping more uniform. Crunchy peanut butter changes the texture and is harder to spread into a thin top layer.
The full recipe contains five tablespoons of regular peanut butter before optional drizzles. That contributes richness as well as protein, so extra additions change calories substantially.
Powdered Peanut Butter
Powdered peanut butter strengthens the peanut flavor and adds dry material that absorbs moisture. It is not the same as a peanut-flavored protein powder, and regular peanut butter is not an equal substitution by tablespoon.
Some brands contain sugar and salt. Read the label if those details matter, and account for them when deciding whether the filling needs additional salt or sweetener.
Vanilla Protein Powder
A scoop is not a universal quantity. Use approximately the serving amount named in the recipe rather than assuming every product’s scoop has the same size.
Whey, casein, plant-based, and mixed powders absorb liquid differently. A casein-heavy product may thicken significantly after standing, while another powder may leave a looser or grainier result. This formula has not been tested across all types.
Use a powder whose flavor you already enjoy. Many are sweetened, which is why the additional sweetener is adjusted after blending rather than added automatically at maximum quantity.
Sweetener
Powdered sugar and powdered sugar substitutes differ in sweetness and bulk. A concentrated stevia or monk-fruit product may need far less than the listed tablespoons, while a baking blend may be closer to a sugar-style measure.
Follow the product’s conversion guidance and start conservatively. Powdered sugar adds sugar and calories; sugar alcohol products can leave a cooling aftertaste and may cause digestive discomfort for some people in larger quantities.
Choosing sugar-free chocolate or a sugar substitute does not make the complete dessert automatically sugar-free. Dairy contains naturally occurring sugars, and other ingredients vary.
Chocolate and Coconut Oil
Semisweet chips give a familiar chocolate flavor. Sugar-free chips use different sweeteners and may melt or firm differently, so their behavior is not guaranteed to match conventional chips.
The small amount of coconut oil helps the melted topping spread. Peanut butter also softens the chocolate mixture. Together they can make a more yielding layer rather than a sharply brittle shell.
Use dry equipment for melting. Keep water and steam out of the chocolate bowl, and heat in short intervals to avoid scorching.
Equipment
Use a blender or food processor suitable for thick mixtures. A smaller container may handle this quantity better than a large blender pitcher where the blades struggle to catch the filling.
You will also need a flexible spatula, measuring tools, a microwave-safe bowl, a spoon, and six small covered serving dishes. A toothpick or skewer is optional for a decorative swirl.
Set the dishes on a tray before filling. It makes moving the portions to the refrigerator easier and reduces the chance of tipping a cup while the topping is still soft.
How to Make the Cheesecake Cups
1. Blend the Cottage Cheese
Place the cottage cheese in the processor or blender. Blend until smooth, stopping to scrape the sides and beneath the lid as needed.
The supplied 30–60 seconds may be enough in some equipment, but judge the texture rather than stopping automatically. Check a little on a spoon for remaining curds.
If the mixture will not circulate, add a spoonful of the measured yogurt. Stop the machine before scraping, and do not push utensils toward moving blades.
2. Add the Filling Ingredients
Add the remaining Greek yogurt, quarter cup peanut butter, vanilla protein powder, powdered peanut butter, vanilla, and an initial amount of the chosen sweetener.
Blend until uniform, pausing to scrape any dry powder from the sides. The mixture should be creamy rather than streaked with peanut butter or dotted with powder pockets.
Keep the pinch of salt until after tasting if your cottage cheese or peanut butter is already noticeably salted.
3. Hydrate and Adjust
Let the blended mixture stand briefly so the powders can absorb moisture. Then assess it with a spoon.
It should hold a soft mound and spread easily. If it is too thick to blend or portion, add milk by the teaspoon, using only as much as needed from the listed tablespoon.
Avoid aiming for a pourable batter. There is no gelatin or other dedicated setting ingredient, so an overly diluted filling will not necessarily become firm in the refrigerator.
Taste and adjust sweetness gradually. The chocolate topping adds sweetness too, so the filling does not need to taste intensely sugary on its own.
4. Portion the Filling
Divide the mixture evenly among six dishes. A scale is useful if consistent nutrition matters, but a spoon is fine for everyday preparation.
Smooth the surface without pressing the mixture into a dense block. Leave a little space for the chocolate layer and garnish.
If your containers are too small, use an additional cup rather than changing the recipe’s layering by forcing all the mixture into them. Recalculate portions if the yield changes.
5. Melt the Chocolate
Place the chocolate chips and coconut oil in a microwave-safe bowl. Heat in 15- to 20-second intervals, stirring well between each.
Stop heating while a few soft pieces remain if stirring will melt them. Chocolate can scorch even when it does not look fully melted in the microwave.
Alternatively, melt gently over a bowl of barely simmering water, keeping the bowl clear of the water and preventing steam from entering it.
6. Add the Peanut Butter
Stir the separate tablespoon peanut butter into the melted chocolate until smooth. Let the topping cool slightly so it remains fluid but is no longer hot.
For a visible peanut butter ribbon, reserve a small part of that measured tablespoon and mix the rest into the chocolate. Soften the reserved portion only enough to drizzle; you do not need to add an unmeasured extra spoonful.
If the topping seems thick, stir patiently before deciding to add anything. Different chips and peanut butters produce different consistency.
7. Spread a Thin Layer
Divide the chocolate mixture among the six cups. Spread gently over the filling, avoiding deep scraping that pulls the pale base up through the top.
A thin layer is easier to eat and more likely to give the intended chocolate-peanut butter contrast. A thick cap may need to be broken into large pieces with a spoon.
If using reserved peanut butter, drizzle a little on the surface and make one or two gentle skewer passes. Overmixing turns the colors uniform rather than creating a ribbon.
8. Add Garnish and Chill
Add chopped peanuts or a few mini chips while the topping is still soft if you want them to adhere. For maximum peanut crunch, add them just before serving instead.
Cover and refrigerate for at least one to two hours, until cold and the chocolate layer has firmed. Keep covers from pressing directly onto the topping.
The filling may remain softer than the chocolate. That is expected for a spoon dessert and not evidence that it needs to be unmolded or frozen.
9. Serve
Serve chilled from the container. If the top is too firm to break comfortably, let an individual portion stand for a few minutes before eating.
Leave the rest of the batch refrigerated. A short softening time for one serving should not become an extended room-temperature display for every cup.
Tips for a Smooth Center and Easy-to-Eat Top
Blend the dairy first. Removing curds is easier before the protein powder and powdered peanut butter thicken the mixture.
Add milk sparingly. A filling that is easy to pour is usually softer than intended here.
Allow the powders to hydrate. Some mixtures become thicker after a short pause, making immediate liquid adjustments misleading.
Keep the chocolate layer thin. The serving cup supports the dessert, so a thick structural shell is unnecessary.
Cool melted chocolate slightly. Hot topping can soften the filling and blur the layers.
Measure decorative extras. A generous peanut butter drizzle or chopped candy addition can change the nutrition more than a small garnish suggests.
Make-Ahead and Storage
Prepare the cups a day ahead for convenient serving. Cover individually and keep at 40°F or below for up to three days, provided the ingredients were fresh and handled properly.
Respect any earlier storage limit from opened dairy products. Mixing older ingredients into a new dessert does not reset their age.
Keep extra crunchy toppings separate if you prefer the clearest texture contrast. A peanut garnish pressed into chocolate can remain convenient, but it may soften slightly during storage.
For transport, use a cooler or insulated lunch bag with enough ice packs to maintain refrigeration temperature. Refrigerate on arrival when possible.
Do not leave the dairy-based dessert without cold holding for more than two hours, or more than one hour when the surrounding temperature exceeds 90°F. Discard portions with mold, an unusual odor, or uncertain handling rather than taste-testing for safety.
Freezing Option
The supplied recipe allows freezing for up to one month. Treat this as a storage option with possible quality changes, not a promise of the same creamy texture after thawing.
Freeze in suitable covered containers, leaving a little room for expansion. Avoid fragile decorative garnishes until after thawing.
Thaw overnight in the refrigerator. Cottage cheese and yogurt may release some water or feel grainier, and the chocolate topping may separate visually from the softer filling.
Do not freeze solely because a loose filling has failed to become a freestanding cheesecake. These are still designed to be eaten from their containers, whether previously frozen or not.
Serving Variations
Chopped Peanut Middle
Sprinkle a small amount of measured chopped peanuts between the filling and topping. This gives crunch inside, though the nuts may soften over time.
Dark Chocolate Finish
Use dark chocolate for a less sweet-tasting contrast. Its sugar, fat, and melting behavior depend on the product, so check the label rather than assuming identical nutrition.
Chocolate Base
Chocolate protein powder creates a different, chocolate-forward filling. It reduces the visual contrast with the topping and may change sweetness and thickness.
Four Larger Portions
Divide the same batch into four dishes for larger desserts. Each portion then contains one and a half times the ingredients of the six-way serving, including the chocolate topping.
Simple Everyday Cups
Skip candy pieces and extra drizzles. A thin chocolate top and a few chopped peanuts already provide the flavor combination without additional decorating work.
Nutrition: Review the Six-Serving Estimate
The recipe contains several protein sources, but the six-way division matters. As an illustration, the cottage cheese might provide about 26 grams protein, yogurt around 12 grams, the scoop of powder 20–25 grams, regular peanut butter roughly 17 grams across the filling and topping, and powdered peanut butter a smaller additional amount.
With small contributions from chocolate and milk, many batches will land around the mid-80s to mid-90s in total grams of protein. Dividing that by six produces roughly 14–16 grams per cup, rather than automatically reaching 18–21.
A broad planning estimate is about 13–17 grams per portion, depending on labels. To claim 18–21 grams in each of six cups, the complete batch would need 108–126 grams. Verify that your actual ingredients support that total.
Calories around 220–290 per cup may be plausible before optional garnishes, but they are not a verified analysis. The supplied 245-calorie figure may suit some products; powdered sugar, larger chocolate measures, or extra candy can increase it.
The recipe should not be described as sugar-free, keto, or suitable for a particular dietary plan merely because one chocolate or sweetener ingredient carries that label. Calculate the complete recipe when those details matter.
Troubleshooting
The Filling Has Curds
Blend the cottage cheese more thoroughly before adding powders. A blender poorly suited to small thick batches may need a smaller container or a food processor.
The Filling Is Grainy Without Visible Curds
The protein powder may have a gritty texture or need time to hydrate. More blending may not remove the texture of a particular product.
The Filling Is Too Soft
The dairy may be watery or too much milk may have been used. Allow the full chill, then serve as a softer creamy dessert if needed. Use thicker yogurt and less added liquid in the next batch.
The Chocolate Is Hard to Break
The layer may be too thick. Let the serving soften briefly and make a thinner layer next time.
The Topping Stays Soft
Peanut butter, coconut oil, and sugar-free chip formulations can all affect firmness. Keep it chilled and serve as a soft chocolate layer rather than promising a brittle shell.
The Chocolate Scorches
Heat in shorter intervals and stir between them. Dark or bitter burnt notes are not reliably fixed with extra peanut butter.
Frequently Asked Questions
Does This Contain Cream Cheese?
No. The supplied filling uses cottage cheese and Greek yogurt for a cheesecake-inspired flavor. Adding cream cheese would change the recipe and nutrition.
Can I Use a Silicone Mold?
Serving dishes are more reliable because the filling is not formulated to become freestanding in the refrigerator. Do not promise clean unmolding from the stated chill alone.
Can I Omit the Protein Powder?
That changes sweetness, protein, and moisture absorption. A powder-free version requires a separately balanced formula.
Is It Peanut-Allergy Friendly?
No. It contains regular and powdered peanut butter, and toppings may introduce more allergens. Check every label if developing a separate alternative.
Can I Eat It Before the Topping Sets?
Yes, if the ingredients have been handled properly. Chilling is for temperature and texture rather than a cooking step.
Print
High-Protein Reese’s-Inspired Peanut Butter Cheesecake Cups
Description
Yield: Six small cups
Prep time: Approximately 15 minutes
Chill time: At least 1–2 hours
Total time: Approximately 1 hour 15 minutes to 2 hours 15 minutes
Method: Blended, no-bake, refrigerated
Ingredients
Peanut Butter Cheesecake-Style Filling
- 1 cup low-fat cottage cheese
- 1/2 cup plain Greek yogurt
- 1/4 cup creamy peanut butter
- 1 scoop vanilla protein powder, approximately the label’s 30-gram serving
- 2 tablespoons powdered peanut butter
- 2 to 3 tablespoons powdered sweetener or powdered sugar, adjusted to taste and product strength
- 1 teaspoon vanilla extract
- Up to 1 tablespoon milk, only as needed
- A small pinch of salt, only if needed
Chocolate Peanut Butter Topping
- 1/2 cup semisweet or sugar-free chocolate chips
- 1 teaspoon coconut oil
- 1 tablespoon creamy peanut butter
Optional Garnishes
- 2 tablespoons chopped roasted peanuts, divided among the cups
- A few mini chocolate chips
- Small pieces of peanut butter cup candy
- A light peanut butter drizzle
Yield: Six small dessert portions. Use food-safe cups or ramekins with room for one-sixth of the filling and topping. Four-ounce containers are a useful starting size, but final volume varies; have an extra dish available rather than overfilling.
The tablespoon of peanut butter in the topping is separate from the quarter cup in the filling. Additional decorative peanut butter or candy pieces are extras and should be counted separately in nutrition estimates.
Instructions
- Blend 1 cup low-fat cottage cheese until smooth.
- Add 1/2 cup Greek yogurt, 1/4 cup peanut butter, 1 scoop vanilla protein powder, 2 tablespoons powdered peanut butter, sweetener to taste, and 1 teaspoon vanilla. Blend and assess before adding salt.
- Add milk by the teaspoon only if necessary, using up to 1 tablespoon. Divide between six dishes and smooth.
- Melt 1/2 cup chocolate chips with 1 teaspoon coconut oil gently. Stir in 1 tablespoon peanut butter and cool slightly.
- Divide in a thin layer over the filling. Add optional garnish and cover.
- Refrigerate 1–2 hours, until cold and the top has firmed. Serve with spoons from the containers.
Storage: Refrigerate at 40°F or below for up to three days, subject to ingredient freshness. Freeze for up to one month if you accept possible texture changes, and thaw in the refrigerator.
Estimated nutrition: Approximately 220–290 calories and 13–17 grams protein per six-way portion before optional garnishes, depending on ingredients. Verify with product labels and equal measured portions.