
High-Protein Peanut Butter Cup Protein Fluff
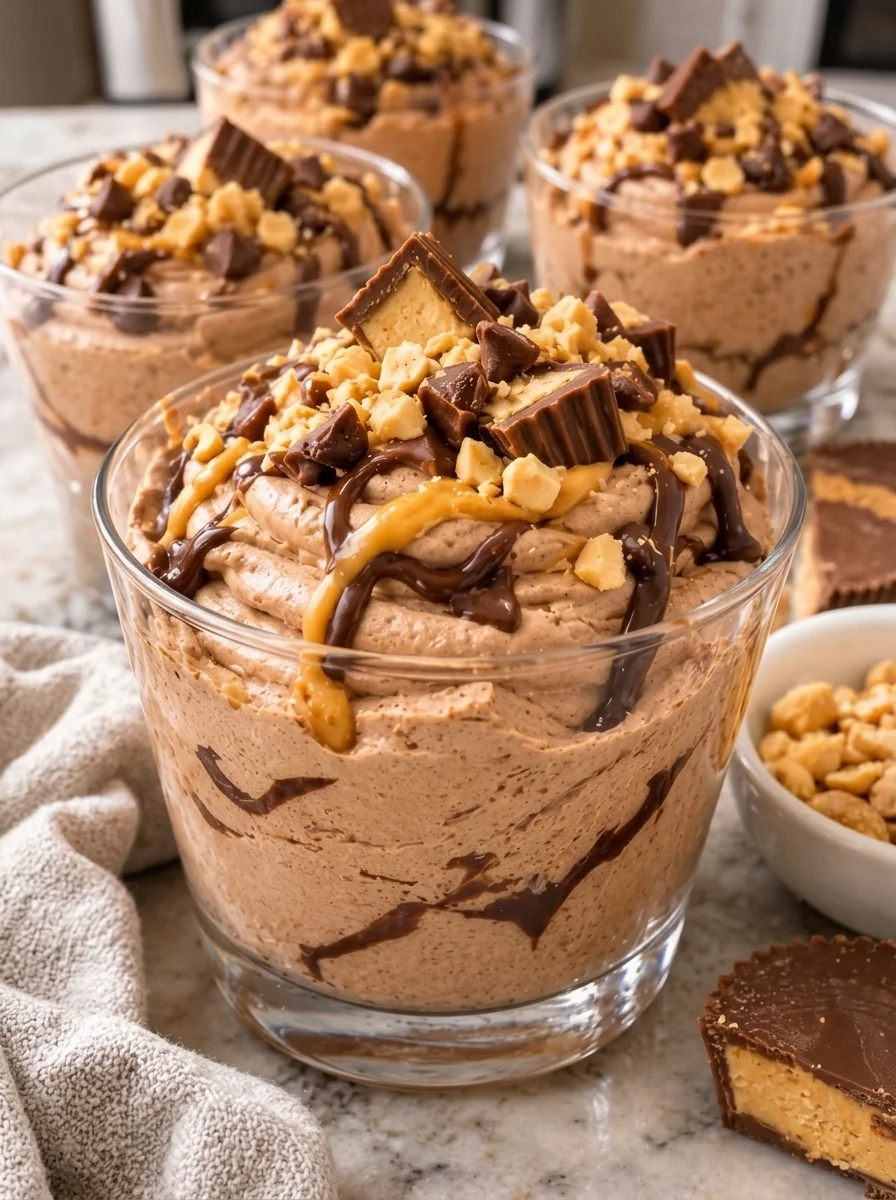
High-Protein Peanut Butter Cup Protein Fluff brings together creamy peanut butter, cocoa, vanilla, and a tangy blended dairy base in a simple no-bake dessert. Cottage cheese and Greek yogurt provide body, while protein powder contributes flavor, sweetness, and additional protein. A small chocolate peanut butter drizzle adds a richer finish without requiring a crust or a full cheesecake.
The recipe is convenient for four individual snacks or dessert portions. Blend the base, melt the drizzle, and refrigerate until cold. Chopped peanuts or a few mini chocolate chips give a little crunch against the smooth filling.
Despite the name, this is a thick blended dessert rather than a whipped, cloud-like mousse. It contains no whipped cream, beaten egg whites, or other strongly aerated component. Expect a creamy filling that softly mounds on a spoon, with a little lightness from blending and a firmer consistency after chilling.
Recipe note: This article expands the supplied recipe, which has not been kitchen-tested here. The final texture, sweetness, and nutrition vary with your dairy products and protein powder. The original 23-gram protein claim per serving should be verified against the actual labels and the four-way portion size.
What Makes This Dessert Different
Peanut butter is blended throughout the base, so its flavor is present even in bites without the topping. A tablespoon of cocoa adds a mild chocolate note rather than turning the filling into a very dark chocolate pudding.
The topping uses melted chocolate, a little peanut butter, and coconut oil. It is a drizzle that can firm in the refrigerator, not a permanently fluid chocolate sauce. Thin ribbons are easier to eat with a spoon than a thick cap across the entire cup.
The dairy contributes a little tang and a dense, creamy body. It is peanut-butter-cup-inspired in flavor, but it will taste different from candy because the yogurt and cottage cheese remain part of the experience.
Ingredients
Peanut Butter Chocolate Base
- 1 cup low-fat cottage cheese
- 1/2 cup plain nonfat Greek yogurt
- 1/4 cup creamy natural peanut butter, thoroughly stirred
- 1 scoop vanilla protein powder, approximately the label’s 30-gram serving
- 2 tablespoons powdered sugar-free sweetener, or an amount adjusted to the product and your taste
- 1 teaspoon vanilla extract
- 1 tablespoon unsweetened cocoa powder
- Up to 2 to 3 tablespoons unsweetened almond milk, only as needed
- Up to 1/8 teaspoon fine salt, after tasting
Chocolate Peanut Butter Drizzle
- 2 tablespoons sugar-free chocolate chips
- 1 teaspoon creamy peanut butter
- 1 teaspoon coconut oil
Optional Toppings
- 1 tablespoon chopped roasted peanuts, divided among the servings
- 1 tablespoon mini chocolate chips, divided among the servings
- A light dusting of cocoa powder
- A few small pieces of sugar-free peanut butter cups
Yield: Four small dessert portions. Choose serving dishes with room for one-quarter of the mixture, a little drizzle, and any toppings. The final volume varies, so divide the batch evenly instead of filling different-sized jars to the same level.
The teaspoon of peanut butter for the drizzle is separate from the quarter cup in the filling. Any additional peanut butter poured on at serving is an extra ingredient for nutrition purposes.
Ingredient Notes
Cottage Cheese
Choose a low-fat cottage cheese with a flavor you enjoy. Blending smooths the curds but does not remove a salty or strongly tangy taste.
If there is a visible pool of loose liquid on top, pour off that excess before measuring. Do not press the curds completely dry; that would change the intended moisture balance.
Small-curd and large-curd products can both become smooth in suitable equipment. The important step is processing the cottage cheese before the other ingredients make the mixture much thicker.
Greek Yogurt
Use thick plain Greek yogurt. Regular yogurt is generally looser and may make the filling less substantial. A flavored yogurt introduces additional sweetness and can change the intended flavor.
Nonfat yogurt follows the supplied recipe. A higher-fat version can be used as a richer variation, but it changes calories and mouthfeel and may affect consistency.
Stir the yogurt to an even texture before measuring so you are not adding a disproportionate amount of surface liquid.
Natural Peanut Butter
Stir natural peanut butter thoroughly in its container before measuring. A scoop from an oily upper layer produces a looser mixture than a scoop of dry solids from the bottom.
Smooth peanut butter gives the cleanest filling. Crunchy peanut butter introduces pieces that prevent the base from feeling completely smooth and can make portioning less even.
The peanut butter contributes protein, but also substantial fat and calories. More peanut butter is a flavor adjustment, not a calorie-neutral way to make the dessert thicker.
Protein Powder
Check the serving weight on the package. A scoop is not standardized across brands, so an oversized scoop can make the filling much thicker than intended.
Use a vanilla powder you already enjoy. Its sweetness and aftertaste will remain noticeable, especially in a dessert with only a small amount of cocoa.
Whey, casein, plant-based, and mixed powders absorb liquid differently. Some thicken strongly after standing; others remain softer or leave a slightly grainy texture. This formula has not been tested with every type, so add liquid according to the mixture rather than assuming a fixed amount is always required.
Sweetener
Powdered sugar-free sweeteners differ in concentration. A baking blend may measure more like sugar, while a concentrated stevia or monk-fruit product can require much less.
Follow the label’s conversion guidance and start with a modest amount. Many protein powders are already sweetened, so you may not need the full two tablespoons of a comparable blend.
Sugar alcohol products can have a cooling aftertaste and may cause digestive discomfort for some people in larger amounts. Powdered sugar is another taste option, but it adds sugar and calories and changes the dietary description.
Cocoa, Vanilla, and Salt
Unsweetened cocoa gives a gentle chocolate background. Natural and Dutch-process cocoa both work in this no-bake mixture, though the flavor differs. No baking reaction requires one specific type here.
Vanilla supports the peanut butter and dairy flavors. Adding far more than the teaspoon can make its alcohol or artificial notes more noticeable, depending on the product.
The full 1/8 teaspoon salt may be unnecessary if the cottage cheese, peanut butter, and powder are already well seasoned. Taste first, then add a small pinch if needed.
Almond Milk
Milk is an adjustment, not an amount that must be used in full. The listed two to three tablespoons are an upper guide for a mixture that needs loosening.
Begin with a teaspoon at a time. Adding liquid in tablespoon-sized splashes can quickly turn a spoonable dessert into a softer pudding.
Almond milk introduces tree nuts. Dairy milk or another suitable unsweetened alternative changes flavor and nutrition and should be selected with allergies in mind.
Chocolate Topping
Sugar-free chips vary in sweetener, fat, and melting behavior. They are not guaranteed to melt or firm exactly like conventional chocolate chips.
The peanut butter and coconut oil soften the chocolate mixture and help it drizzle. Once chilled, it may be firm, flexible, or slightly soft depending on the products and thickness.
Two tablespoons of chocolate divided among four servings makes a modest finish. Do not expect a deep shell on every cup from that quantity.
Equipment
Use a food processor or blender suitable for thick mixtures. A smaller container can be more effective than a large pitcher when the quantity is too shallow to circulate around the blades.
Have a flexible spatula, measuring tools, a microwave-safe bowl, a spoon, and four food-safe covered serving containers ready. A tray makes it easier to move the cups into the refrigerator without spilling.
Clear glasses show the topping well, but ramekins or lidded snack jars are equally practical. These containers support the soft dessert; the filling is not intended for clean unmolding.
How to Make Peanut Butter Cup Protein Fluff
1. Smooth the Cottage Cheese
Place the cottage cheese in the processor or blender. Blend until creamy, stopping to scrape the sides and beneath the lid.
Check a little on a spoon for remaining curds. Processing time depends on the appliance, so do not stop automatically after a short pulse if the mixture is still coarse.
If the cottage cheese will not circulate, add a spoonful of the measured yogurt to help it move. Stop the motor before scraping and follow the appliance’s thick-mixture instructions.
2. Add the Remaining Base Ingredients
Add the rest of the yogurt, quarter cup peanut butter, protein powder, an initial amount of sweetener, vanilla, and cocoa.
Blend until uniform, scraping any dry powder from the sides. The mixture should have an even light-chocolate color without pockets of peanut butter.
Hold back the salt until tasting if your ingredients are already salted. There is no need to add every seasoning before knowing the base flavor.
3. Let the Powders Hydrate
Allow the blended base to stand briefly. Cocoa and protein powder can absorb moisture during that pause, changing the thickness.
Taste and adjust sweetness gradually. Remember that chocolate drizzle and optional candy add more sweetness later.
Avoid adding several extra spoonfuls of cocoa, peanut butter, and powder at once. Each affects flavor and consistency, making it harder to identify why a batch becomes too thick or bitter.
4. Adjust the Texture Carefully
The filling should mound softly on a spoon and spread with light pressure. It should not pour freely or sit as a dry, chalky paste.
If it is too thick, add almond milk one teaspoon at a time and blend briefly after each addition. Use only what is needed from the listed amount.
A softer filling will not necessarily become firm simply because it chills longer. This recipe has no gelatin or other dedicated setting ingredient.
5. Portion the Base
Divide evenly between four small cups or bowls. A scale is useful if consistent portions are important for nutrition, but careful spooning is fine for everyday preparation.
Smooth the tops gently and leave room for the drizzle. Avoid compressing the mixture repeatedly in an attempt to create additional volume or a firmer set.
If the batch does not fill your containers as high as expected, use smaller dishes rather than changing the ingredient quantities just for presentation.
6. Melt the Drizzle
Combine the chocolate chips, teaspoon peanut butter, and teaspoon coconut oil in a microwave-safe bowl.
Heat in short 15- to 20-second intervals, stirring thoroughly between each. Stop heating when stirring can melt the last small soft pieces.
A very small chocolate quantity can scorch quickly. Keep the bowl and utensils dry, and do not add a splash of almond milk to this topping as an unplanned fix for thick chocolate; that changes the mixture and can affect how it melts.
7. Cool Slightly and Decorate
Let the melted topping cool until fluid but no longer hot. Drizzle thin lines over the base rather than pouring a thick pool into the middle.
If you want a visible ribbon just beneath the surface, draw a skewer through a few lines once or twice while the topping is still soft. The chocolate may begin firming as it meets the cool filling, so work gently and avoid repeated stirring.
The supplied method is primarily a topping drizzle. It does not require the chocolate to stay liquid throughout refrigerated storage.
8. Chill
Cover and refrigerate for 30 to 60 minutes, until cold and a little thicker. Some powder blends thicken further overnight, while others change less.
The chill is for the intended temperature and consistency rather than a cooking stage. The filling remains a creamy spoon dessert.
Use covers that do not press directly onto the top. Keep the cups refrigerated while waiting to serve.
9. Add Crunch and Serve
Add the measured chopped peanuts, mini chips, or candy pieces shortly before eating for the best texture.
Serve with a spoon directly from the container. If a chocolate ribbon is very firm, allow that individual portion to soften briefly rather than leaving the entire batch out.
Keep the remaining cups cold and return unused topping ingredients to appropriate storage.
Tips for a Better Batch
Blend the cottage cheese before adding powders. Smoothing curds is easier while the mixture is still relatively loose.
Use thick yogurt and measured peanut butter. A watery yogurt or separated peanut butter can change the base considerably.
Pause before adding milk. The powders may thicken after hydration, so an immediate large adjustment can be misleading.
Taste before adding salt or maximum sweetener. Dairy and protein powder can already supply both.
Keep the chocolate in thin ribbons. A hard, thick cap can overwhelm a soft filling.
Save crunchy toppings for serving. They provide more contrast when they have not spent hours against moist dairy.
Serving and Presentation Ideas
For a simple snack, use a lidded jar and a small chocolate drizzle. Pack peanuts separately and add them when ready to eat.
For dessert glasses, place a few chocolate lines close to the inside edge before adding a final spoonful of filling. Keep the total chocolate amount the same if you want the original portion estimate.
For a smaller tasting portion, divide the batch into eight cups rather than four. Each then contains half the ingredients of the four-way serving.
For a party, keep most portions refrigerated and bring out a small number at a time. Shelf-stable peanut butter and packaged candy do not make the assembled dairy dessert shelf-stable.
Make-Ahead and Storage
Cover individual portions and refrigerate at 40°F or below. Enjoy within three to four days, assuming the ingredients were fresh and handled properly.
Follow any earlier opened-storage limit from a dairy product. Turning older cottage cheese into a dessert does not establish a new four-day window.
A small amount of liquid separation can occur. If the dessert has remained properly refrigerated and is otherwise within its storage period, stir gently before eating. This will blend any surface pattern, but it can improve consistency.
Discard portions with mold, an unusual odor, or uncertain handling history. Do not taste questionable dairy food to decide whether it is safe.
For transport, use an insulated bag with enough ice packs to maintain refrigeration temperature and refrigerate on arrival. Do not leave the cups without cold holding for more than two hours, or more than one hour when temperatures exceed 90°F.
Freezing is not recommended for the intended texture. Cottage cheese and yogurt can become grainy or release moisture after thawing. A recipe formulated specifically for frozen cups is a better choice if that is the result you want.
Variations
Chocolate Protein Powder
Replace vanilla powder with a chocolate version for a darker-tasting base. Sweetness and moisture absorption can differ, so reassess before adding extra cocoa or milk.
Stronger Peanut Flavor
Choose a peanut butter with a flavor you enjoy and use the measured amount well mixed. Adding extra peanut butter increases richness and calories and may not be necessary once the dessert is chilled.
Dark Chocolate Drizzle
Use conventional dark chocolate instead of sugar-free chips as a taste variation. Melting behavior and nutrition change with the product.
Simple Vanilla Peanut Butter
Omit the tablespoon of cocoa from the base for a paler filling with a more distinct chocolate topping. The base may need less added milk because a dry ingredient has been removed.
Nut or Seed Alternative
A different butter and milk alternative change flavor, allergens, texture, and nutrition. Check every ingredient, including powder and chocolate, rather than assuming a single swap makes the whole dessert suitable for a particular allergy.
Nutrition: Check the Batch Before Dividing
The original 23 grams of protein per cup would require 92 grams in the complete four-serving batch. Many common combinations of the listed ingredients provide less.
As an illustration, cottage cheese might contribute about 26 grams, yogurt around 12 grams, a scoop of powder 20–25 grams, and the regular peanut butter roughly 15 grams across the base and topping. Cocoa, chocolate, and milk contribute smaller additional amounts.
That example often puts the batch around the upper 70s or low 80s in total grams, giving roughly 19–21 grams per cup. A broad estimate of approximately 18–22 grams is a more cautious planning range, but your product labels determine the actual result.
Calories around 230–290 per serving without optional toppings may be plausible with low-calorie sweetener. The supplied 245-calorie figure fits some combinations, but it is not a verified analysis. Full-fat dairy, powdered sugar, extra chocolate, peanuts, or chopped candy increase it.
This dessert is not automatically low-carb, sugar-free, or suitable for a specific dietary plan. Dairy contains naturally occurring carbohydrate, and sugar-free chocolate can still contribute carbohydrate, fat, and calories. Calculate the complete recipe from the labels when those details matter.
Troubleshooting
The Base Is Grainy
First distinguish cottage cheese curds from powder texture. Blend the dairy more thoroughly before thickening it. A naturally gritty protein powder may not become completely smooth with longer processing.
The Base Is Too Runny
The dairy may be watery or too much milk may have been added. Give it the full chilling period, then serve as a softer pudding-style dessert if needed. Use less liquid in the next batch.
The Filling Tastes Chalky
The powder may need more hydration or may not suit this use. A small amount of yogurt or milk can help dryness, but adding more powder is likely to worsen it.
The Chocolate Drizzle Sets Quickly
That is expected against cold filling. Drizzle before it becomes too cool in the bowl and use thin lines rather than trying to create a deep liquid swirl.
The Dessert Is Too Salty
Cottage cheese, peanut butter, and powder may already contain substantial salt. Hold the measured salt until tasting and reduce it in the next batch if necessary.
Frequently Asked Questions
Is This Actually Whipped Mousse?
No. It is a blended dairy dessert with a thick, creamy consistency. The name does not imply the same airiness as a mousse made with whipped cream or egg whites.
Can I Eat It Before Chilling?
Yes, when made with properly handled ready-to-eat ingredients. Chilling improves the intended temperature and thickness rather than making it cooked.
Can I Leave Out the Protein Powder?
That changes protein, sweetness, and moisture absorption. A powder-free version needs a separately balanced formula rather than the same texture promise after an omission.
Can I Make Two Large Servings?
Yes. Each would contain twice the ingredients of the original four-way portion, including the chocolate drizzle.
Can I Unmold These Cups?
The recipe is not designed for that. Serve in glasses, jars, or bowls with spoons.
Print
High-Protein Peanut Butter Cup Protein Fluff
Description
Yield: Four small portions
Prep: Approximately 15 minutes
Chill: 30–60 minutes
Total: Approximately 45–75 minutes
Method: Blended, no-bake, refrigerated
Ingredients
Peanut Butter Chocolate Base
- 1 cup low-fat cottage cheese
- 1/2 cup plain nonfat Greek yogurt
- 1/4 cup creamy natural peanut butter, thoroughly stirred
- 1 scoop vanilla protein powder, approximately the label’s 30-gram serving
- 2 tablespoons powdered sugar-free sweetener, or an amount adjusted to the product and your taste
- 1 teaspoon vanilla extract
- 1 tablespoon unsweetened cocoa powder
- Up to 2 to 3 tablespoons unsweetened almond milk, only as needed
- Up to 1/8 teaspoon fine salt, after tasting
Chocolate Peanut Butter Drizzle
- 2 tablespoons sugar-free chocolate chips
- 1 teaspoon creamy peanut butter
- 1 teaspoon coconut oil
Optional Toppings
- 1 tablespoon chopped roasted peanuts, divided among the servings
- 1 tablespoon mini chocolate chips, divided among the servings
- A light dusting of cocoa powder
- A few small pieces of sugar-free peanut butter cups
Yield: Four small dessert portions. Choose serving dishes with room for one-quarter of the mixture, a little drizzle, and any toppings. The final volume varies, so divide the batch evenly instead of filling different-sized jars to the same level.
The teaspoon of peanut butter for the drizzle is separate from the quarter cup in the filling. Any additional peanut butter poured on at serving is an extra ingredient for nutrition purposes.
Instructions
- Blend 1 cup low-fat cottage cheese until smooth.
- Add 1/2 cup nonfat Greek yogurt, 1/4 cup well-stirred peanut butter, 1 scoop vanilla protein powder, sweetener to taste, 1 teaspoon vanilla, and 1 tablespoon cocoa. Blend thoroughly.
- Let hydrate briefly, then add almond milk by the teaspoon only if needed, using up to the listed 2–3 tablespoons. Taste before adding up to 1/8 teaspoon salt.
- Divide among four dishes.
- Gently melt 2 tablespoons sugar-free chocolate chips with 1 teaspoon peanut butter and 1 teaspoon coconut oil. Cool slightly and drizzle thinly over the filling.
- Cover and refrigerate 30–60 minutes. Add optional crunchy toppings before serving.
Storage: Refrigerate at 40°F or below for 3–4 days, subject to ingredient freshness. Freezing is not recommended for the intended texture.
Estimated nutrition: Approximately 230–290 calories and 18–22 grams protein per four-way portion before optional toppings, depending on ingredients. Verify with your own labels and equal portions.