
High-Protein Reese’s-Style Chocolate Peanut Butter Mousse Cups
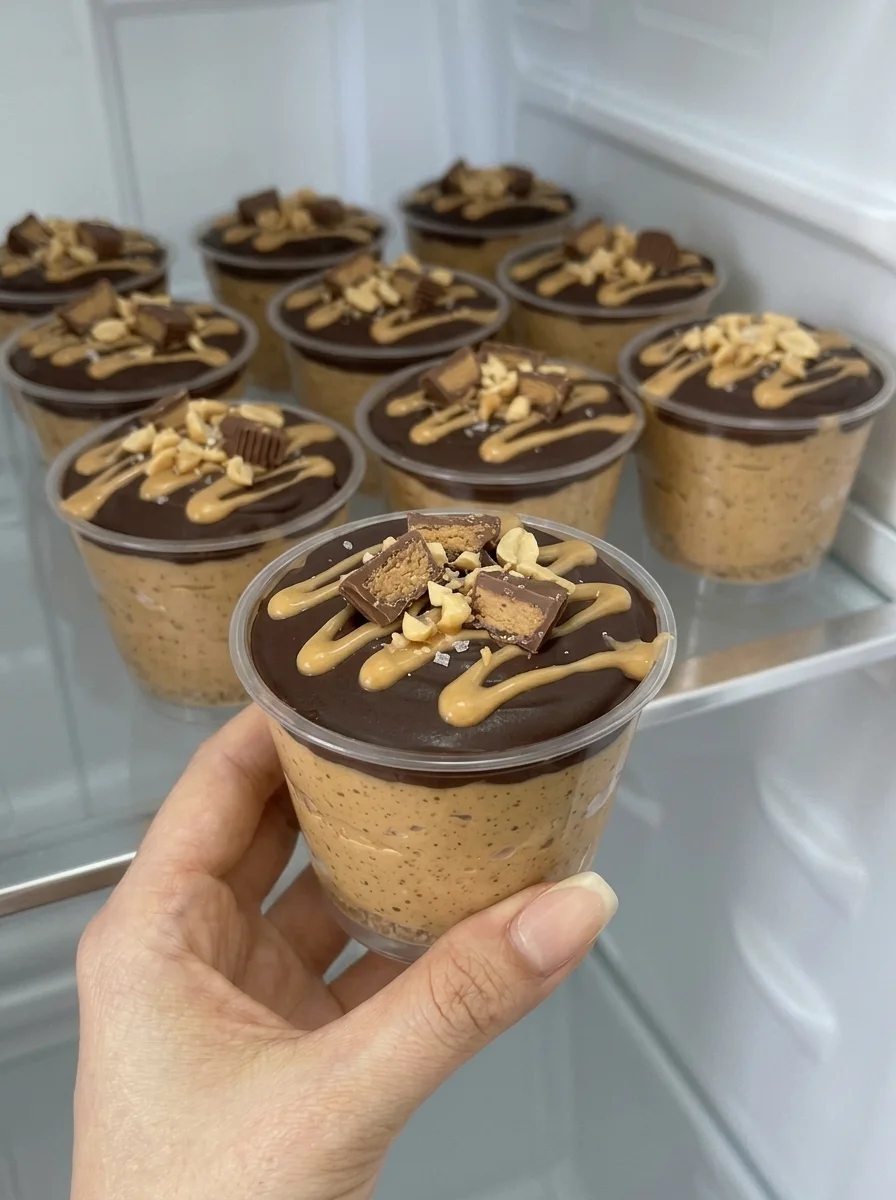
Peanut butter and dark chocolate meet in these individual protein mousse cups, with a thick dairy-based filling beneath a soft ganache topping. Greek yogurt gives the peanut butter layer a pleasant tang, powdered peanut butter strengthens the nutty flavor, and protein powder adds body. A few chopped peanuts and peanut butter cup pieces provide contrast to the creamy center.
They are convenient to portion ahead and keep chilled for a dessert or substantial snack. Clear cups show the peanut butter and chocolate layers, but small jars or ramekins work just as well. The presentation can be simple: a spoonful of ganache and a few peanuts are enough to make each serving look finished.
The texture deserves a clear description. Beating Greek yogurt with peanut butter can make it smooth and lighter in feel, but it does not reliably create the aeration of a classic whipped-cream or egg-white mousse. Expect a thick, creamy, spoonable filling rather than a guaranteed cloud-like foam.
This article expands the supplied recipe with ingredient and assembly guidance. It has not been independently kitchen-tested. Protein powders, yogurt brands, and sugar-free chocolate formulations vary considerably, so use the consistency checks instead of relying only on mixing and chilling times.
Flavor and Texture
The filling should taste primarily of peanut butter, with vanilla and a gentle dairy tang. Powdered peanut butter reinforces the flavor without adding the same quantity of fat as another large scoop of natural peanut butter.
The chocolate layer is ganache: chocolate combined with cream. It should be softer than plain melted chocolate once chilled, though some sugar-free chips may produce a firmer, grainier, or less predictable result. It is not intended as a brittle chocolate shell.
Reese’s-style describes the chocolate-and-peanut-butter inspiration. This is not an official branded recipe or an exact copy of a commercial peanut butter cup. The yogurt and protein powder remain noticeable ingredients, especially if either has a strong flavor.
The finished cups are spoon desserts. They are not designed to unmold like candy or hold their shape unsupported on a plate.
Ingredients
Peanut Butter Protein Filling
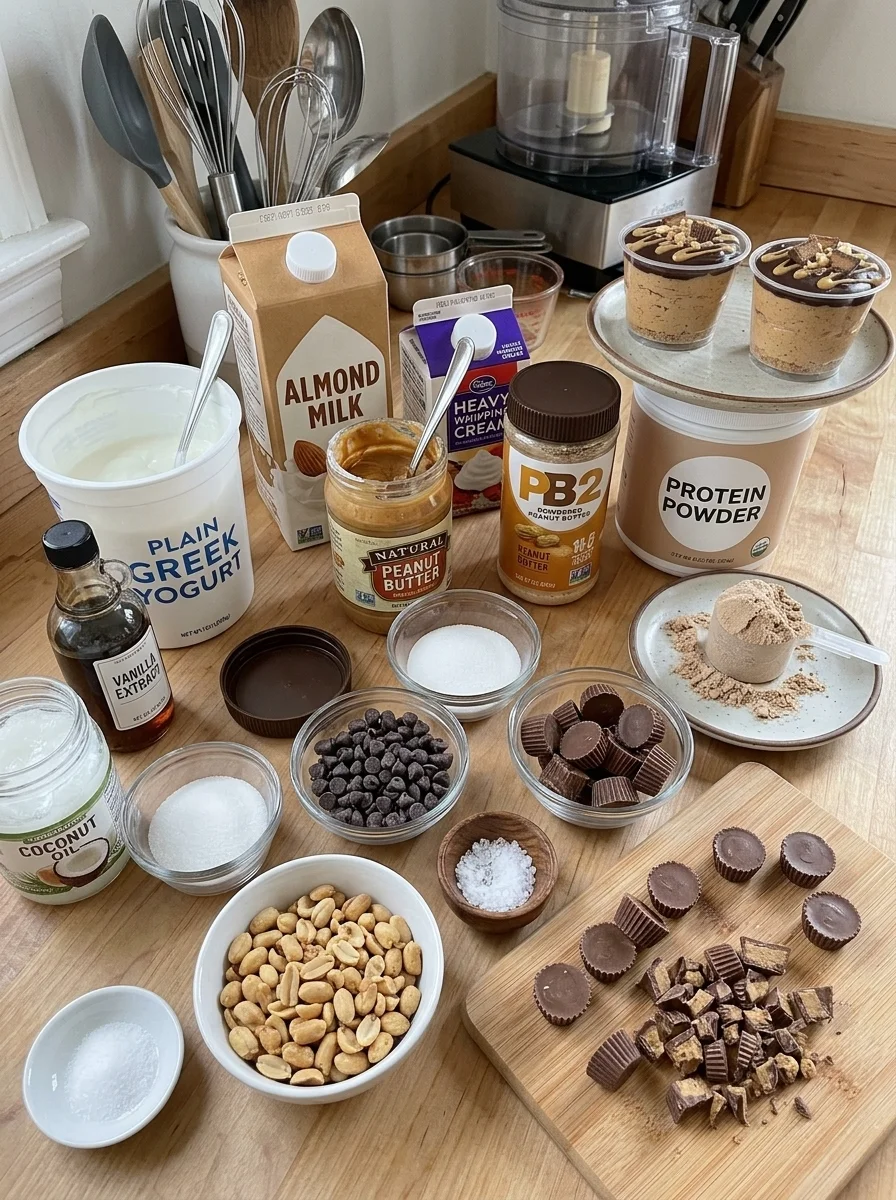
- 2 cups plain nonfat Greek yogurt
- 1/2 cup creamy natural peanut butter, stirred until evenly combined
- 1/2 cup powdered peanut butter, such as PB2
- 2 scoops vanilla or peanut butter protein powder, approximately 60 grams total; use the label weight rather than assuming all scoops match
- Up to 3 tablespoons sugar-free maple-style syrup or a suitable powdered sweetener, adjusted to taste
- 1 1/2 teaspoons vanilla extract
- Up to 1/4 teaspoon salt, depending on the peanut products
- 2–3 tablespoons unsweetened almond milk, only as needed
Chocolate Ganache
- 3/4 cup sugar-free dark chocolate chips suitable for melting
- 1/3 cup heavy cream
- 1 teaspoon coconut oil
Optional Garnish
- 2 tablespoons creamy peanut butter, gently warmed until drizzleable
- 6 mini peanut butter cups, chopped
- 1/3 cup chopped roasted salted peanuts
- A little flaky sea salt
Suggested yield: Start with eight small dessert cups and keep two more available. The batch can be divided into eight generous or ten smaller servings, depending on the actual mixed volume.
Five-to-six-ounce containers provide room for the dessert and a lid. This ingredient quantity does not necessarily fill eight to ten containers three-quarters full. Divide the filling evenly and leave space for the ganache rather than targeting a fixed fill line.
Ingredient Notes
Greek yogurt is the primary dairy base
Use thick, plain Greek yogurt. Thin ordinary yogurt adds more liquid and may require substantial adjustment. Pour off visible separated whey before measuring, then stir the yogurt until uniform.
Nonfat yogurt keeps the base relatively lean, but it is not the only ingredient contributing calories. Peanut butter, chocolate, cream, peanuts, and candy make these a rich dessert even with a nonfat dairy base.
Full-fat Greek yogurt can be tried, but the nutrition and mouthfeel change. Use the same texture checks and avoid adding milk until you see how the mixture behaves.
Cottage cheese is an alternative, not an additional ingredient
The supplied recipe allows blended low-fat cottage cheese instead of Greek yogurt. If choosing that version, blend it completely smooth before adding other ingredients and drain visible excess whey first.
Cottage cheese differs in salt, moisture, and curd structure. It is not guaranteed to produce the same consistency at an equal volume. Start with little or no added salt and assess the finished mixture before adding almond milk.
The supplied introduction also mentions cream cheese, but no cream cheese quantity appears in the ingredient list. Do not add an unspecified amount or replace the entire yogurt quantity with cream cheese. That would be a different, much richer formula requiring its own proportions.
Stir natural peanut butter first
Natural peanut butter often separates in the jar. Mix the oil back through it before measuring so each portion contains a balanced amount of solids and fat.
A scoop taken from a dry bottom layer can make the filling stiff, while an oily scoop from the top can make it loose. Consistency at the measuring stage helps prevent unnecessary adjustments later.
Check whether both the natural and powdered peanut butter contain salt before adding the full quarter teaspoon.
Protein powder changes the texture
Whey and casein do not absorb liquid in exactly the same way. A whey-heavy product may make a smoother, looser mixture, while casein can continue thickening after mixing.
A blend may be convenient, but the recipe has not been tested with every formulation. Choose a flavor you already enjoy, because unpleasant sweetness or aftertaste will remain noticeable in a no-bake filling.
Measure approximately 60 grams total using the package information. Scoop volume is not standardized. If you use more powder than intended, the filling may become chalky and require extra liquid.
Sweetener is a taste adjustment
Sugar-free maple-style syrup adds liquid; powdered erythritol adds dry bulk and can have a cooling sensation. They are not identical ingredients even when used in the same tablespoon amount.
Start with less than three tablespoons if the protein powder is already sweet. Blend or beat, taste with a clean spoon, and adjust gradually.
Other powdered sweeteners have different concentrations. Do not substitute an intensely concentrated product by the same volume without checking its directions.
Sugar-free chocolate needs a small trial
Some sugar-free chips are formulated primarily for baking and do not melt as smoothly as conventional chocolate. The sweetener and fat blend affect the ganache’s texture and firmness.
Use chips whose package indicates they can be melted, and follow any relevant handling instructions. If preparing for an event, test a small amount with cream before making the whole batch.
The teaspoon of coconut oil can loosen the texture slightly, but it cannot guarantee a smooth emulsion from every product.
Equipment
Use a mixing bowl and hand mixer, or a food processor if blending cottage cheese. Have a spatula, a heatproof bowl for the ganache, a small saucepan or microwave-safe cup for heating cream, and eight to ten food-safe dessert containers.
A piping bag gives a tidy finish, but a spoon is sufficient. If the filling is too stiff to pipe comfortably, adjust it carefully instead of forcing it through a tiny tip.
Use containers suitable for refrigerated food. Let the ganache become lukewarm before assembly, particularly when working with plastic portion cups that are not intended for hot liquids.
How to Make the Cups
1. Arrange the containers
Place eight small cups on a tray and keep two extra nearby. The tray makes it easier to move the assembled desserts without tipping them.
Choose cups with lids if you plan to store individual portions. Do not fill them so high that a lid presses into the garnish.
2. Smooth the dairy and peanut butter
Beat the Greek yogurt and stirred peanut butter until evenly combined. Add the vanilla and a small initial amount of sweetener and salt.
Mix until no large peanut butter streaks remain. Scrape the bowl so the mixture is uniform from top to bottom.
If using cottage cheese, blend it smooth first, then incorporate the peanut butter and remaining flavorings. Beating visible curds briefly in a bowl is less likely to produce a silky result.
3. Add the powders gradually
Sift or break up lumps in the protein powder and powdered peanut butter. Add them in several portions, mixing on low at first so the powders do not scatter.
Increase the speed only as needed to combine. Scrape the bowl and check for dry pockets.
There is no need to beat indefinitely in pursuit of a whipped-cream texture. Once smooth, give the mixture a few minutes to hydrate before deciding how much milk it needs.
4. Adjust the consistency
Add almond milk one teaspoon at a time, mixing after each addition. The listed two to three tablespoons are an allowance, not an amount that must all be used.
Aim for a thick mixture that mounds on a spoon but spreads without tearing. It should not pour like a smoothie or feel like a dry paste.
Taste and adjust the sweetener. If using casein-rich powder, allow another brief rest because it may continue thickening.
5. Divide and chill
Divide the filling evenly among the cups. If the portions look too large for your preference, spread the batch across ten cups instead of eight.
Smooth the tops gently and leave room for a thin chocolate layer. Refrigerate for about fifteen minutes while preparing ganache.
This short chill firms the surface slightly but is not the full setting period.
6. Heat the cream
Warm the heavy cream until hot and steaming but not vigorously boiling. Pour it over the chocolate chips and coconut oil in a heatproof bowl.
Let stand about two minutes so the chocolate softens. Stir slowly from the center outward until the mixture becomes smooth.
If unmelted pieces remain, use very short microwave bursts or a gentle warm-water bath suitable for the bowl, stirring between intervals. Avoid overheating and keep stray water out of the chocolate mixture.
7. Let the ganache cool slightly
Allow the ganache to become lukewarm and still fluid before spooning it over the chilled filling.
Very hot ganache can soften the dairy surface and is unnecessary for assembly. Ganache that has cooled too far may need gentle warming before it spreads.
The mixture should flow slowly from the spoon. A grainy or oily mixture may reflect overheating or the chocolate formulation; more oil is not automatically the solution.
8. Add a thin chocolate layer
Divide the ganache across the cups rather than assuming a fixed tablespoon amount will match every yield. Begin with a small spoonful on each and distribute the remainder.
Tilt gently or use the back of a spoon to cover the surface. Keep the layer thin enough to cut easily with a spoon once chilled.
Eight servings receive more topping per cup than ten. Record the final serving count if you plan to calculate nutrition.
9. Garnish thoughtfully
Warm the optional peanut butter just enough to drizzle, then add a small zigzag over the chocolate. It should be fluid, not hot.
Add a modest amount of chopped peanuts or candy. Save some crunchy garnish for serving day if the cups will be refrigerated overnight.
Salted peanuts and peanut butter cups already provide seasoning, so flaky salt is optional. A tiny pinch is usually enough.
10. Chill and cover
Refrigerate until the ganache is set to your preference and the filling is cold. Start checking after 45–60 minutes, recognizing that a firmer result may take longer with some chocolate products.
Once the topping is no longer warm and the decorations are stable, cover the cups. Do not leave them uncovered in the refrigerator for days, where they can absorb odors and dry at the surface.
Serve chilled with a spoon. The ganache may be fudgy, soft, or firmer depending on the chocolate, rather than a guaranteed identical shell in every batch.
Getting the Texture Right
Use thick yogurt before adding powders. Trying to rescue thin yogurt with large amounts of protein powder can produce an overly sweet or chalky filling.
Allow time for hydration. A mixture that looks loose immediately after stirring may thicken as the powders absorb moisture.
Add milk gradually. One extra tablespoon is easy to add but difficult to remove once the filling becomes runny.
Do not confuse smoothness with aeration. Mixing can remove lumps and make the filling feel lighter, but there is no separate whipped foam in this formula.
Keep the ganache thin. A heavy chocolate cap can overwhelm the peanut butter center and make the dessert harder to eat neatly.
Make-Ahead Planning
Prepare the filling and ganache a day ahead and store the cups covered in the refrigerator. Add the final peanuts and candy close to serving for the best crunch.
For a neat presentation, pipe the filling before adding chocolate. For a simpler snack, spoon it into small jars and keep the garnish minimal.
If making these for several people, check dairy, peanut, and protein-powder ingredients before serving. The recipe contains peanuts and dairy in its standard form, and some toppings introduce additional allergens.
Keep the portions chilled when transporting. An insulated cooler with ice packs is more appropriate than leaving dairy desserts in a warm car.
Storage and Freezing
Keep covered at 40°F or below and use within three to four days, subject to ingredient freshness. The supplied five-day instruction is longer than the conservative storage window used here for an untested mixed dairy dessert.
Refrigerate promptly and keep room-temperature exposure within two hours, or one hour when the surroundings exceed 90°F. Follow USDA leftover handling guidance.
Use clean spoons and avoid returning partly eaten portions to a shared container. Keep lids closed so the cups do not absorb refrigerator odors.
Freezing is not recommended when the goal is a smooth refrigerated mousse. Yogurt and cottage cheese can separate or become grainy after thawing. A frozen serving is a different texture, and this formula has not been tested as a frozen dessert.
Variations
Chocolate filling: Try chocolate protein powder for a stronger chocolate note. Its sweetness and thickening behavior may differ, so adjust carefully.
Coconut ganache: The supplied alternative is full-fat canned coconut milk. Stir the can thoroughly before measuring. It can produce a different flavor and consistency from heavy cream; the exact ganache texture is not guaranteed.
Simpler garnish: Omit the candy pieces and finish with a few chopped peanuts. This reduces added decoration but does not automatically make the dessert sugar-free.
Smaller portions: Divide into ten cups rather than eight for a lighter serving. Use the actual yield when calculating nutrition.
Cottage cheese base: Blend low-fat cottage cheese completely smooth as discussed above. Check salt and moisture before adding almond milk.
Troubleshooting
The filling is chalky
The protein powder may be unpleasant in a no-bake recipe, the measured amount may be too high, or the powders may need more time to hydrate. Add only a small amount of milk after resting. More blending does not always remove a protein powder’s inherent texture.
The filling is too thin
The yogurt may be thin or too much milk or syrup may have been added. Chill briefly and reassess before adding more dry ingredients. Start with thicker yogurt next time.
The filling is too stiff
Add milk by the teaspoon. Casein and powdered peanut butter can continue absorbing moisture, so adjust gradually instead of immediately adding several tablespoons.
The chocolate layer is grainy
The chips may not be suitable for ganache, or the mixture may have overheated. Use gentle heat and a small product trial. Sugar-free formulations do not all behave like standard dark chocolate.
The topping is too hard
The chocolate formulation or layer thickness may be responsible. Make a thinner layer next time. Let a serving stand briefly before eating if desired, without leaving the batch out for an extended period.
The cups do not look full
The suggested container capacity is larger than the actual portion volume. A partially filled cup is preferable to assuming this batch will fill every five-to-six-ounce container three-quarters full. Use smaller containers for a fuller presentation if desired.
Frequently Asked Questions
Is cream cheese required?
No. It appears in the supplied introduction as a possible dairy ingredient but is not part of the measured formula. The primary version uses Greek yogurt, with blended cottage cheese as an alternative.
Can I use only natural peanut butter?
Omitting powdered peanut butter changes flavor, protein, and moisture absorption. It is not a direct substitution without reformulating the filling.
Are these sugar-free?
Not automatically. Yogurt contains naturally occurring milk sugar, and the garnish may include regular candy. Sugar-free chips and syrup do not make every ingredient sugar-free.
How much protein is in each cup?
It depends on the labels and whether the batch makes eight or ten servings. A rough ingredient-based estimate may be around 18–24 grams per one-eighth portion, before some optional garnishes. Ten portions contain proportionately less. Calculate using your actual yogurt, peanut products, powder, and chocolate for precision.
What about calories?
With peanut butter, chocolate, cream, and the listed garnishes, a one-eighth portion can be a substantial dessert, potentially around 350–450 calories depending on products and topping use. This is an illustrative range, not a verified panel. Omitting candy or dividing into ten changes the result.
Print
High-Protein Reese’s-Style Chocolate Peanut Butter Mousse Cups
Description
- Prep: Approximately 20–25 minutes
- Initial filling chill: About 15 minutes, overlapping ganache preparation
- Final chill: At least 45–60 minutes, longer as needed
- Total: Approximately 1 hour 15 minutes to 1 hour 30 minutes or more
- Yield: 8 generous or 10 smaller cups
- Method: No-bake, refrigerated
Ingredients
Peanut Butter Protein Filling
- 2 cups plain nonfat Greek yogurt
- 1/2 cup creamy natural peanut butter, stirred until evenly combined
- 1/2 cup powdered peanut butter, such as PB2
- 2 scoops vanilla or peanut butter protein powder, approximately 60 grams total; use the label weight rather than assuming all scoops match
- Up to 3 tablespoons sugar-free maple-style syrup or a suitable powdered sweetener, adjusted to taste
- 1 1/2 teaspoons vanilla extract
- Up to 1/4 teaspoon salt, depending on the peanut products
- 2–3 tablespoons unsweetened almond milk, only as needed
Chocolate Ganache
- 3/4 cup sugar-free dark chocolate chips suitable for melting
- 1/3 cup heavy cream
- 1 teaspoon coconut oil
Optional Garnish
- 2 tablespoons creamy peanut butter, gently warmed until drizzleable
- 6 mini peanut butter cups, chopped
- 1/3 cup chopped roasted salted peanuts
- A little flaky sea salt
Suggested yield: Start with eight small dessert cups and keep two more available. The batch can be divided into eight generous or ten smaller servings, depending on the actual mixed volume.
Five-to-six-ounce containers provide room for the dessert and a lid. This ingredient quantity does not necessarily fill eight to ten containers three-quarters full. Divide the filling evenly and leave space for the ganache rather than targeting a fixed fill line.
Instructions
1. Arrange the containers
Place eight small cups on a tray and keep two extra nearby. The tray makes it easier to move the assembled desserts without tipping them.
Choose cups with lids if you plan to store individual portions. Do not fill them so high that a lid presses into the garnish.
2. Smooth the dairy and peanut butter
Beat the Greek yogurt and stirred peanut butter until evenly combined. Add the vanilla and a small initial amount of sweetener and salt.
Mix until no large peanut butter streaks remain. Scrape the bowl so the mixture is uniform from top to bottom.
If using cottage cheese, blend it smooth first, then incorporate the peanut butter and remaining flavorings. Beating visible curds briefly in a bowl is less likely to produce a silky result.
3. Add the powders gradually
Sift or break up lumps in the protein powder and powdered peanut butter. Add them in several portions, mixing on low at first so the powders do not scatter.
Increase the speed only as needed to combine. Scrape the bowl and check for dry pockets.
There is no need to beat indefinitely in pursuit of a whipped-cream texture. Once smooth, give the mixture a few minutes to hydrate before deciding how much milk it needs.
4. Adjust the consistency
Add almond milk one teaspoon at a time, mixing after each addition. The listed two to three tablespoons are an allowance, not an amount that must all be used.
Aim for a thick mixture that mounds on a spoon but spreads without tearing. It should not pour like a smoothie or feel like a dry paste.
Taste and adjust the sweetener. If using casein-rich powder, allow another brief rest because it may continue thickening.
5. Divide and chill
Divide the filling evenly among the cups. If the portions look too large for your preference, spread the batch across ten cups instead of eight.
Smooth the tops gently and leave room for a thin chocolate layer. Refrigerate for about fifteen minutes while preparing ganache.
This short chill firms the surface slightly but is not the full setting period.
6. Heat the cream
Warm the heavy cream until hot and steaming but not vigorously boiling. Pour it over the chocolate chips and coconut oil in a heatproof bowl.
Let stand about two minutes so the chocolate softens. Stir slowly from the center outward until the mixture becomes smooth.
If unmelted pieces remain, use very short microwave bursts or a gentle warm-water bath suitable for the bowl, stirring between intervals. Avoid overheating and keep stray water out of the chocolate mixture.
7. Let the ganache cool slightly
Allow the ganache to become lukewarm and still fluid before spooning it over the chilled filling.
Very hot ganache can soften the dairy surface and is unnecessary for assembly. Ganache that has cooled too far may need gentle warming before it spreads.
The mixture should flow slowly from the spoon. A grainy or oily mixture may reflect overheating or the chocolate formulation; more oil is not automatically the solution.
8. Add a thin chocolate layer
Divide the ganache across the cups rather than assuming a fixed tablespoon amount will match every yield. Begin with a small spoonful on each and distribute the remainder.
Tilt gently or use the back of a spoon to cover the surface. Keep the layer thin enough to cut easily with a spoon once chilled.
Eight servings receive more topping per cup than ten. Record the final serving count if you plan to calculate nutrition.
9. Garnish thoughtfully
Warm the optional peanut butter just enough to drizzle, then add a small zigzag over the chocolate. It should be fluid, not hot.
Add a modest amount of chopped peanuts or candy. Save some crunchy garnish for serving day if the cups will be refrigerated overnight.
Salted peanuts and peanut butter cups already provide seasoning, so flaky salt is optional. A tiny pinch is usually enough.
10. Chill and cover
Refrigerate until the ganache is set to your preference and the filling is cold. Start checking after 45–60 minutes, recognizing that a firmer result may take longer with some chocolate products.
Once the topping is no longer warm and the decorations are stable, cover the cups. Do not leave them uncovered in the refrigerator for days, where they can absorb odors and dry at the surface.
Serve chilled with a spoon. The ganache may be fudgy, soft, or firmer depending on the chocolate, rather than a guaranteed identical shell in every batch.