
High-Protein Chocolate Fudge Swirl Greek Yogurt Cups
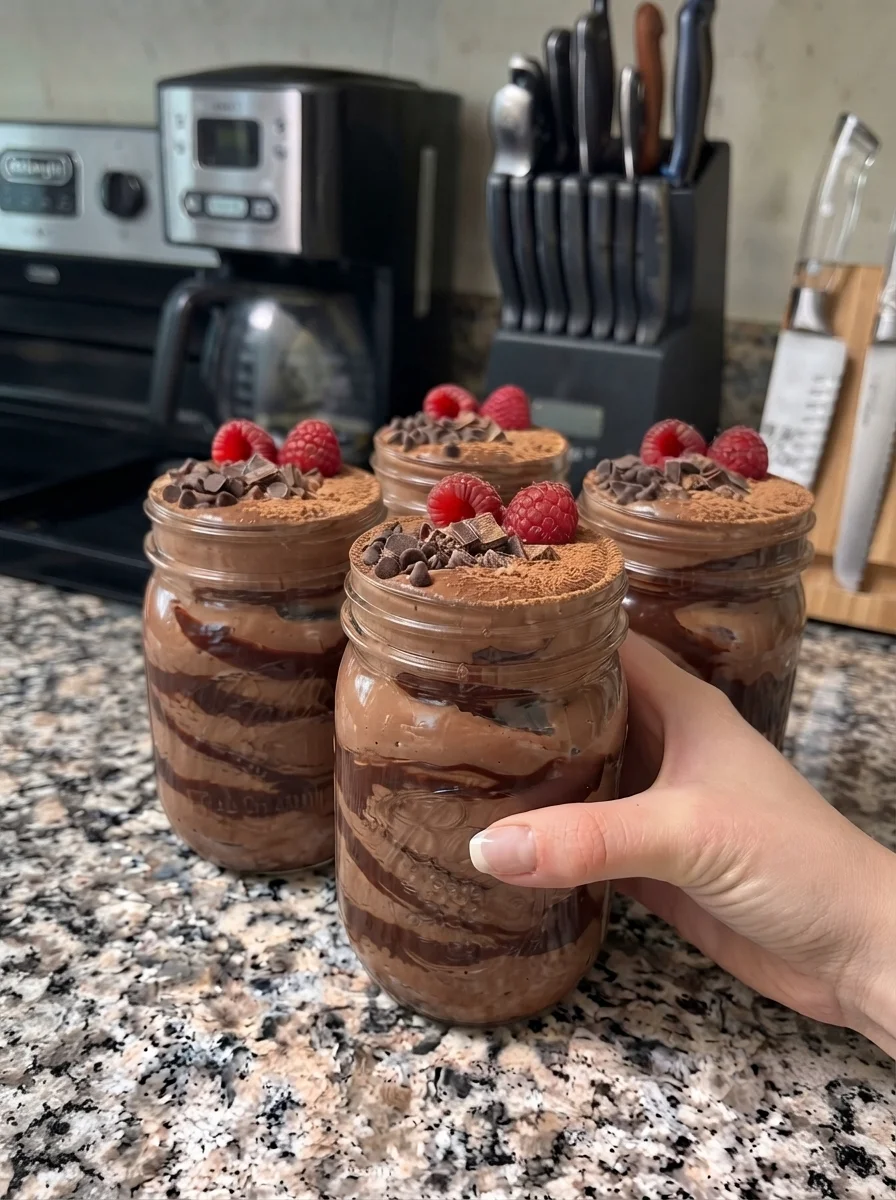
High-Protein Chocolate Fudge Swirl Greek Yogurt Cups combine a tangy chocolate yogurt filling with rich ribbons of melted chocolate and nut butter. Cocoa deepens the flavor, protein powder adds body, and a little vanilla rounds out the sweetness. The finished dessert is thick enough to eat with a spoon, with a darker chocolate contrast running through each serving.
There is no oven step, and the cups are easy to portion into small jars or ramekins. Mix the base, prepare a small chocolate swirl, and chill until everything is cold and the ribbons have firmed. A few raspberries or a dusting of cocoa are enough to finish them.
The texture is closer to a dense chocolate yogurt dessert than an aerated mousse or a sliceable cheesecake. The recipe contains no cream cheese, whipped cream, or gelatin. Its richness comes from thick yogurt, cocoa, and the chocolate-nut-butter swirl.
This article expands the supplied recipe with preparation and troubleshooting guidance. It has not been independently kitchen-tested. Yogurt, protein powder, and sugar-free chocolate differ substantially, so use the consistency checks rather than expecting every brand to behave identically.
What to Expect
The base should be smooth, creamy, and lightly tangy, with a chocolate flavor influenced by the protein powder. A thick strained Greek yogurt provides the best starting point for a spoon dessert that does not become watery.
The swirl is a small amount of chocolate mixed with nut butter and coconut oil. It can firm into soft or slightly crisp ribbons when it contacts cold yogurt. Its exact texture depends on the chocolate formulation, temperature, and amount of milk added.
The word fudge describes the rich chocolate effect, not a traditional cooked fudge made by controlling sugar crystallization. These cups are refrigerated rather than frozen, and the recipe is not intended to produce a frozen candy that can be unmolded.
Chilling helps the powders hydrate and the chocolate settle. It does not guarantee that a thin yogurt mixture will become a firm cheesecake filling, so start with the right consistency before assembling.
Ingredients
Chocolate Greek Yogurt Base
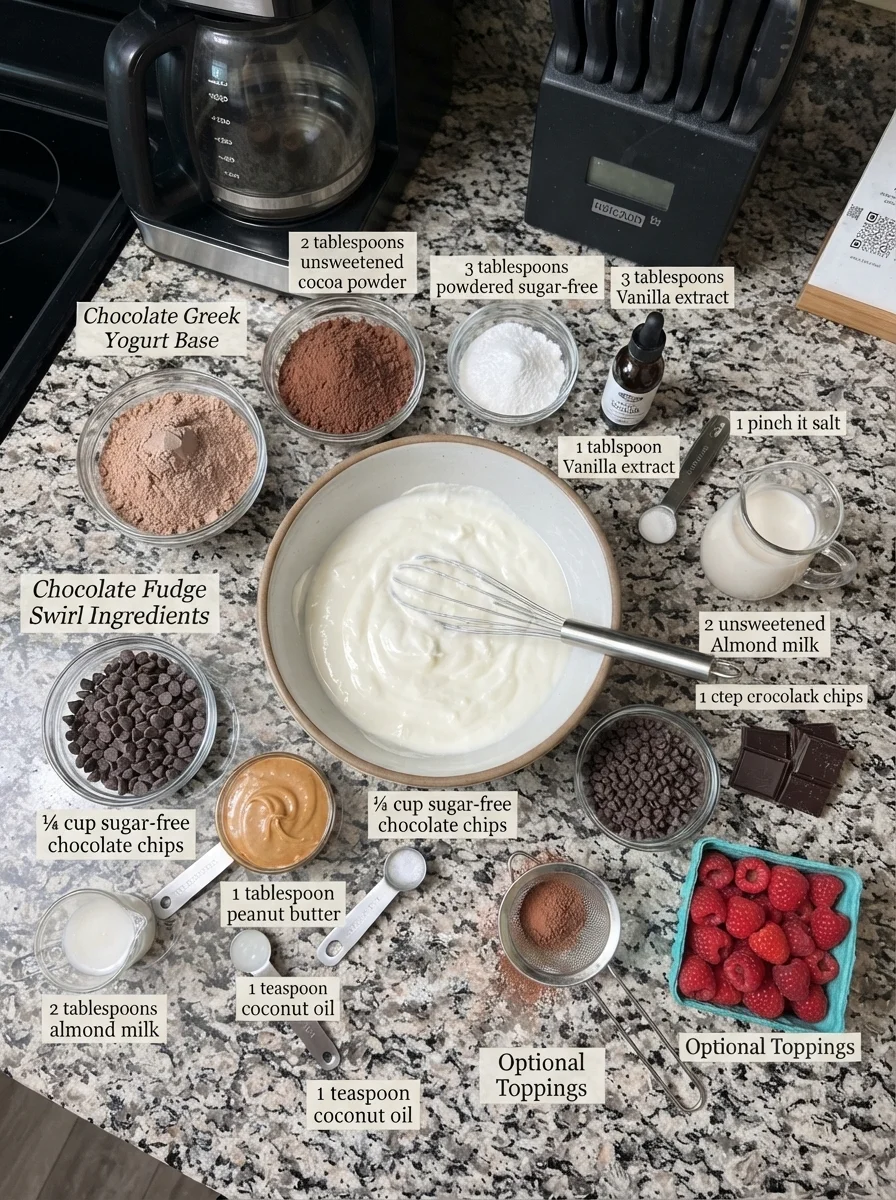
- 2 cups plain nonfat Greek yogurt, thick and strained
- 1 scoop chocolate protein powder, approximately 30 grams according to the label
- 2 tablespoons unsweetened cocoa powder
- Up to 3 tablespoons powdered sugar-free sweetener, adjusted to taste and product strength
- 1 teaspoon vanilla extract
- Up to 2 tablespoons unsweetened almond milk, only as needed
- A small pinch of salt
Chocolate Swirl
- 1/4 cup sugar-free chocolate chips suitable for melting
- 1 tablespoon creamy peanut butter or almond butter, stirred smooth
- 1 teaspoon coconut oil
- Up to 1 tablespoon unsweetened almond milk, warmed, optional for adjusting the swirl
Optional Toppings
- 1 tablespoon mini chocolate chips, divided among the cups
- 1 tablespoon chopped dark chocolate, divided among the cups
- A light dusting of cocoa powder
- A few washed and dried fresh raspberries
Yield: Four spoon-served dessert cups. Containers holding approximately five to six ounces provide useful room for the filling and a lid, but the finished volume varies.
The almond milk allowances are separate: up to two tablespoons for the yogurt and up to one tablespoon for the swirl. Neither amount must be used in full.
Ingredient Notes
Thick Greek yogurt is the foundation
Choose plain, unsweetened Greek yogurt that holds a soft mound on a spoon. Pour off visible surface whey before measuring, then stir the yogurt until even.
Ordinary unstrained yogurt is often too thin for the same formula. Trying to compensate with large amounts of protein powder can make the dessert excessively sweet, chalky, or stiff.
If you need to strain a thinner yogurt, do so under refrigeration before measuring the final quantity. The resulting yield and protein content depend on the product.
Nonfat yogurt is the reference ingredient. Full-fat Greek yogurt can produce a richer result, but calories and consistency will change. Avoid automatically adding milk until you have mixed the base.
Protein powder affects sweetness and thickness
A scoop is not a standardized weight. Use the serving information on the package to measure approximately 30 grams.
Whey, casein, and blended powders do not absorb liquid in the same way. Casein-rich products can continue thickening after mixing, while some whey products produce a looser mixture. Plant protein powders can have a more pronounced texture and have not been tested here.
Use a powder you enjoy in a no-bake preparation. Cocoa and vanilla can complement its flavor, but they cannot reliably hide an unpleasant aftertaste.
Cocoa should be free of lumps
Unsweetened cocoa adds concentrated chocolate flavor without relying only on the powder. Sift or break up clumps before mixing.
Natural and Dutch-process cocoa have different flavor profiles. Either can be tried in this no-bake base, since there is no baking-soda reaction to balance, but the taste and color will differ.
An extra teaspoon is an optional way to deepen chocolate flavor, not a required addition. More cocoa also absorbs moisture and can increase bitterness.
Sweeteners are not interchangeable by volume
A powdered sweetener can dissolve more smoothly than a coarse granular product, but brands differ in concentration. Some are designed as sugar replacements by volume; others are far more concentrated.
Begin with less than the listed maximum if the protein powder is already sweet. Taste after mixing and add gradually.
Powdered erythritol may leave a cooling sensation. Liquid sweeteners add moisture, so using one instead of powder may reduce or eliminate the need for almond milk.
Nut butter helps soften the chocolate
Creamy peanut butter gives a peanut-butter-cup note, while almond butter offers a different nutty flavor. Stir natural nut butter thoroughly before measuring so the oil and solids are evenly combined.
Use smooth nut butter for the most even ribbons. Crunchy versions introduce pieces that can interrupt a thin swirl, though they may be enjoyable as a separate variation.
Check the ingredients if serving someone with allergies. Almond milk, almond butter, and peanut butter are distinct allergen considerations rather than automatically interchangeable choices for every guest.
Sugar-free chips require a small trial
Sugar-free chocolate chips vary in sweeteners, fat composition, and melting behavior. Choose a product labeled suitable for melting and follow any relevant package guidance.
The coconut oil loosens the chocolate and changes how it firms when chilled. It does not guarantee a silky result from every chip formulation.
Regular dark chocolate can be used as a flavor variation, but it changes the sugar and nutrition profile. Even with sugar-free chips, the whole dessert is not automatically sugar-free because yogurt contains milk sugar and toppings may contain added sugar.
Equipment
Use a mixing bowl, whisk or flexible spatula, a small microwave-safe bowl, measuring spoons, and four food-safe dessert containers. A fine sieve helps with cocoa and protein-powder lumps.
A hand mixer is optional. The base does not need aggressive whipping; careful stirring is usually enough if the ingredients are smooth.
Use a toothpick, small skewer, or narrow utensil to create the swirl. A broad spoon can mix the two components too completely if you want distinct ribbons.
Have the cups ready before melting the chocolate. The swirl becomes harder to distribute as it cools, especially once it touches chilled yogurt.
How to Make the Cups
1. Smooth the yogurt
Place the measured Greek yogurt in a bowl and whisk briefly until smooth. Break up any lumps without adding milk yet.
If there is a visible puddle of whey in the container, pour that away before measuring. The aim is a thick base, not a mixture that needs extensive thickening later.
2. Combine the dry flavorings
Sift or stir the protein powder and cocoa together to remove clumps. Add them to the yogurt in portions, mixing and scraping the bowl between additions.
Add the vanilla, a small pinch of salt, and an initial amount of sweetener. Stir until the chocolate color is even and no dry pockets remain at the bottom.
Avoid adding the full sweetener amount before tasting, particularly with a strongly sweetened protein powder.
3. Let the base hydrate
Allow the mixture to stand for about three to five minutes. This gives the powders time to absorb moisture and makes the final adjustment easier to judge.
Stir again and assess. A base that looked slightly loose at first may now be thick enough without almond milk.
This short rest is for texture, not a required setting process. Keep the preparation moving rather than leaving dairy on the counter for a long period.
4. Adjust by the teaspoon
If the base is too stiff to stir or spoon comfortably, add almond milk one teaspoon at a time. Mix after each addition.
Aim for a thick, smooth filling that forms a soft mound. It should spread into the cups without pouring like a drink.
Taste with a clean spoon and adjust the sweetness. If the base is too thin, chill briefly before making large changes; do not repeatedly add protein powder without considering its flavor and sweetness.
5. Portion the base
Divide the mixture evenly among four cups. Smooth gently, leaving room above for the chocolate and any toppings.
For more visible internal ribbons, hold back a little base in the bowl. You can alternate a thin drizzle of chocolate with a second small spoonful of yogurt rather than keeping the entire swirl only on top.
There is no requirement to fill a container to a particular level. The ingredient quantity determines the portion, and cup capacity simply provides room to serve it.
6. Melt the chocolate mixture gently
Combine the chocolate chips, nut butter, and coconut oil in a microwave-safe bowl. Heat in 15-second bursts, stirring thoroughly between each.
Stop heating when a few small pieces remain and stir until they melt in the residual heat. This is gentler than continuing until every chip looks liquid in the microwave.
If the package recommends a different melting method, follow that guidance. Avoid scorching, which can create a thick or grainy mixture that more heat will not repair.
7. Decide whether milk is needed
The melted chocolate, nut butter, and coconut oil may already be fluid enough for thin ribbons. If so, omit the swirl milk.
Adding a small amount of water-based liquid to melted chocolate can cause it to thicken or seize, especially when the liquid is cold. The supplied tablespoon of almond milk is therefore an optional adjustment, not a guaranteed route to a glossy sauce.
If trying it, warm the milk first and stir it in gradually while the chocolate is warm, following the chocolate product’s guidance. Expect the texture to change. If the mixture becomes a thick paste, stop and assess rather than repeatedly overheating it or pouring in unmeasured milk.
For a first batch, using the milk-free chocolate-nut-butter mixture is the simpler starting point when it already drizzles comfortably.
8. Cool to lukewarm
Let the melted mixture cool slightly until it is no longer hot but remains workable. This reduces the chance of warming the yogurt surface excessively.
Do not wait until it is cold and firm. If it thickens before assembly, warm briefly and stir again.
The cooler yogurt will begin setting the chocolate on contact, so work one cup at a time.
9. Create the ribbons
Drizzle a small amount over each portion. Use a toothpick or narrow utensil to make a few gentle passes through the chocolate and yogurt.
Stop while distinct ribbons remain. Extensive stirring produces a uniform chocolate filling rather than a visible swirl.
For layered cups, add a little reserved yogurt over an initial drizzle, then finish with another small drizzle. Keep the total chocolate divided evenly across all four servings.
10. Chill and garnish
Cover the cups and refrigerate for one to two hours, or until cold and the swirl has firmed to your liking. Two hours is a useful planning target rather than a guarantee of a sliceable set.
Add optional chocolate pieces or cocoa before serving. Wash and dry raspberries and add them close to eating to reduce extra moisture on the surface.
Serve straight from the refrigerator with a spoon. A brief stand of a few minutes can soften firmer chocolate ribbons, but keep the rest of the batch chilled.
Tips for a Creamy Base
Choose the yogurt carefully. Thick strained yogurt has more effect on the starting texture than prolonged whisking.
Break up powder clumps before adding them. Dry pockets can remain hidden in an otherwise smooth-looking bowl.
Give the powders a few minutes to hydrate before adding milk. This is especially useful with casein-rich blends.
Use small liquid adjustments. A teaspoon can improve spoonability without turning the base runny.
Do not expect aeration simply because the recipe is called a cup dessert. The intended result is creamy and substantial, with no separate whipped foam.
Tips for a Distinct Swirl
Use thin drizzles rather than a thick chocolate cap if you want ribbons throughout the filling. A heavy top layer can become difficult to break with a spoon.
Keep the melted chocolate lukewarm and the yogurt cool. The temperature difference helps the chocolate hold a visible pattern, but it also means you need to swirl promptly.
Make only a few passes with the utensil. More motion usually blurs the pattern rather than improving it.
Accept some variation in firmness. Sugar-free chips and nut butter can produce a softer fudge-like ribbon or a slightly snappier streak. Neither is guaranteed to match every product photograph.
Make-Ahead and Serving
Prepare all four cups at once and refrigerate them covered. Add crunchy or fresh toppings near serving for the best appearance.
For an afternoon snack, keep the garnish minimal. For dessert, add a raspberry or a little chopped dark chocolate. The base is already chocolate-flavored, so a large amount of additional topping is not necessary.
Small clear jars show the swirl, but ordinary ramekins are equally useful. Choose containers with lids if transporting the cups.
Carry the desserts in an insulated bag with ice packs and refrigerate on arrival. A dairy cup should not remain in a warm car simply because the chocolate has set.
Storage Information
Keep covered in the refrigerator at 40°F or below and use within three to four days, subject to ingredient freshness and clean handling.
Do not leave the cups at room temperature for more than two hours, or one hour when the surroundings exceed 90°F. Follow USDA leftover handling guidance.
Use a clean spoon for each portion. If a little whey separates, stir gently when serving, understanding that stirring may blend the decorative swirl into the base.
Freezing is not recommended for the intended creamy refrigerated texture. Greek yogurt can become grainy or release liquid after thawing. A frozen version would be a separate texture adaptation rather than the same dessert after storage.
Store raspberries and other moist toppings separately until serving when possible. This helps keep the surface neat and reduces extra liquid.
Variations
Peanut butter cup flavor: Choose peanut butter for the swirl and add a few chopped peanuts before serving. Include them in the nutrition calculation.
Almond version: Use almond butter and a small amount of chopped toasted almonds. This is a different nut flavor, not an allergy-free variation.
Deeper cocoa: Add one extra teaspoon cocoa to the base if desired. Taste before adding more because cocoa can increase bitterness and thickness.
Espresso accent: Add a tiny pinch of instant espresso powder to the warm swirl or base for a stronger chocolate impression. It introduces caffeine and should be optional.
Regular dark chocolate: Use a meltable dark chocolate you enjoy if sugar-free chips are not important to you. The sugar content and setting behavior change.
Troubleshooting
The filling tastes chalky
The protein powder may not suit a no-bake recipe, or the mixture may need a brief hydration rest. Add a little milk only after assessing. More cocoa or sweetener does not necessarily hide an unpleasant protein texture.
The base is too runny
The yogurt may have been thin or too much milk may have been added. Chill briefly and reassess. Start with thicker yogurt next time rather than compensating with a large amount of extra powder.
The swirl thickened after adding milk
Water-based liquid can change melted chocolate abruptly, especially in small amounts. Use the milk-free version if it already drizzles well, or follow a tested sauce method for your chocolate product. Do not assume more heat alone will fix a seized mixture.
The chocolate forms hard pieces
It may have cooled before swirling or been added in thick dollops. Use thin drizzles and swirl promptly. A short stand before eating may soften the nut-butter-containing streaks slightly.
The swirl disappeared
The two mixtures were stirred together too thoroughly. Use a few shallow passes or create alternating small layers instead.
Frequently Asked Questions
Is this cheesecake?
It is cheesecake-inspired in its tangy, creamy character, but it contains no cream cheese and is not baked or stabilized as a cheesecake.
Can I use cottage cheese?
That would be a separate adaptation requiring thorough blending and a moisture assessment. The stated formula uses Greek yogurt, so an equal-volume substitution is not guaranteed to produce the same result.
Can I omit the protein powder?
The flavor, sweetness, protein content, and thickness would change. It may still be an enjoyable yogurt dessert, but it is not the same measured formula.
Are these sugar-free or keto?
Not automatically. Yogurt contains naturally occurring milk sugar, and toppings can add sugar. Carbohydrate totals depend on product labels and serving size. Sugar-free chips alone do not establish a keto serving.
What is the estimated protein?
Two cups of yogurt providing about 15–18 grams per three-quarter cup contribute roughly 40–48 grams protein to the batch. A typical scoop adds about 20–25 grams, with a little more from cocoa and nut butter. Dividing into four generally suggests around 16–20 grams per cup, rather than assuming the supplied 24 grams is achieved by every brand.
What are the estimated calories?
Approximately 180–230 calories per cup may be plausible before generous optional toppings, depending especially on the yogurt, powder, and sugar-free chocolate. This is an illustrative range, not a verified nutrition panel. Use the actual labels and the amount of swirl consumed for a precise calculation.
Print
High-Protein Chocolate Fudge Swirl Greek Yogurt Cups
Description
- Prep time: Approximately 15–20 minutes
- Chill time: 1–2 hours
- Total time: Approximately 1 hour 15 minutes to 2 hours 20 minutes
- Servings: 4 cups
- Method: No oven; microwave melting and refrigeration
Ingredients
Chocolate Greek Yogurt Base
- 2 cups plain nonfat Greek yogurt, thick and strained
- 1 scoop chocolate protein powder, approximately 30 grams according to the label
- 2 tablespoons unsweetened cocoa powder
- Up to 3 tablespoons powdered sugar-free sweetener, adjusted to taste and product strength
- 1 teaspoon vanilla extract
- Up to 2 tablespoons unsweetened almond milk, only as needed
- A small pinch of salt
Chocolate Swirl
- 1/4 cup sugar-free chocolate chips suitable for melting
- 1 tablespoon creamy peanut butter or almond butter, stirred smooth
- 1 teaspoon coconut oil
- Up to 1 tablespoon unsweetened almond milk, warmed, optional for adjusting the swirl
Optional Toppings
- 1 tablespoon mini chocolate chips, divided among the cups
- 1 tablespoon chopped dark chocolate, divided among the cups
- A light dusting of cocoa powder
- A few washed and dried fresh raspberries
Yield: Four spoon-served dessert cups. Containers holding approximately five to six ounces provide useful room for the filling and a lid, but the finished volume varies.
The almond milk allowances are separate: up to two tablespoons for the yogurt and up to one tablespoon for the swirl. Neither amount must be used in full.
Instructions
1. Smooth the yogurt
Place the measured Greek yogurt in a bowl and whisk briefly until smooth. Break up any lumps without adding milk yet.
If there is a visible puddle of whey in the container, pour that away before measuring. The aim is a thick base, not a mixture that needs extensive thickening later.
2. Combine the dry flavorings
Sift or stir the protein powder and cocoa together to remove clumps. Add them to the yogurt in portions, mixing and scraping the bowl between additions.
Add the vanilla, a small pinch of salt, and an initial amount of sweetener. Stir until the chocolate color is even and no dry pockets remain at the bottom.
Avoid adding the full sweetener amount before tasting, particularly with a strongly sweetened protein powder.
3. Let the base hydrate
Allow the mixture to stand for about three to five minutes. This gives the powders time to absorb moisture and makes the final adjustment easier to judge.
Stir again and assess. A base that looked slightly loose at first may now be thick enough without almond milk.
This short rest is for texture, not a required setting process. Keep the preparation moving rather than leaving dairy on the counter for a long period.
4. Adjust by the teaspoon
If the base is too stiff to stir or spoon comfortably, add almond milk one teaspoon at a time. Mix after each addition.
Aim for a thick, smooth filling that forms a soft mound. It should spread into the cups without pouring like a drink.
Taste with a clean spoon and adjust the sweetness. If the base is too thin, chill briefly before making large changes; do not repeatedly add protein powder without considering its flavor and sweetness.
5. Portion the base
Divide the mixture evenly among four cups. Smooth gently, leaving room above for the chocolate and any toppings.
For more visible internal ribbons, hold back a little base in the bowl. You can alternate a thin drizzle of chocolate with a second small spoonful of yogurt rather than keeping the entire swirl only on top.
There is no requirement to fill a container to a particular level. The ingredient quantity determines the portion, and cup capacity simply provides room to serve it.
6. Melt the chocolate mixture gently
Combine the chocolate chips, nut butter, and coconut oil in a microwave-safe bowl. Heat in 15-second bursts, stirring thoroughly between each.
Stop heating when a few small pieces remain and stir until they melt in the residual heat. This is gentler than continuing until every chip looks liquid in the microwave.
If the package recommends a different melting method, follow that guidance. Avoid scorching, which can create a thick or grainy mixture that more heat will not repair.
7. Decide whether milk is needed
The melted chocolate, nut butter, and coconut oil may already be fluid enough for thin ribbons. If so, omit the swirl milk.
Adding a small amount of water-based liquid to melted chocolate can cause it to thicken or seize, especially when the liquid is cold. The supplied tablespoon of almond milk is therefore an optional adjustment, not a guaranteed route to a glossy sauce.
If trying it, warm the milk first and stir it in gradually while the chocolate is warm, following the chocolate product’s guidance. Expect the texture to change. If the mixture becomes a thick paste, stop and assess rather than repeatedly overheating it or pouring in unmeasured milk.
For a first batch, using the milk-free chocolate-nut-butter mixture is the simpler starting point when it already drizzles comfortably.
8. Cool to lukewarm
Let the melted mixture cool slightly until it is no longer hot but remains workable. This reduces the chance of warming the yogurt surface excessively.
Do not wait until it is cold and firm. If it thickens before assembly, warm briefly and stir again.
The cooler yogurt will begin setting the chocolate on contact, so work one cup at a time.
9. Create the ribbons
Drizzle a small amount over each portion. Use a toothpick or narrow utensil to make a few gentle passes through the chocolate and yogurt.
Stop while distinct ribbons remain. Extensive stirring produces a uniform chocolate filling rather than a visible swirl.
For layered cups, add a little reserved yogurt over an initial drizzle, then finish with another small drizzle. Keep the total chocolate divided evenly across all four servings.
10. Chill and garnish
Cover the cups and refrigerate for one to two hours, or until cold and the swirl has firmed to your liking. Two hours is a useful planning target rather than a guarantee of a sliceable set.
Add optional chocolate pieces or cocoa before serving. Wash and dry raspberries and add them close to eating to reduce extra moisture on the surface.
Serve straight from the refrigerator with a spoon. A brief stand of a few minutes can soften firmer chocolate ribbons, but keep the rest of the batch chilled.