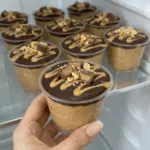
Description
- Prep: Approximately 20–25 minutes
- Initial filling chill: About 15 minutes, overlapping ganache preparation
- Final chill: At least 45–60 minutes, longer as needed
- Total: Approximately 1 hour 15 minutes to 1 hour 30 minutes or more
- Yield: 8 generous or 10 smaller cups
- Method: No-bake, refrigerated
Ingredients
Peanut Butter Protein Filling
- 2 cups plain nonfat Greek yogurt
- 1/2 cup creamy natural peanut butter, stirred until evenly combined
- 1/2 cup powdered peanut butter, such as PB2
- 2 scoops vanilla or peanut butter protein powder, approximately 60 grams total; use the label weight rather than assuming all scoops match
- Up to 3 tablespoons sugar-free maple-style syrup or a suitable powdered sweetener, adjusted to taste
- 1 1/2 teaspoons vanilla extract
- Up to 1/4 teaspoon salt, depending on the peanut products
- 2–3 tablespoons unsweetened almond milk, only as needed
Chocolate Ganache
- 3/4 cup sugar-free dark chocolate chips suitable for melting
- 1/3 cup heavy cream
- 1 teaspoon coconut oil
Optional Garnish
- 2 tablespoons creamy peanut butter, gently warmed until drizzleable
- 6 mini peanut butter cups, chopped
- 1/3 cup chopped roasted salted peanuts
- A little flaky sea salt
Suggested yield: Start with eight small dessert cups and keep two more available. The batch can be divided into eight generous or ten smaller servings, depending on the actual mixed volume.
Five-to-six-ounce containers provide room for the dessert and a lid. This ingredient quantity does not necessarily fill eight to ten containers three-quarters full. Divide the filling evenly and leave space for the ganache rather than targeting a fixed fill line.
Instructions
1. Arrange the containers
Place eight small cups on a tray and keep two extra nearby. The tray makes it easier to move the assembled desserts without tipping them.
Choose cups with lids if you plan to store individual portions. Do not fill them so high that a lid presses into the garnish.
2. Smooth the dairy and peanut butter
Beat the Greek yogurt and stirred peanut butter until evenly combined. Add the vanilla and a small initial amount of sweetener and salt.
Mix until no large peanut butter streaks remain. Scrape the bowl so the mixture is uniform from top to bottom.
If using cottage cheese, blend it smooth first, then incorporate the peanut butter and remaining flavorings. Beating visible curds briefly in a bowl is less likely to produce a silky result.
3. Add the powders gradually
Sift or break up lumps in the protein powder and powdered peanut butter. Add them in several portions, mixing on low at first so the powders do not scatter.
Increase the speed only as needed to combine. Scrape the bowl and check for dry pockets.
There is no need to beat indefinitely in pursuit of a whipped-cream texture. Once smooth, give the mixture a few minutes to hydrate before deciding how much milk it needs.
4. Adjust the consistency
Add almond milk one teaspoon at a time, mixing after each addition. The listed two to three tablespoons are an allowance, not an amount that must all be used.
Aim for a thick mixture that mounds on a spoon but spreads without tearing. It should not pour like a smoothie or feel like a dry paste.
Taste and adjust the sweetener. If using casein-rich powder, allow another brief rest because it may continue thickening.
5. Divide and chill
Divide the filling evenly among the cups. If the portions look too large for your preference, spread the batch across ten cups instead of eight.
Smooth the tops gently and leave room for a thin chocolate layer. Refrigerate for about fifteen minutes while preparing ganache.
This short chill firms the surface slightly but is not the full setting period.
6. Heat the cream
Warm the heavy cream until hot and steaming but not vigorously boiling. Pour it over the chocolate chips and coconut oil in a heatproof bowl.
Let stand about two minutes so the chocolate softens. Stir slowly from the center outward until the mixture becomes smooth.
If unmelted pieces remain, use very short microwave bursts or a gentle warm-water bath suitable for the bowl, stirring between intervals. Avoid overheating and keep stray water out of the chocolate mixture.
7. Let the ganache cool slightly
Allow the ganache to become lukewarm and still fluid before spooning it over the chilled filling.
Very hot ganache can soften the dairy surface and is unnecessary for assembly. Ganache that has cooled too far may need gentle warming before it spreads.
The mixture should flow slowly from the spoon. A grainy or oily mixture may reflect overheating or the chocolate formulation; more oil is not automatically the solution.
8. Add a thin chocolate layer
Divide the ganache across the cups rather than assuming a fixed tablespoon amount will match every yield. Begin with a small spoonful on each and distribute the remainder.
Tilt gently or use the back of a spoon to cover the surface. Keep the layer thin enough to cut easily with a spoon once chilled.
Eight servings receive more topping per cup than ten. Record the final serving count if you plan to calculate nutrition.
9. Garnish thoughtfully
Warm the optional peanut butter just enough to drizzle, then add a small zigzag over the chocolate. It should be fluid, not hot.
Add a modest amount of chopped peanuts or candy. Save some crunchy garnish for serving day if the cups will be refrigerated overnight.
Salted peanuts and peanut butter cups already provide seasoning, so flaky salt is optional. A tiny pinch is usually enough.
10. Chill and cover
Refrigerate until the ganache is set to your preference and the filling is cold. Start checking after 45–60 minutes, recognizing that a firmer result may take longer with some chocolate products.
Once the topping is no longer warm and the decorations are stable, cover the cups. Do not leave them uncovered in the refrigerator for days, where they can absorb odors and dry at the surface.
Serve chilled with a spoon. The ganache may be fudgy, soft, or firmer depending on the chocolate, rather than a guaranteed identical shell in every batch.