
Soft Christmas Peppermints

Soft Christmas Peppermints bring a little color and a refreshing finish to a holiday dessert tray. Made with butter, cream cheese, powdered sugar, and peppermint extract, these small candies have a creamy center and a gently firm surface after chilling. Red, green, and white portions make a festive assortment, while a simple fork impression gives each mint a familiar homemade look.
There is no boiling sugar, candy thermometer, or oven involved. You mix a soft dough, divide and color it if desired, shape small portions, and refrigerate until they are firm enough to handle. The process is straightforward, but a few details make a noticeable difference: use block cream cheese, keep the butter soft rather than melted, add the sugar gradually, and avoid adding too much liquid coloring.
These are cream cheese mints rather than hard peppermint candies. They should remain tender when you bite into them. Chilling makes them easier to arrange and package, but it does not turn them into shelf-stable candy. Keep the finished batch refrigerated and bring out small portions for serving.
The directions below expand the supplied recipe with ingredient guidance, texture cues, and practical storage advice. This version has not been independently kitchen-tested, and the precise sugar requirement, yield, and setting time may vary with your ingredients and portion size.
What to Expect
The flavor is sweet and buttery with a cool peppermint finish. Cream cheese adds a mild tang that balances the powdered sugar without making the candies taste like a strongly flavored cheesecake.
The texture is soft, dense, and smooth, with a slightly drier exterior after uncovered refrigerator time. These mints are not chewy like taffy, crisp like cookies, or glossy like hard candy. Small surface irregularities and shallow fork marks suit their handmade character.
You can make the entire batch white or divide it into Christmas colors. Coloring is decorative and optional; it does not change the basic preparation. A few marbled pieces can add variety without requiring a separate dough.
Recipe Overview
| Detail | Information |
|---|---|
| Preparation time | About 25–35 minutes, depending on shaping |
| Chilling time | Approximately 2–3 hours |
| Total time | About 2 hours 25 minutes to 3 hours 35 minutes |
| Cooking time | None |
| Yield | About 40–50 generously portioned mints, or more if shaped smaller |
| Main texture | Soft cream cheese candy with a lightly firm surface |
| Equipment | Mixer, mixing bowl, parchment-lined tray, fork |
| Storage | Refrigerated in an airtight container after setting |
The number of candies is a guide rather than a guarantee. A true ¾-inch ball may produce more than 50 pieces from this quantity of dough. Choose a consistent size and count the finished batch if you want accurate portions or nutrition estimates.
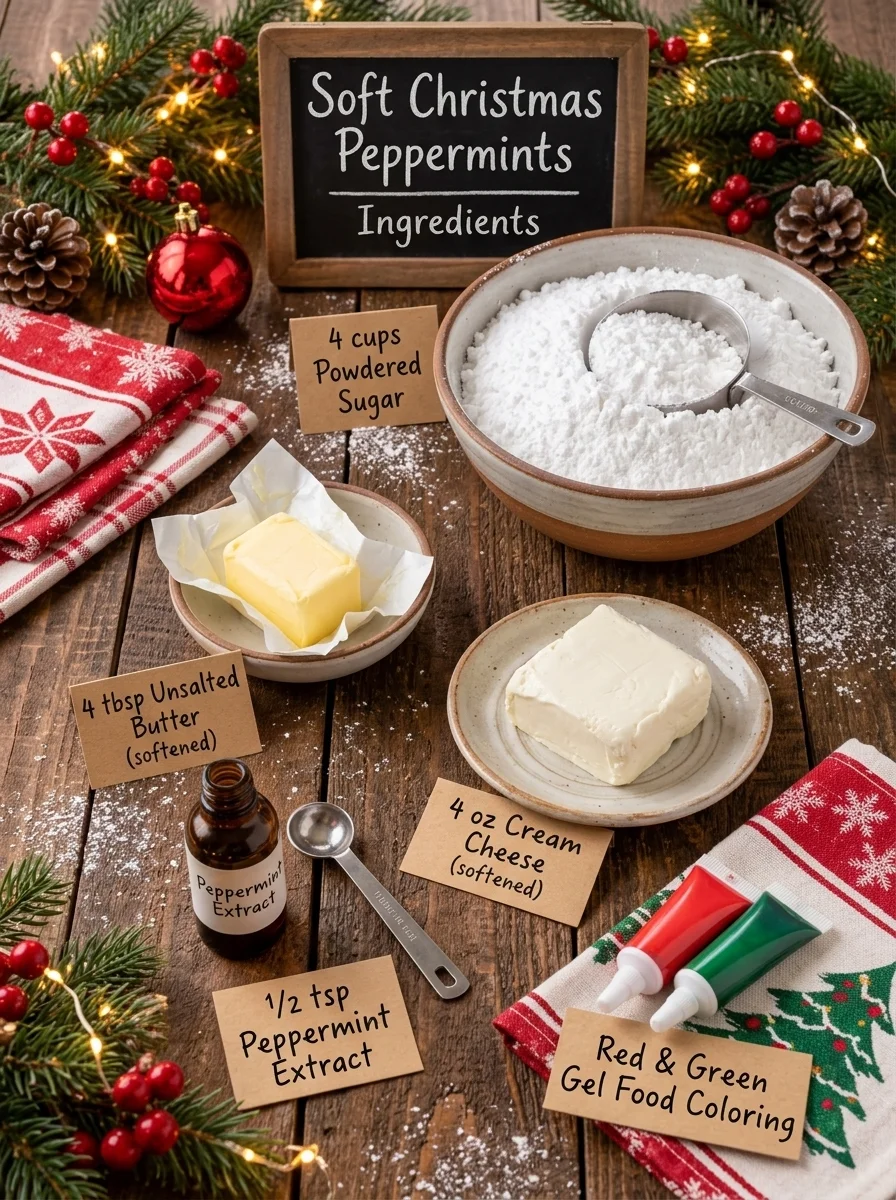
Ingredients
- 4 tablespoons unsalted butter, softened but not melted
- 4 ounces full-fat block cream cheese, softened
- 4 cups powdered sugar, plus a little extra only if needed
- ½ teaspoon peppermint extract
- Red gel food coloring, optional
- Green gel food coloring, optional
A little additional powdered sugar can also help prevent sticking while shaping. Use it sparingly so the finished mints retain a soft texture.
Butter
Unsalted butter provides richness and allows the peppermint flavor to remain clear. It should yield easily when pressed but still hold its shape. Butter that looks oily or partially melted can make the dough greasy and harder to shape.
Cut cold butter into small pieces to help it soften evenly. Avoid melting it and then trying to compensate with a large amount of sugar. If it becomes too warm, cool it until it returns to a soft, creamy consistency before mixing.
Cream cheese
Full-fat block cream cheese is the most predictable choice. Spreadable cream cheese from a tub can contain more moisture or have a different formulation, resulting in a looser dough.
Use plain cream cheese rather than a flavored spread. Let it soften enough to blend smoothly with the butter. Small cold lumps can remain noticeable in this uncooked mixture, so smooth the base thoroughly before adding sugar.
Reduced-fat products may behave differently. If you choose one, expect to adjust the texture and avoid assuming that the same amount of sugar will give an identical result.
Powdered sugar
Powdered sugar supplies sweetness and structure. Add it gradually so it incorporates evenly and does not create a cloud around the mixer.
If the sugar is visibly lumpy, sift it first. Break up any compacted lumps before adding them to the bowl. Once the dough becomes thick, a sturdy spatula or your hands may be easier to use than continuing to strain a small hand mixer.
The listed 4 cups are a starting formula, not a reason to add unlimited extra sugar. Warm ingredients can temporarily make a dough sticky. A short refrigerator rest may solve that problem without making the candies overly dry.
Peppermint extract
Use food-grade peppermint extract intended for baking. Peppermint oil, candy flavoring concentrates, and essential oils are not interchangeable with extract by volume.
Begin with the listed ½ teaspoon. Extract strengths vary, and a strong mint flavor can quickly overwhelm the butter and cream cheese. Taste a small amount after the sugar is incorporated, then add only a tiny additional amount if needed.
Spearmint extract gives a different flavor. Choose peppermint for the classic cool holiday mint character described here.
Gel food coloring
Gel coloring adds color with relatively little liquid. Begin with a small dab and work it into the dough thoroughly before adding more.
Very dark shades can require more coloring and may affect flavor or texture. Soft red and green shades are perfectly suitable; there is no need to force the dough into an extremely saturated color.
Use separate clean utensils for each color. Food-safe gloves can help prevent staining when kneading colored portions.
Equipment and Preparation
Set out a mixing bowl, electric hand mixer or stand mixer, flexible spatula, measuring cups and spoons, and a baking sheet lined with parchment paper. A fork makes shallow ridges, while a flat-bottomed glass creates smooth buttons.
Make enough space in the refrigerator for the tray before you start. The candies need to sit flat while firming. Keep them away from uncovered foods with strong aromas, since butter and cream cheese can pick up refrigerator odors.
If your refrigerator cannot hold a full baking sheet, use smaller trays or plates lined with parchment. Leave a little space between the candies so they do not stick together before their surfaces firm.
How to Make Soft Christmas Peppermints
1. Beat the butter and cream cheese
Place the softened butter and cream cheese in the mixing bowl. Beat until smooth and evenly combined, about 1–2 minutes. Stop and scrape the bottom and sides of the bowl, then mix again briefly.
Look for a uniform creamy base with no visible cream cheese lumps. This is the easiest stage to remove lumps; once the sugar makes the mixture stiff, they are harder to blend away.
You do not need to whip a large amount of air into the mixture. The goal is smoothness rather than a mousse-like texture.
2. Add the peppermint extract
Mix in ½ teaspoon peppermint extract until evenly distributed. Scrape the bowl again if necessary.
Adding the extract to the creamy base helps distribute its flavor before the dough becomes firm. Avoid pouring extra extract directly onto a finished colored portion, where it may be harder to incorporate evenly.
3. Incorporate the powdered sugar gradually
Add the powdered sugar about 1 cup at a time, mixing on low speed after each addition. Start slowly so the sugar stays in the bowl.
The mixture will change from creamy frosting to a thick dough. As resistance increases, stop the mixer and finish combining with a sturdy spatula or clean hands if needed. Do not force a small mixer through dough that is too stiff for it.
After the listed sugar is incorporated, pinch off a small piece and try rolling it. The dough should be soft and pliable, holding its shape with only minimal sticking.
If it feels very soft because the bowl or ingredients are warm, refrigerate for about 10–15 minutes before deciding whether it needs additional sugar. If it remains sticky after that short rest, knead in powdered sugar 1 tablespoon at a time.
Stop as soon as the dough is manageable. Extra sugar firms it, but too much can make the mints dry and crumbly.
4. Divide and color
Divide the dough into three roughly equal portions. Leave one white, add a small amount of red gel to another, and color the third green.
Knead each colored portion gently until the color is even. Work on parchment or another clean surface, and wash your hands or change gloves between colors to avoid muddy streaks.
Keep unused portions covered while shaping. If one portion becomes warm and sticky, place it in the refrigerator briefly while working with another.
5. Portion the candies
Take small, evenly sized pieces of dough and roll them into balls. The original recipe suggests balls about ¾ inch wide; you can use a small measuring spoon as a portioning aid if you prefer.
Consistent portions help the candies firm at a similar rate and make a platter look tidy. If you need a particular number for gift boxes, divide the dough into groups first, then portion each group equally.
Do not worry if your yield is higher than 40–50. Smaller pieces are often pleasant after a rich holiday meal, and the batch size depends directly on how much dough goes into each mint.
6. Flatten and decorate
Place the balls on the parchment-lined tray, leaving small gaps. Gently press each one with a fork to make shallow lines, or use the bottom of a glass for a smooth top.
If the fork sticks, touch it lightly to powdered sugar and tap off the excess. You need only a fine coating, not a thick layer of sugar over every candy.
Keep the mints thick enough to remain soft in the center. Very thin pieces can dry more quickly and may break when lifted.
For pillow-shaped candies, roll a portion of dough into a narrow rope and cut it into short segments. Handle the rope gently and chill it briefly if it begins to flatten or stick.
7. Chill until firm enough to handle
Place the tray uncovered in the refrigerator for approximately 2–3 hours, or until the candies lift cleanly and hold their shape. Keep the tray protected from drips and contact with other foods.
The refrigerator firms the butter and cream cheese and allows the exposed surface to dry slightly. An airtight container is for storage after this setting stage; sealing the candies immediately limits surface drying.
The centers should remain tender. Do not wait for them to become hard candies, because that is not the intended texture.
8. Transfer and serve
Once set, transfer the peppermints to an airtight container, separating layers with parchment. Refrigerate until needed.
For serving, arrange a small quantity on a candy dish or in mini paper liners. Let that portion stand briefly if you prefer a softer bite, while keeping the rest chilled.
Return unused portions to the refrigerator promptly. The candies are attractive on a holiday tray, but the cream cheese base means they need a different storage approach from commercially packaged hard mints.
Tips for Smooth, Tender Mints
Fix temperature before changing the formula
A warm dough can appear to need much more sugar than it actually does. Cool it briefly, then reassess. This preserves the creamy texture and reduces unnecessary sweetness.
Scrape the bowl thoroughly
Cream cheese and butter can cling to the bowl beneath the beaters. Scraping between additions helps prevent streaks and small lumps in the finished candies.
Add color in small amounts
Gel color is easier to intensify than remove. Work it in completely before judging the shade, and remember that white dough will soften the appearance of a small amount of coloring.
Use a light touch with the fork
A shallow impression gives the candies a classic appearance without making them too thin. Pressing hard can create ragged edges or cause the mint to stick to the fork.
Keep the work surface lightly dusted
Too much powdered sugar on the counter can get kneaded into the dough and make it dry. Use parchment and only a small dusting where necessary.
Troubleshooting
| Problem | Possible cause | Practical adjustment |
|---|---|---|
| Dough sticks heavily to hands | Warm ingredients, extra moisture, or insufficient sugar | Chill briefly, then add sugar by the tablespoon only if needed |
| Mints crumble when rolled | Excess sugar or very cold dough | Let a small portion soften briefly and knead gently before changing anything |
| Cream cheese lumps remain | Base was not smooth before adding sugar | Start with properly softened block cream cheese and beat the base thoroughly |
| Fork pulls the candy apart | Dough is too soft or fork is sticky | Chill the portion briefly and dust the fork lightly |
| Color looks streaky | Coloring not fully incorporated | Knead gently until even, or keep deliberate marbling |
| Peppermint flavor is overpowering | Too much or overly concentrated flavoring | Measure extract carefully; concentrated oils require different directions |
| Candies flatten on the tray | Dough is too warm or soft | Chill before shaping and reassess the sugar amount |
| Surface remains tacky | Humidity, soft dough, or early airtight storage | Give the tray additional uncovered refrigerator time and handle gently |
Avoid adding milk or water as a first response to crumbly dough. A small cold portion may simply need a little time to soften. Adding liquid can create a sticky mixture that then needs more sugar, making the texture harder to control.
Christmas Color and Shape Ideas
Classic red, green, and white
Divide the dough into thirds and shape each color separately. Mix the finished pieces together on a white platter for a simple holiday presentation.
Red-and-white marbled mints
Place a small piece of red dough beside a similar piece of white dough. Twist them together once or twice, roll gently, and flatten. Stop before the colors blend into a uniform pink.
Green-and-white mints
Use the same brief twisting method with green and white dough. Make a few marbled pieces alongside solid colors rather than marbling the entire batch.
Small molded candies
A flexible food-safe candy mold may work with a dough firm enough to release cleanly. Test one cavity before filling the whole mold, and avoid intricate details that are difficult to remove without tearing.
Simple pillow mints
Cut short pieces from a narrow rope of dough. This is useful when you want a different shape without extra equipment. Keep the pieces similar in size so they look consistent in a gift box.
All these options use the same basic dough. Additional decorations such as sprinkles are optional extras and may change the texture, sweetness, and ingredient list.
Serving Ideas
Serve the mints after a holiday meal, alongside coffee or hot chocolate, or as a small contrast to chocolate cookies and rich desserts. Their cool peppermint flavor works especially well when the rest of the tray includes buttery shortbread or dark chocolate treats.
Mini paper liners make individual portions easier to lift and help keep colors separated on a platter. Use a shallow serving dish rather than a deep bowl if you want to protect the fork impressions.
For a larger gathering, replenish the dish from the refrigerator instead of placing the entire batch out at once. This keeps the candies firmer and makes it easier to manage serving time.
Make-Ahead and Gifting Guidance
These peppermints are convenient to prepare ahead because they require several hours of chilling anyway. For the freshest appearance, make them a day or two before a gathering and store them in a tightly covered container after setting.
They can be gifts, but they are refrigerated gifts. Pack them only once firm, separate layers with parchment, and include a clear “Keep refrigerated” label. Transport in an insulated bag with cold packs when needed.
Do not present them as pantry candy or mail them through an ordinary unrefrigerated shipping service. A decorative box does not provide temperature control. Choose a different shelf-stable candy recipe if your gift needs to travel without refrigeration.
Storage Information
Refrigerator
Store the set candies in an airtight container in the refrigerator at 40°F or below. Use within 1 week as the supplied recipe’s suggested quality window, provided they have been handled cleanly and kept cold; this is not a laboratory-validated shelf life. Follow any shorter relevant ingredient guidance.
Separate layers with parchment to prevent sticking and protect the surface. Keep the container away from strongly scented foods.
Freezer
For longer storage, freeze the firm candies in a single layer before transferring to a freezer-safe container. Separate layers and freeze for up to 2 months for best quality.
Thaw in the refrigerator inside the covered container. This helps limit condensation directly on the candies. Their surface may be slightly tackier after freezing, so handle gently.
Serving time
Keep the main batch refrigerated. Limit time at room temperature to 2 hours, or 1 hour when the temperature exceeds 90°F. Count preparation, transport, and serving time together rather than restarting the clock each time the candies move.
A short stand before eating can soften a chilled mint, but extended room-temperature storage is not part of this recipe.
Nutrition and Yield Notes
The original estimate of roughly 55 calories per candy is plausible for a batch divided into about 40–50 pieces, but the actual number depends on the sugar brand, extra sugar used, and final yield.
As a broad illustration, the whole batch may contain approximately 2,500–2,700 calories. Dividing it into 40 candies gives roughly 63–68 calories each; 50 candies gives roughly 50–54. Smaller mints will have fewer calories per piece because there are more pieces in the same batch.
For a closer estimate, calculate the nutrition from your ingredient labels and divide by your actual count. These candies contain dairy and a substantial amount of sugar. They are a traditional sweet treat rather than a high-protein or low-carbohydrate dessert.
Frequently Asked Questions
Are these the same as hard peppermint candies?
No. They are soft cream cheese mints with a buttery, tender texture. They do not require cooking sugar to a candy stage.
Can I omit the coloring?
Yes. White peppermints taste the same and look attractive in holiday paper liners. Coloring is entirely optional.
Can I use a spoon instead of a mixer?
You can mix thoroughly softened butter and cream cheese with a sturdy spoon, but removing every lump may take more effort. Finish incorporating the thick dough with a spatula or clean hands.
Why is my yield different?
Portion size changes the count considerably. A ¾-inch ball may be smaller than the portions needed to produce only 40–50 pieces. Keep the size consistent and use the actual finished count for nutrition calculations.
Will the candies become hard in the refrigerator?
They should firm enough to handle while remaining soft inside. They are not intended to become brittle or hard-crack candy.
Can I leave them out overnight to dry?
This version uses cream cheese and calls for refrigerated setting. Do not substitute an overnight room-temperature drying period.
Can I use liquid food coloring?
Gel is preferable because it introduces less liquid. Liquid coloring may make the dough softer, particularly if you use enough to create deep colors.
Can I substitute peppermint oil?
Not in the same amount. Concentrated food-grade flavorings have their own dosing instructions. Use baking peppermint extract for the stated measurement, and do not substitute non-food essential oil.
Can I make them before Christmas week?
Yes. Freeze the set candies for longer storage, then thaw in the refrigerator. For a party only a day or two away, refrigeration is the simpler option.
Printable Recipe Card
Soft Christmas Peppermints
Creamy, buttery peppermint candies shaped into festive red, green, and white buttons. No cooking required.
Prep time: 25–35 minutes
Chill time: 2–3 hours
Total time: Approximately 2 hours 25 minutes to 3 hours 35 minutes
Yield: About 40–50 larger mints, or more smaller pieces
Ingredients
- 4 tablespoons unsalted butter, softened
- 4 ounces full-fat block cream cheese, softened
- 4 cups powdered sugar, plus a little extra if needed
- ½ teaspoon peppermint extract
- Red gel food coloring, optional
- Green gel food coloring, optional
Directions
- Beat the butter and cream cheese until completely smooth, about 1–2 minutes. Scrape the bowl.
- Mix in the peppermint extract.
- Add powdered sugar about 1 cup at a time on low speed. Finish mixing with a sturdy spatula or clean hands when the dough becomes stiff.
- Check the texture. If warm and sticky, chill for 10–15 minutes before adding extra sugar. If still needed, add sugar 1 tablespoon at a time until pliable and manageable.
- Divide into three portions. Leave one white and knead a little red or green gel into the other portions.
- Roll into small, evenly sized balls. Arrange on parchment and gently flatten with a fork or glass.
- Refrigerate uncovered for approximately 2–3 hours, until firm enough to lift cleanly. Centers should remain soft.
- Transfer to an airtight container with parchment between layers. Keep refrigerated until serving.
Storage: Refrigerate at 40°F or below; the suggested quality window is up to 1 week with proper handling. Freeze for up to 2 months for best quality. Thaw in the refrigerator.
Serving: Bring out small portions. Limit room-temperature time to 2 hours, or 1 hour above 90°F.
Little tip: If the dough becomes sticky, try a short chill before adding more sugar. That simple pause helps keep the finished peppermints soft rather than dry.

Soft Christmas Peppermints
Description
Creamy, buttery peppermint candies shaped into festive red, green, and white buttons. No cooking required.
Prep time: 25–35 minutes
Chill time: 2–3 hours
Total time: Approximately 2 hours 25 minutes to 3 hours 35 minutes
Yield: About 40–50 larger mints, or more smaller pieces
Ingredients
- 4 tablespoons unsalted butter, softened
- 4 ounces full-fat block cream cheese, softened
- 4 cups powdered sugar, plus a little extra if needed
- ½ teaspoon peppermint extract
- Red gel food coloring, optional
- Green gel food coloring, optional
Instructions
- Beat the butter and cream cheese until completely smooth, about 1–2 minutes. Scrape the bowl.
- Mix in the peppermint extract.
- Add powdered sugar about 1 cup at a time on low speed. Finish mixing with a sturdy spatula or clean hands when the dough becomes stiff.
- Check the texture. If warm and sticky, chill for 10–15 minutes before adding extra sugar. If still needed, add sugar 1 tablespoon at a time until pliable and manageable.
- Divide into three portions. Leave one white and knead a little red or green gel into the other portions.
- Roll into small, evenly sized balls. Arrange on parchment and gently flatten with a fork or glass.
- Refrigerate uncovered for approximately 2–3 hours, until firm enough to lift cleanly. Centers should remain soft.
- Transfer to an airtight container with parchment between layers. Keep refrigerated until serving.
Storage: Refrigerate at 40°F or below; the suggested quality window is up to 1 week with proper handling. Freeze for up to 2 months for best quality. Thaw in the refrigerator.
Serving: Bring out small portions. Limit room-temperature time to 2 hours, or 1 hour above 90°F.
Little tip: If the dough becomes sticky, try a short chill before adding more sugar. That simple pause helps keep the finished peppermints soft rather than dry.