
2-Ingredient Apple Pie Cups
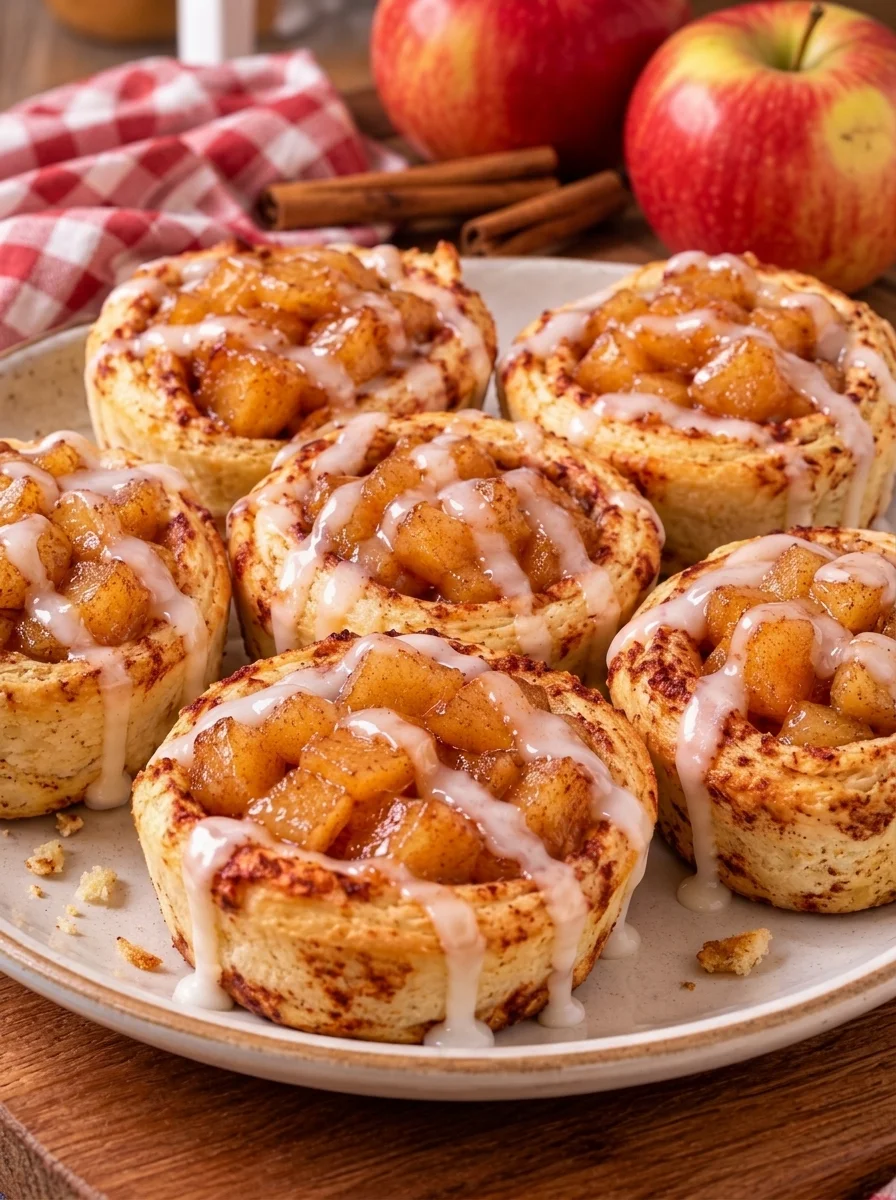
Warm apples, cinnamon-scented pastry, and a drizzle of icing make these apple pie cups an easy dessert for days when you want something cozy without making pie dough. Refrigerated cinnamon rolls form the shells, and canned apple pie filling provides the sweet fruit center. The icing packaged with the rolls supplies the finishing touch.
The result is closer to an apple-filled cinnamon roll than a traditional flaky pie. Expect soft, tender pastry with lightly browned edges, a spoonful of saucy apples in the center, and a sweet vanilla-style drizzle. They are especially good served warm, when the filling is soft and the icing settles into the folds of the pastry.
This recipe makes eight cups using a regular eight-count package of cinnamon rolls. Roll sizes vary, so the amount of filling and baking time need a little flexibility. A standard 12-cup muffin pan works well: simply use eight wells. You do not need a special eight-cup pan.
The method below expands the supplied recipe with practical guidance. It has not been independently kitchen-tested with every brand or package size, so use the pastry’s doneness as your final guide.
Why These Apple Pie Cups Are Easy to Make
The cinnamon is already distributed through the refrigerated dough, so there is no separate spice mixture to prepare. The apples are already cooked and sweetened, which means you can focus on shaping the shells and baking the dough thoroughly.
The small portions are convenient for brunch trays, family desserts, or a casual gathering. Each cup has its own pastry shell, so you can serve them individually without slicing a whole pie.
Another advantage is that you can adjust the portions without changing the basic idea. A modest spoonful of filling leaves room for the dough to puff and helps prevent a wet center. Any remaining apple filling can be refrigerated separately and served another day.
The short ingredient list does not mean the cups need to be overloaded with filling. A well-baked shell and a balanced amount of fruit make a better dessert than a muffin cup packed to the rim.
Recipe at a Glance
| Detail | What to expect |
|---|---|
| Main ingredients | Refrigerated cinnamon rolls and canned apple pie filling |
| Yield | 8 apple pie cups |
| Pan | Standard muffin pan, using 8 wells |
| Oven temperature | 375°F, with attention to package guidance and pan type |
| Preparation | About 10–15 minutes |
| Baking | Approximately 18–25 minutes; start checking at 15 minutes |
| Resting | 5–10 minutes before removal |
| Texture | Soft cinnamon-roll pastry with tender, saucy apples |
| Best serving temperature | Warm, after the filling has cooled slightly |
Ingredients
- 1 can regular-size refrigerated cinnamon rolls, 8 count, with included icing
- 1 can apple pie filling, 21 ounces; use only as much as the shells comfortably hold
Lightly grease the muffin wells with your usual pan release. This is a pan-preparation aid rather than part of the two main ingredients. If you count every item used in preparation, describe the recipe as two main ingredients plus pan grease.
Choosing the cinnamon rolls
Use a regular eight-count package rather than assuming all refrigerated cinnamon rolls are interchangeable. Some packages contain fewer, much larger rolls, and others use dough that uncoils easily. Those differences affect shaping, yield, and baking time.
The dough should be large enough to flatten into a circle that covers the bottom of a standard muffin well and reaches partway up the sides. Keep it cold until you are ready to shape it. Warm dough can become sticky and lose its structure.
Read the baking directions on your package before starting. This filled-cup format may take longer than the package’s unfilled rolls, but the manufacturer’s temperature guidance is still useful, particularly for dark or nonstick pans.
Choosing the apple filling
A standard canned apple pie filling works here. Brands vary in sweetness, slice size, and the proportion of apples to thickened sauce. Chop long slices into smaller pieces so that each shell gets fruit without large pieces pushing against the dough.
You may not use the entire 21-ounce can. Eight regular cinnamon rolls often hold less filling than the full can comfortably supplies. Begin with about 1½ tablespoons per shell and increase toward 2 tablespoons only if there is enough space.
There is no need to force the last spoonfuls into the cups. Cover and refrigerate the unused filling according to its label, then use it on oatmeal, pancakes, or yogurt.
The included icing
Set the icing aside before shaping the rolls. It belongs on the baked cups rather than inside them. Applying it after a short cooling period helps it remain visible instead of immediately melting into the hot filling.
If your cinnamon roll package does not include icing, the cups can still be served plain, but an additional homemade glaze would make the ingredient list longer.
Equipment
- Standard muffin pan
- Baking sheet to place beneath the muffin pan if desired
- Small knife and cutting board
- Measuring spoon or small spoon for filling
- Small offset spatula or a blunt table knife for loosening the cups
- Wire cooling rack
- Foil, if the tops brown before the dough finishes baking
A metal muffin pan generally gives the pastry more direct heat than silicone. If you use silicone, support it on a baking sheet and expect the sides to brown differently. Do not assume the same baking time will work for every material.
How to Make 2-Ingredient Apple Pie Cups
1. Prepare the oven and pan
Heat the oven to 375°F. Position a rack near the middle of the oven. Lightly grease eight wells of a standard muffin pan, coating the bottoms and sides.
Check the cinnamon roll label for any specific temperature adjustment for your pan. Dark pans can brown the outer dough quickly, so begin checking early and follow relevant package guidance.
You can place the muffin pan on a rimmed baking sheet to catch an occasional drip. Avoid stacking it on a thick insulated sheet, which can slow browning underneath.
2. Chop the apple filling
Spoon some of the apple filling onto a cutting board and cut any long slices into small, bite-size pieces. Return them to the filling and stir gently.
The goal is manageable pieces, not a puree. Smaller pieces settle into the shells more evenly, make portioning easier, and reduce the chance of a large apple slice tearing the dough.
Keep the filling at its normal room or refrigerator temperature. There is no need to heat it before assembly.
3. Flatten the cinnamon rolls
Open the cinnamon rolls and separate them. Set the icing aside.
Working with one roll at a time, press it into a circle with your fingertips or the lightly greased bottom of a glass. Aim for even thickness, with enough dough in the center to form a sturdy base.
Do not stretch the middle until it becomes paper-thin. A thin or torn bottom can leak filling and stick to the pan. If a spiral separates, gently press the edges together before placing it in the muffin well.
4. Form the pastry shells
Press each flattened roll into a prepared muffin well. Ease the dough across the bottom and partway up the sides, forming a shallow cup.
Work gently rather than pulling sharply at the edges. If the dough springs back, let it relax for a minute, then press it into place again.
The shells do not need to rise above the rim. Leaving space around the top gives the pastry room to expand without crowding neighboring cups.
5. Add a modest amount of filling
Spoon about 1½ tablespoons of chopped apple filling into each shell. Add a little more only where the shell can hold it without reaching the rim.
Keep the filling below the top edge of the dough. The dough will puff as it bakes, and an overfilled cup can spill over, creating sticky patches around the muffin well.
Try to give each cup both apples and sauce. Avoid filling one shell mostly with thickened liquid while another gets all the fruit.
6. Bake until the pastry is cooked through
Bake for approximately 18–25 minutes, beginning to check at 15 minutes. The exact time depends on the cinnamon roll brand, dough thickness, pan, filling temperature, and amount of fruit.
Look for puffed pastry with golden exposed edges. The dough around the filling should look set rather than glossy, wet, or stretchy. Bubbling apple filling alone does not show that the pastry underneath is baked.
If the edges brown quickly but the dough near the apples still looks raw, loosely cover the pan with foil and continue baking in short intervals. Foil slows additional browning; the cups still need enough time in the oven to finish cooking.
For the first batch, it can help to remove one cup carefully after the resting period and inspect the base. If the bottom is pale and doughy rather than set, return the remaining cups to the oven and bake a little longer. Do not rely on color at the very top alone.
7. Rest before removing
Let the cups stand in the muffin pan for 5–10 minutes. This allows the pastry to firm slightly and the very hot filling to settle.
Run a small offset spatula or blunt knife around the edges, taking care with a nonstick pan’s coating. Lift each cup out gently and transfer it to a rack or serving plate.
Leaving the cups in the pan for a long time can trap steam underneath, so remove them once they are sturdy enough to handle.
8. Drizzle with icing and serve
Knead or stir the packaged icing if needed, then drizzle it over the warm cups. Use a spoon or snip a small opening in the icing packet if its packaging allows.
Let the filling cool to a comfortable eating temperature before serving. The pastry can feel manageable while the thick apple center remains very hot.
Serve warm with a fork, especially if the filling is generous. These are individual desserts, but a plate makes them easier to enjoy without losing icing or warm apples.
Tips for Better Results
Keep the pastry thickness even
A shell with a thick lump on one side and a very thin bottom will bake unevenly. Spend an extra moment pressing the dough into an even layer before filling.
Use less filling than you think
A small amount of apples gives the pastry room to rise and makes it easier for the base to cook. More filling does not necessarily make a better cup.
Chop large apple pieces
Long canned apple slices can bridge across the shell and leave pockets beneath them. Smaller pieces fit neatly into the center and are easier to eat.
Check the dough beside the fruit
The filling is already cooked before it goes into the oven. Your main baking task is to cook the refrigerated dough completely, including the portion directly beneath and beside the apples.
Ice after a short rest
Icing added straight from the oven tends to melt into a thin glaze. Waiting several minutes gives a more visible drizzle while keeping the dessert warm.
Troubleshooting
| Problem | Likely cause | What to change |
|---|---|---|
| Golden top but doughy center | Too much filling, thick dough, or insufficient baking | Reduce the filling, shape evenly, and extend baking under loose foil if needed |
| Filling bubbles over | Shells filled too high | Start with 1½ tablespoons and leave space below the rim |
| Cups stick to the pan | Inadequate greasing or leaked filling | Grease the wells evenly and loosen cups after a short rest |
| Dough tears while shaping | Center stretched too thin or dough became warm | Keep dough cool and press gently into an even circle |
| Bottoms become damp | Cups cooled too long in the pan | Transfer to a rack once they can be lifted safely |
| Icing disappears | Applied while the cups were extremely hot | Let them rest before drizzling |
| Cups are too sweet | Sweetened dough, filling, and icing all contribute sugar | Use a lighter icing drizzle and serve smaller portions |
Optional Variations
The basic recipe uses two main ingredients. Any additions below are optional and increase the ingredient count.
Cinnamon pecan apple cups
Sprinkle a small amount of finely chopped pecans over the apples before baking. Keep the amount modest so the nuts do not crowd the shells, and watch for excessive browning.
Caramel apple cups
Finish the cooled cups with a light caramel drizzle. Consider using less of the packaged icing, since the filling, rolls, and caramel are all sweet.
Apple cranberry cups
Add a few dried cranberries to the apple filling for a tart contrast. Chop large pieces and keep the total filling volume within the shell’s capacity.
Vanilla ice cream dessert cups
Serve each warm cup on a plate with a small scoop of vanilla ice cream. Let the fruit filling cool slightly first so the dessert is comfortable to eat.
Different canned pie fillings
Other thick canned pie fillings may work, but they can release different amounts of moisture. Start with a modest spoonful and check the dough carefully. Fresh fruit is not a direct substitute for canned filling because it changes the moisture, sweetness, and cooking requirements.
Serving Ideas
These cups fit well on a brunch table alongside eggs, fresh fruit, and coffee. The savory dishes balance the sweetness and make a small pastry portion feel more complete.
For dessert, serve one cup with ice cream or a spoonful of whipped cream. A light dusting of cinnamon is enough if you want a simple finish without adding another sweet sauce.
At a gathering, arrange the cups in a single layer on a platter. Add the icing shortly before serving for the neatest appearance. If you are transporting them, let the icing settle and keep the cups level so the fruit remains in the shells.
Make-Ahead Guidance
The best texture comes from assembling the cups shortly before baking. You can chop the canned apple slices ahead and refrigerate them in a covered container, then shape the cold dough when you are ready.
If you assemble a few hours in advance, cover and refrigerate the pan promptly, follow the dough package’s handling guidance, and bake the same day. The filling may soften the dough while it sits, so a long assembled hold is less desirable than keeping the components separate.
A chilled assembled pan may need additional baking time. Use a pan suitable for the temperature change and check that the dough is fully baked before removing the batch.
For the simplest plan, bake the cups ahead, cool, refrigerate, and reheat them before serving. Save the icing until after reheating if possible.
Storage and Reheating
Refrigerator
Cool the cups briefly, then refrigerate in an airtight container within 2 hours. Store for up to 4 days. For better texture, avoid sealing them while they are still releasing heavy steam.
Arrange them in a single layer where possible. If stacking is necessary, separate the layers to prevent the icing from sticking to the cup above it.
Oven reheating
Warm refrigerated cups in a 325°F oven for about 8–12 minutes, checking as needed. The center should be hot throughout. Loosely cover if the pastry begins to darken before the filling warms.
The time varies with the size of the cups and how cold they are. Add the icing after reheating when possible.
Microwave reheating
Start with approximately 15–25 seconds for one refrigerated cup, then continue in short intervals if needed. Microwaving makes the pastry softer than oven reheating.
Let the cup stand briefly and check the filling temperature before eating, since the apples can heat unevenly.
Freezing
Freeze fully cooled, preferably uniced cups in a freezer-safe container for up to 2 months for best quality. Separate them so they do not freeze into one block.
Thaw overnight in the refrigerator and reheat before serving. The pastry may be softer after thawing, so the oven is usually the better choice when you want to refresh the edges.
Nutrition Notes
Nutrition depends heavily on the cinnamon roll package, how much icing you use, and how much apple filling actually goes into the cups. A reasonable working estimate is approximately 180–250 calories per cup for regular-size rolls and a modest amount of filling, but some products or larger portions can exceed that range.
For a closer calculation, add the nutrition for all eight rolls and the included icing, then add only the amount of apple filling used. Divide by eight. Do not automatically include the entire filling can if a substantial portion remains.
Ice cream, nuts, caramel, and other extras should be calculated separately. These are sweet pastries rather than a high-protein breakfast; serve them in the portion that suits the rest of your meal.
Frequently Asked Questions
Do I need an eight-cup muffin pan?
No. Use eight wells of a standard 12-cup muffin pan. There is no need to buy a different pan for this recipe.
Can I use large cinnamon rolls?
Large rolls will change the yield and may need a jumbo muffin pan or another shaping method. They are not a direct swap for eight regular rolls. Keep the dough thickness even and allow additional baking time where needed.
Will I use the entire can of filling?
Possibly not. The full can may be more than eight regular shells comfortably hold. Store the remainder separately rather than overfilling the cups.
Are these flaky like traditional apple pie?
They have a soft cinnamon-roll texture. The exposed edges can brown, but the shell is not a traditional flaky pie crust.
Can I make mini cups?
You can experiment with smaller portions of dough and filling in a mini muffin pan, but the yield and timing will change. Start checking earlier and confirm that the dough is cooked through. Dividing each roll changes the original eight-cup recipe.
Can I use homemade apple filling?
Yes, if it is already cooked, cooled, and thick enough to sit in a shell without flooding it. Homemade filling adds preparation time and ingredients, so it changes the two-ingredient premise.
Why is the dough still sticky beneath the apples?
It may be underbaked, too thick, or carrying too much filling. Bake longer as needed and use less filling in the next batch. A little moisture from apples is expected; raw, stretchy dough is not the intended result.
Can I leave off the icing?
Yes. The rolls and filling already provide sweetness. Serve plain or use just a small drizzle from the included packet.
Recipe Card
2-Ingredient Apple Pie Cups
Soft cinnamon-roll shells filled with tender apples and finished with the icing included in the package.
Yield: 8 cups
Prep: 10–15 minutes
Bake: Approximately 18–25 minutes
Rest: 5–10 minutes
Total: Approximately 35–50 minutes
Oven: 375°F, considering relevant cinnamon roll package guidance
Ingredients
- 1 can regular-size refrigerated cinnamon rolls, 8 count, with icing
- 1 can apple pie filling, 21 ounces; some filling may remain
Instructions
- Heat the oven to 375°F. Lightly grease eight wells of a standard muffin pan.
- Chop large apple slices in the filling into bite-size pieces. Set the cinnamon roll icing aside.
- Flatten each roll into an evenly thick circle. Press into a muffin well to cover the bottom and reach partway up the sides.
- Add about 1½ tablespoons of filling per shell, increasing toward 2 tablespoons only if space allows. Keep filling below the dough’s rim.
- Bake approximately 18–25 minutes, starting to check at 15 minutes. The exposed pastry should be golden, and the dough beside the apples should be set. Cover loosely with foil if browning too fast and continue until baked through.
- Rest in the pan for 5–10 minutes. Gently loosen and lift out the cups.
- Drizzle with the included icing. Let the hot apple centers cool slightly before serving.
Storage: Refrigerate within 2 hours and use within 4 days. Freeze preferably uniced cups for up to 2 months for best quality.
Little tip: Leave a little room for the dough to puff. A modest spoonful of apples and a fully baked shell give these simple cups their best balance of tender pastry and warm fruit.

2-Ingredient Apple Pie Cups
Description
Soft cinnamon-roll shells filled with tender apples and finished with the icing included in the package.
Yield: 8 cups
Prep: 10–15 minutes
Bake: Approximately 18–25 minutes
Rest: 5–10 minutes
Total: Approximately 35–50 minutes
Oven: 375°F, considering relevant cinnamon roll package guidance
Ingredients
- 1 can regular-size refrigerated cinnamon rolls, 8 count, with icing
- 1 can apple pie filling, 21 ounces; some filling may remain
Instructions
- Heat the oven to 375°F. Lightly grease eight wells of a standard muffin pan.
- Chop large apple slices in the filling into bite-size pieces. Set the cinnamon roll icing aside.
- Flatten each roll into an evenly thick circle. Press into a muffin well to cover the bottom and reach partway up the sides.
- Add about 1½ tablespoons of filling per shell, increasing toward 2 tablespoons only if space allows. Keep filling below the dough’s rim.
- Bake approximately 18–25 minutes, starting to check at 15 minutes. The exposed pastry should be golden, and the dough beside the apples should be set. Cover loosely with foil if browning too fast and continue until baked through.
- Rest in the pan for 5–10 minutes. Gently loosen and lift out the cups.
- Drizzle with the included icing. Let the hot apple centers cool slightly before serving.
Storage: Refrigerate within 2 hours and use within 4 days. Freeze preferably uniced cups for up to 2 months for best quality.
Little tip: Leave a little room for the dough to puff. A modest spoonful of apples and a fully baked shell give these simple cups their best balance of tender pastry and warm fruit.