
High-Protein Peanut Butter Cup Cheesecake Cups
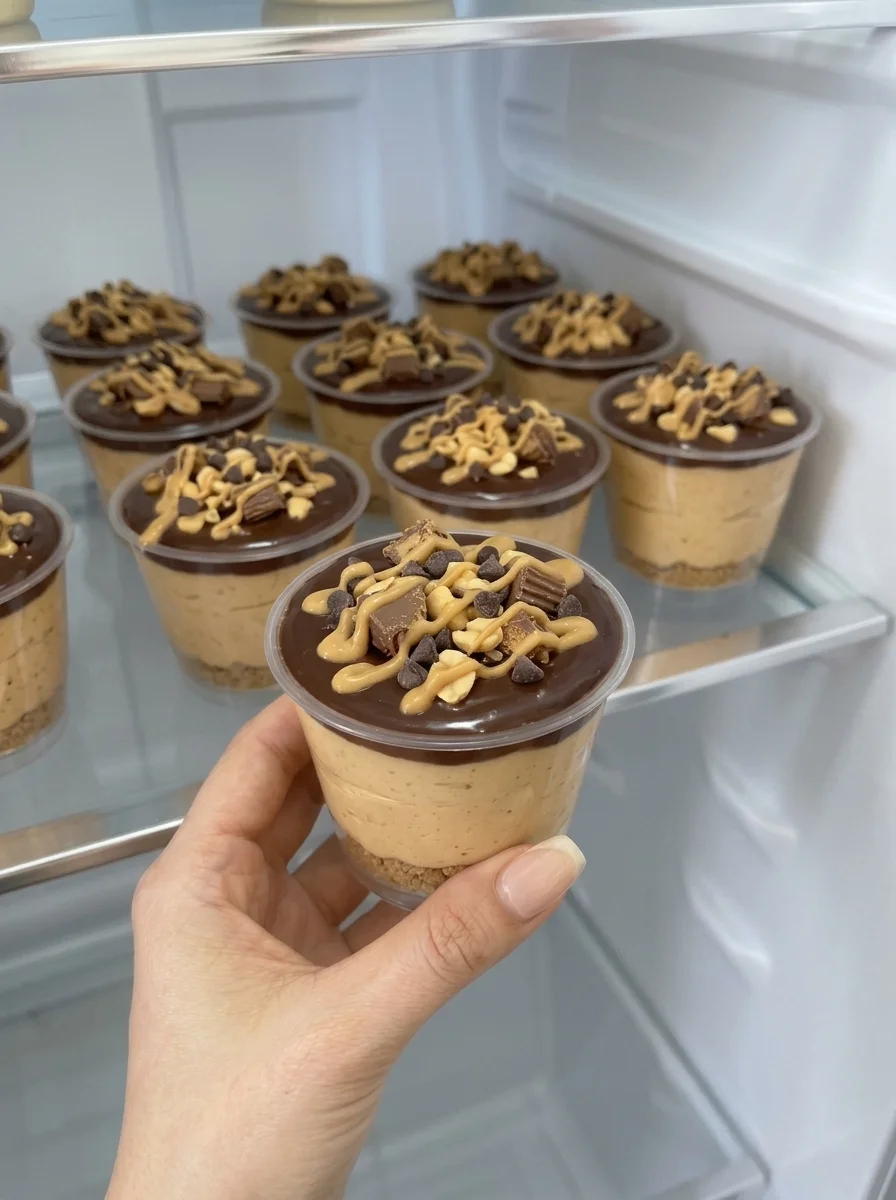
Peanut butter and chocolate make a familiar dessert pairing, and these cheesecake cups add a creamy, tangy filling to the combination. Greek yogurt, reduced-fat cream cheese, peanut butter, and protein powder blend into a rich, spoonable base. A thin layer of chocolate sets on top, giving each cup a little snap before the spoon reaches the soft filling underneath.
There is no crust to prepare and no oven to heat. Mix the filling, divide it among four small dishes, add the chocolate, and refrigerate. The result is a simple make-ahead dessert that delivers cheesecake-inspired flavor without making a full-sized cheesecake.
These are best served in their cups. Without eggs, gelatin, or another firm setting agent, the filling thickens in the refrigerator but is not guaranteed to stand freely when unmolded. Ramekins and small jars are therefore more dependable than expecting a silicone mold to release a perfectly shaped dessert.
Recipe note: This supplied recipe has not been independently tested. Greek yogurt thickness, cream cheese style, and protein-powder formulation affect the texture. Nutrition figures are estimates; the original 220-calorie claim may understate a cup made with the full chocolate topping and regular peanut butter.
Why You’ll Love These Cups
- No baking or water bath is required.
- Cream cheese gives the yogurt base a recognizable cheesecake flavor.
- Peanut butter adds richness and balances the yogurt’s tang.
- A thin chocolate topping supplies a contrasting texture.
- Four individual portions are convenient to prepare ahead.
Recipe at a Glance
- Prep time: Approximately 15 minutes, plus softening the cream cheese
- Chill time: At least 2 hours
- Total time: About 2 hours 15 minutes, plus softening
- Yield: 4 small cheesecake cups
- Category: No-bake dessert, snack
- Texture: Creamy, thick, and spoonable with a firm chocolate topping
Ingredients
For the Cheesecake Filling
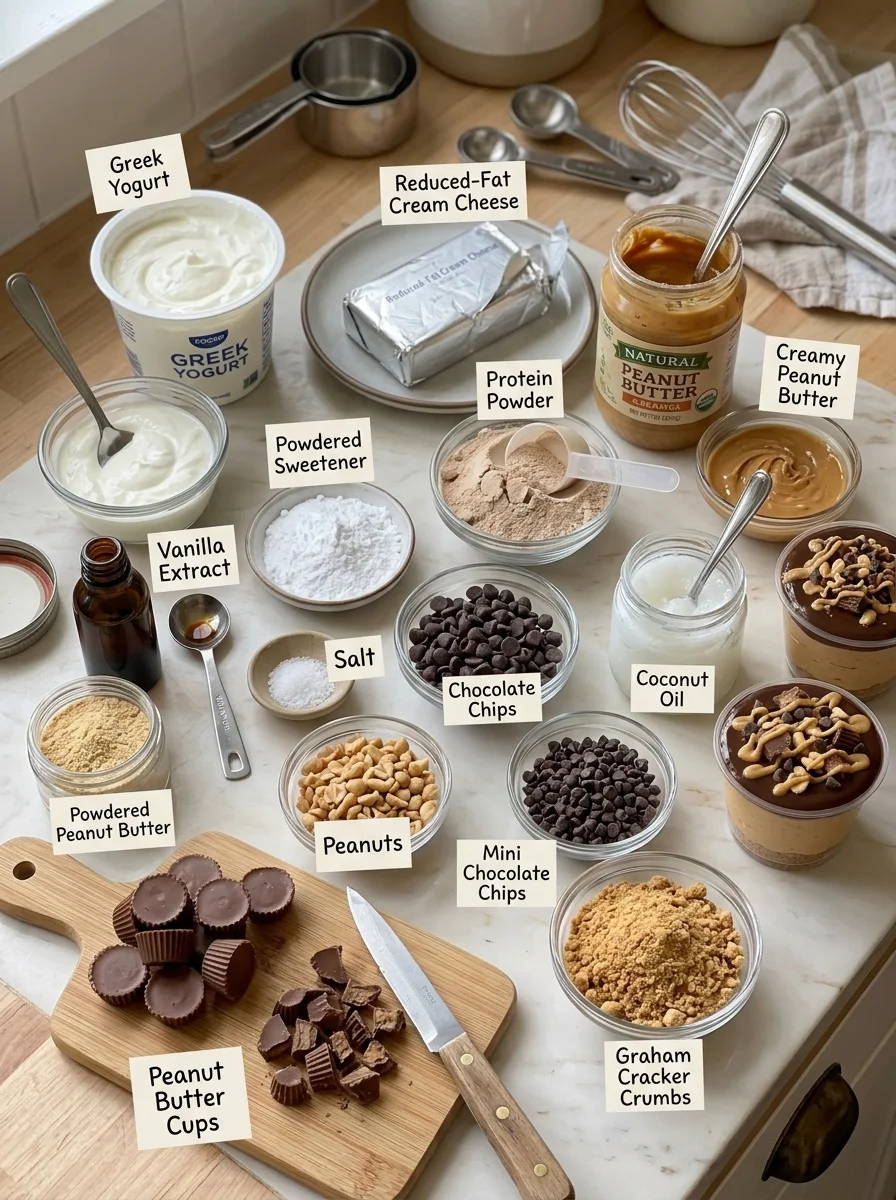
- 1 cup plain nonfat Greek yogurt
- 4 ounces reduced-fat cream cheese, softened
- 1/4 cup creamy peanut butter
- About 1 ounce vanilla or chocolate protein powder, approximately one standard serving as specified on the label
- 2 tablespoons powdered sweetener, or to taste and according to the product’s sweetness
- 1 teaspoon vanilla extract
- A pinch of salt
- Milk, only if needed, added 1 teaspoon at a time
For the Chocolate Topping
- 1/4 cup sugar-free or dark chocolate chips
- 1 teaspoon coconut oil
- 1 tablespoon powdered peanut butter mixed with 1–2 teaspoons water, optional
Optional Finishes
- Chopped peanuts
- Mini chocolate chips
- A small drizzle of peanut butter
- Chopped sugar-free peanut butter cups
- A light dusting of cocoa powder
- A tiny pinch of flaky salt
Ingredient Notes
Greek Yogurt
Choose a thick plain Greek yogurt. It supplies moisture, tang, and protein, so both its flavor and consistency are noticeable. A thin yogurt can leave a softer filling, while a firmly strained product makes the mixture easier to portion.
Stir the container before measuring, but avoid adding a large pool of separated liquid. Regular unstrained yogurt is not an equivalent replacement in this small no-bake formula. It may need a recipe designed around its higher moisture level.
Nonfat yogurt keeps the base lighter, but full-fat Greek yogurt can be used for a richer variation. That changes the calories and may affect texture. Use a product you enjoy eating plain rather than expecting sweetener to hide an unpleasant flavor.
Reduced-Fat Cream Cheese
A firm block-style reduced-fat cream cheese gives a more predictable filling than a loose or whipped tub spread. Soften it until it can be beaten smoothly, not until melted or warm.
Mix the cream cheese on its own first. Once cold yogurt has been added, remaining firm lumps are harder to remove. Scrape the bowl and beaters during mixing to catch any pieces clinging to the sides.
Cream cheese adds body, but it does not turn this into a firm baked cheesecake. The finished cups should be thick enough to spoon rather than slice into freestanding wedges.
Creamy Peanut Butter
Regular creamy peanut butter mixes easily and gives a consistent texture. Natural peanut butter also works if thoroughly stirred before measuring. An oily spoonful from the top or a dry spoonful from the bottom can change the filling considerably.
Use room-temperature peanut butter that stirs smoothly. If it is unusually firm, soften it separately with gentle stirring or a very brief warming, then allow it to cool before adding. Hot peanut butter can make the dairy mixture loose.
Protein Powder
Vanilla powder gives a lighter peanut butter cheesecake flavor, while chocolate powder makes the entire filling chocolatey. The topping provides chocolate in either version.
Scoop sizes vary, so check the label rather than assuming every scoop is the same. The original recipe calls for about 30 grams, roughly 1 ounce. Protein content also varies by brand and blend.
Casein, whey blends, and plant-based powders absorb moisture differently. Some thicken over several minutes, and others leave a slightly grainier texture. Start with a powder you already like and add milk only after giving the mixture a short rest.
Powdered Sweetener
Powdered sweetener blends more readily into a cold filling than a coarse granulated product. However, products differ in concentration. Two tablespoons of a sugar-equivalent blend are not the same as two tablespoons of a highly concentrated sweetener.
Follow the label’s sweetness guidance and start modestly, especially if your protein powder is sweetened. Taste after mixing. The chocolate topping adds sweetness too, so the filling does not need to be intensely sweet on its own.
Chocolate and Coconut Oil
Use dark chocolate chips you enjoy, or a sugar-free product that melts well. Sugar-free chocolate is not necessarily calorie-free or low in total carbohydrate; check its ingredients and nutrition if those details matter to you.
Coconut oil helps the melted chocolate flow, though it can also make the topping soften more readily as it warms. Keep the layer thin. A thick disc of refrigerated chocolate can be difficult to break with a spoon and may lift off the filling in one piece.
Optional Powdered Peanut Butter
Mix the powdered peanut butter with only enough water to make a smooth drizzle. This is an optional finish, separate from the regular peanut butter in the base.
Keep the prepared drizzle out of the bowl of melted chocolate. Water can cause melted chocolate to seize. Add small dots or ribbons directly to the assembled cup, or drizzle over the set shell just before serving for the simplest result.
Equipment and Container Choice
Use a mixing bowl, hand mixer, spatula, dry microwave-safe bowl, and four small dessert cups or ramekins. Containers with lids are convenient for making ahead, but leave enough space that the lid will not touch the chocolate.
Shallow dishes make it easier to spread a thin topping. In narrow jars, the same amount of chocolate forms a thicker layer. Divide the chocolate according to surface area rather than assuming every container needs an identical spoonful.
Silicone muffin cups can hold the filling, but clean unmolding is uncertain because the filling is soft. If using them, plan to serve with a spoon in the mold unless you have tested your particular mixture.
How to Make Peanut Butter Cup Cheesecake Cups
1. Beat the Cream Cheese
Place softened cream cheese in the bowl. Beat until smooth, scraping down the sides and bottom. There should be no firm lumps before the other dairy goes in.
If the cheese resists mixing, allow a little more softening time rather than adding milk immediately. Do not leave it out for hours; a brief room-temperature softening is enough.
2. Add Peanut Butter, Yogurt, and Vanilla
Mix in the peanut butter, then add the Greek yogurt and vanilla. Beat until evenly combined. Scrape the bowl again so the mixture has a consistent color and texture.
The filling should look creamy and thick. A little yogurt tang is expected and is part of the cheesecake-style flavor.
3. Mix in the Powder and Sweetener
Add the protein powder, a modest amount of powdered sweetener, and a pinch of salt. Mix on low so the powder does not scatter, then beat briefly until incorporated.
Let the filling rest for a few minutes before judging thickness. If it is too stiff to spoon comfortably, add milk a teaspoon at a time. Stop once it spreads easily; it should not become pourable.
Taste with a clean spoon and adjust sweetness. Avoid correcting a loose mixture by adding large amounts of powder, which can make it chalky and change the flavor.
4. Divide Into Cups
Portion the filling evenly among four small cups. Smooth with the back of a spoon, leaving room for the topping. Tap the cups gently if needed to settle large gaps, but do not expect a perfectly air-free pastry-shop finish.
Place the cups in the refrigerator while you melt the chocolate if the filling has become warm during mixing.
5. Melt the Chocolate
Combine the chips and coconut oil in a clean, dry microwave-safe bowl. Microwave in 15–20-second intervals, stirring between each. Stop when only a few small pieces remain and stir until smooth.
Avoid overheating. Chocolate can scorch or become thick rather than turning more fluid with continued heating. Keep water and damp utensils away from the bowl.
6. Add the Topping
Let the melted chocolate cool briefly until fluid but not hot. Spoon a thin layer over each cup and spread gently. Work one cup at a time because the chilled filling can set the chocolate quickly.
If using the prepared powdered peanut butter, add a few small dots to the chocolate on the cup and gently draw through with a toothpick. Alternatively, add the drizzle after chilling, just before eating. The latter keeps the shell simpler to spread.
7. Chill
Refrigerate for at least 2 hours, until the topping has hardened and the filling is cold and thick. Cover once the shell has set if a lid or wrap would otherwise touch it.
The filling may firm further overnight, but it will remain spoonable rather than become a baked-style cheesecake.
8. Garnish and Serve
Add peanuts, a small drizzle, or other optional finishes just before serving. Let one cup stand for about 5 minutes if you prefer a slightly softer filling and shell.
Keep the remaining cups refrigerated. Break through the chocolate with a spoon and scoop down into the peanut butter filling.
Tips for a Smooth Filling
Soften Before Mixing
Cold cream cheese is the most common source of lumps. Beat it alone before adding yogurt so you can see and remove any firm pieces.
Use Thick Dairy
A loose yogurt or soft tub spread changes the balance. Start with thick Greek yogurt and block-style cream cheese rather than trying to repair a watery mixture afterward.
Let the Powder Hydrate
Some powders thicken after mixing. A brief pause helps prevent unnecessary milk additions. Add liquid slowly rather than pouring in a tablespoon at once.
Keep the Chocolate Thin
A delicate topping is easier to crack and gives a better balance with the filling. A drizzle is an equally useful option if spreading a complete shell feels difficult.
Taste Before Portioning
Powders, peanut butter, and sweeteners vary. Adjust the filling in the bowl, when it is easy to mix evenly, rather than trying to sweeten each finished cup.
Flavor Variations
Chocolate Peanut Butter Filling
Use chocolate protein powder for a darker base. Taste before adding any extra cocoa; the supplied formula does not require it, and more dry ingredients can make the filling stiff.
Vanilla Cheesecake Base
Use vanilla powder and keep the chocolate in the topping. This makes the contrast between the peanut butter filling and dark shell more noticeable.
Salted Peanut Finish
Add a tiny pinch of flaky salt and a few chopped peanuts to the soft chocolate topping. Keep it light because some peanut butters and powders already contain salt.
Chocolate Ribbons
Drizzle the melted chocolate in thin lines instead of spreading a complete layer. This is easier to eat straight from the refrigerator and can help when your containers are narrow.
Different Nut Butter
Almond butter or a suitable seed butter creates a different flavor. Stir thoroughly before measuring and expect the richness and consistency to vary. An ingredient substitution alone does not make a recipe safe for someone with an allergy; check every label and prevent cross-contact.
Serving Ideas
Serve the cups as a small dessert, snack, or one component of breakfast. Fresh strawberries or a few banana slices pair well with the peanut butter flavor; add fruit at serving rather than letting it release moisture over several days.
For guests, matching ramekins and a modest garnish make an attractive presentation without much extra work. Identify peanuts and dairy clearly, and check the protein powder for any other relevant allergens.
For a packed snack, use a sealed container and keep it chilled with an ice pack. The chocolate may soften in warm conditions, but the dairy filling also needs refrigeration, so appearance is not the only concern.
Make-Ahead and Storage
Refrigerator: Cover and store at 40°F or below for 3–4 days, using fresh dairy ingredients within their remaining usable storage periods. Making a new dessert does not extend the life of older opened yogurt.
Make ahead: Prepare a day before serving for a convenient chilled dessert. Keep chopped nuts, fruit, and extra drizzles separate until serving for the best texture.
Freezer: The supplied recipe suggests up to 1 month. Freezing is possible as a quality experiment, but yogurt and reduced-fat cream cheese may separate or become grainy after thawing. It is not guaranteed simply to become softer. Test one portion before freezing a full batch, thaw in the refrigerator, and use promptly.
Serving: Take out only the cups you plan to eat. Do not leave dairy-based desserts at room temperature for more than 2 hours, or more than 1 hour when the surroundings exceed 90°F. A few minutes to soften the topping is enough.
Troubleshooting
The Filling Has Cream Cheese Lumps
The cream cheese may have been too cold. Next time, soften it properly and beat it before adding yogurt. Once chocolate is on top, it is difficult to remix the filling without disturbing the finished cup.
The Filling Is Too Loose
The yogurt or cream cheese may have been unusually soft, or too much milk may have been added. Chill before making further adjustments. If still loose, serve as a creamy dessert rather than expecting it to unmold.
The Filling Is Chalky
The powder may be the cause, or extra powder may have been added for thickening. Allow it time to hydrate and use a product you enjoy. More sweetener does not necessarily correct an unpleasant powder texture.
The Chocolate Is Too Hard
The layer may be thick. Let the cup stand briefly, then break the shell into smaller pieces with a spoon. Use a thinner layer or drizzle next time.
The Chocolate Seized
Water or excess heat may have affected it. Keep the optional water-based peanut butter drizzle out of the melting bowl. Use short heating intervals and dry equipment.
Frequently Asked Questions
Will These Unmold Like Mini Cheesecakes?
Not reliably. There is no baking or firm setting agent, and yogurt moisture varies. Small serving dishes are the most dependable choice for this soft filling.
Can I Skip the Protein Powder?
You can make a different version without it, but the filling will likely be softer and less sweet, and the protein will decrease. Skip milk unless needed and adjust sweetener carefully.
Can I Use Regular Cream Cheese?
Yes, as a richer variation. It may produce a somewhat firmer filling and increases calories relative to many reduced-fat products. Recalculate nutrition if that matters to you.
Are They Sugar-Free?
Not automatically. Sugar-free chips do not make every ingredient sugar-free, and yogurt contains naturally occurring milk sugar. Check the powder, peanut butter, sweetener, and toppings before making a dietary claim.
Are They Low Carb?
That depends on the products and toppings. The title describes added protein, not a guaranteed carbohydrate level. Calculate total or net carbohydrate according to your needs and the actual labels.
How Much Protein Is in a Cup?
Approximately 18–22 grams may be plausible with some high-protein yogurts and powders, but it is not guaranteed. Many common combinations may be closer to roughly 16–20 grams per cup. Add the full batch’s protein and divide by four for a useful estimate.
Are They Really 220 Calories Each?
That figure may be low for the complete recipe. Peanut butter, cream cheese, chocolate, and coconut oil all contribute energy. With common products, a rough range of about 270–340 calories per cup before substantial extra toppings may be more realistic, but labels and portion sizes determine the actual result. These are estimates, not verified nutrition data.
Print
High-Protein Peanut Butter Cup Cheesecake Cups
Description
Prep time: 15 minutes, plus softening cream cheese
Chill time: At least 2 hours
Yield: 4 small cups
Ingredients
Filling
- 1 cup plain nonfat Greek yogurt
- 4 ounces reduced-fat block-style cream cheese, softened
- 1/4 cup creamy peanut butter
- About 1 ounce vanilla or chocolate protein powder
- 2 tablespoons powdered sweetener, adjusted to taste and product strength
- 1 teaspoon vanilla extract
- A pinch of salt
- Milk, a teaspoon at a time, only if needed
Topping
- 1/4 cup dark or sugar-free chocolate chips
- 1 teaspoon coconut oil
- 1 tablespoon powdered peanut butter mixed with 1–2 teaspoons water, optional for a separate drizzle
- Chopped peanuts or other optional finishes
Instructions
- Beat softened cream cheese until smooth. Mix in peanut butter, yogurt, and vanilla, scraping the bowl.
- Add protein powder, sweetener, and salt. Mix on low until incorporated. Rest briefly, then add milk by the teaspoon only if too stiff. Taste and adjust sweetness.
- Divide among four small serving cups or ramekins and smooth the tops.
- Melt chocolate and coconut oil in a dry microwave-safe bowl in 15–20-second intervals, stirring between each. Let cool briefly while still fluid.
- Spread a thin chocolate layer over each cup. Keep the water-based peanut butter drizzle out of the melting bowl; add it directly to the cups or reserve for serving.
- Refrigerate at least 2 hours. Cover after the shell sets. Add garnishes before eating and serve chilled.
Storage: Refrigerate covered for 3–4 days at 40°F or below. Freezing for up to 1 month is an optional quality experiment; thaw in the refrigerator and expect possible separation or graininess. These are spoonable desserts, not reliably freestanding molded cheesecakes.
Nutrition: Calculate with actual labels and four equal portions. The original 220 calories per cup may be understated once the shell is included; protein varies by dairy and powder brand.