
High-Protein Peanut Butter Chocolate Greek Yogurt Cups
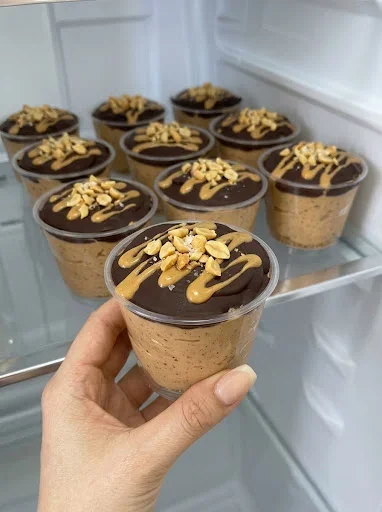
Chocolate, peanut butter, and thick Greek yogurt come together in these easy no-bake cups. The filling is creamy and tangy, with cocoa and chocolate protein powder giving it a rich chocolate flavor. A thin chocolate topping adds a satisfying contrast, and chopped peanuts or a tiny pinch of flaky salt make a simple finish.
These cups can be enjoyed in two ways. Refrigerated, they are a spoonable yogurt dessert with a firm chocolate top. Frozen, they become firmer and easier to remove from silicone liners, with a texture closer to a frozen yogurt snack. The method you choose should match how you plan to serve them.
The distinction matters because yogurt does not necessarily become freestanding after a few hours in the refrigerator. There is no gelatin, baked egg structure, or complete chocolate casing to hold the filling in place. For a dependable chilled dessert, serve it in a cup. For a peel-and-serve version, freeze until firm and serve with the expectation that it softens as it warms.
Recipe note: This supplied recipe has not been independently tested. Yogurt thickness, peanut butter consistency, and protein-powder formulation affect the filling. The original refrigerated unmolding claim is not guaranteed. Nutrition is approximate and should be calculated from the products you use.
Why You’ll Love These Cups
- The filling mixes in one bowl without baking.
- Peanut butter balances Greek yogurt’s tang.
- Cocoa and chocolate powder provide layered chocolate flavor.
- A thin shell or drizzle adds texture without complicated decorating.
- You can choose spoonable refrigerated portions or firmer frozen portions.
Recipe at a Glance
- Prep time: Approximately 15 minutes
- Refrigerator rest: 2–3 hours for a cold, thick, spoonable dessert
- Freezer option: Approximately 4–6 hours or until fully firm; timing varies
- Refrigerated total time: About 2 hours 15 minutes to 3 hours 15 minutes
- Yield: 6 portions
- Method: No-bake
- Serving style: Small dessert dishes when chilled; silicone liners for frozen portions
Ingredients
For the Filling
- 1 1/2 cups plain Greek yogurt
- 1/2 cup creamy natural peanut butter, thoroughly stirred
- About 1 ounce chocolate protein powder, roughly the supplied 30-gram portion
- 1 tablespoon unsweetened cocoa powder
- 2 tablespoons powdered sweetener or powdered sugar, adjusted to taste and product strength
- 1 teaspoon vanilla extract
- Up to 1 tablespoon milk, only if needed
- A pinch of salt
For the Chocolate Topping
- 1/2 cup dark chocolate chips or sugar-free chocolate chips
- 1 teaspoon coconut oil
Optional Finishes
- 2 tablespoons chopped roasted peanuts
- A small peanut butter drizzle
- Mini chocolate chips
- A tiny pinch of flaky sea salt
- A light dusting of cocoa powder
Ingredient Notes
Greek Yogurt
Use a thick plain Greek yogurt. Its flavor and consistency form the foundation of the dessert, so choose one you enjoy on its own. Nonfat yogurt gives a lighter result, while a higher-fat yogurt can make the frozen texture richer.
Protein levels vary considerably. A cup measure alone does not tell you how much protein is in the recipe; use the actual label if that matters to you. Avoid adding a large pool of separated liquid from the container, which can make the base loose.
Regular unstrained yogurt is not an identical substitute. It may make a filling that is too thin for the intended texture, even after adding powder.
Natural Peanut Butter
Stir the peanut butter jar thoroughly before measuring. Natural products separate, and a scoop from the top may be oily while one from the bottom is dry and stiff. An even consistency helps the filling blend smoothly.
The half-cup quantity contributes richness as well as protein. It also adds substantial calories, so the dessert’s protein content should not be interpreted as a low-calorie claim. Choose a smooth product for the most uniform filling.
Chocolate Protein Powder
Use a product whose taste and texture you already like. Some powders are very sweet, while others need more sweetener. Whey, casein blends, and plant-based formulas absorb water differently and can thicken at different rates.
Scoop sizes are not standardized. The supplied amount is about 30 grams, approximately 1 ounce. Follow the intended weight or label serving rather than assuming a large scoop is equivalent.
Protein powder adds flavor and body, but it is not a guaranteed setting agent. Adding more to force a freestanding texture can make the dessert dry or chalky.
Cocoa Powder
Unsweetened cocoa deepens the chocolate flavor. Break up lumps or sift before mixing. Natural or Dutch-process cocoa can work because this recipe does not rely on a reaction with baking soda.
More cocoa is not automatically better. Extra powder can make the filling bitter and absorb more moisture. Start with the tablespoon listed and taste after the mixture has rested briefly.
Sweetener
Powdered sugar and powdered low-calorie sweeteners are not nutritionally identical. Concentrated sweeteners also differ in strength, so use label guidance and add gradually. Two tablespoons of a sugar-equivalent blend should not be confused with two tablespoons of an intensely concentrated product.
The powder and chocolate topping may already be sweet. Begin with less sweetener and taste before adding the rest. Frozen foods can seem less sweet than chilled ones, so a frozen variation may taste different even with identical ingredients.
Milk
Milk is optional. Use it only if the filling is too stiff to spoon. Add one teaspoon at a time and allow the powder to hydrate before deciding it needs more.
The mixture should be thick and spreadable, not pourable. Additional liquid can make refrigerated portions softer and frozen portions icier.
Chocolate and Coconut Oil
Dark chocolate gives a slightly bitter contrast to peanut butter. Sugar-free chips vary in sweetness, melting behavior, and ingredients, so follow package guidance where available. They are not necessarily calorie-free.
Coconut oil helps melted chips flow but can also soften the topping as it warms. Keep the topping thin. The listed chocolate is a top layer, not enough to create a complete supporting candy shell around every cup.
Choosing Containers
For a refrigerated dessert, use six small ramekins, jars, or dessert cups. You can crack the topping with a spoon and eat the filling directly from the dish. This is the most reliable approach if you want a creamy, cheesecake-like texture without freezing.
For frozen portions, use silicone liners in a muffin pan to support them during filling. Paper liners may stick to the moist filling, especially if it is only refrigerated. Even silicone liners do not guarantee a neat release from a soft chilled mixture.
Capacity varies between muffin cups. The batch includes a substantial filling plus topping, so do not force it into six small liners if they are overflowing. Use larger dishes or divide into additional portions, then adjust the serving estimate accordingly.
How to Make the Cups
1. Prepare the Containers
Set out six dessert dishes for refrigerated servings. For frozen portions, place six suitably sized silicone liners in a muffin pan. Leave enough space for the chocolate layer and any lid or covering used later.
2. Mix Yogurt and Peanut Butter
Combine the Greek yogurt and thoroughly stirred peanut butter in a bowl. Whisk or stir until the color is even and no large peanut butter streaks remain.
If the peanut butter is very stiff, stir it separately first. Avoid heating the whole dairy mixture to make it blend; a smooth room-temperature peanut butter is easier to incorporate.
3. Add the Dry Ingredients
Stir in protein powder, cocoa, vanilla, a small amount of sweetener, and a pinch of salt. Mix slowly at first so the powder does not scatter. Scrape the bottom and sides to catch dry pockets.
Let the mixture stand for a few minutes to hydrate. Some powders thicken noticeably during this pause. Taste with a clean spoon and adjust sweetness.
4. Adjust Carefully
If the filling is too stiff, add milk one teaspoon at a time. Stir completely after each addition. Stop when the mixture is easy to spoon and smooth across the top of a dish.
If it is loose, do not immediately add large quantities of protein powder. Chill and reassess, or serve in dishes. For the next batch, use thicker yogurt and avoid unnecessary milk.
5. Portion
Divide the filling evenly among the containers and smooth the tops. A small spoon or spatula helps push it into the edges without leaving large air gaps.
Keep the containers level. If the filling is especially soft, refrigerate briefly while preparing the chocolate so the surface is colder when topped.
6. Melt the Chocolate
Place chocolate chips and coconut oil in a clean, dry microwave-safe bowl. Heat in approximately 20-second intervals, stirring thoroughly between each. Stop when a few small pieces remain and stir until smooth in the residual heat.
Do not overheat or add water. Chocolate can seize or scorch, and more microwave time does not always make it fluid again.
7. Spread a Thin Topping
Let the chocolate cool briefly until fluid but not hot. Spoon over one portion at a time and spread gently into a thin layer. A cold filling can set chocolate quickly, so work in small amounts.
If a complete shell is difficult to spread, use thin ribbons instead. Add optional chopped peanuts or a tiny pinch of salt while the chocolate is still soft.
8. Choose the Chill or Freeze Method
For spoonable cups, refrigerate 2–3 hours, until cold and the topping is firm. Cover once the chocolate sets and serve directly in the dishes.
For removable portions, freeze in silicone liners until fully firm, approximately 4–6 hours or longer depending on size and freezer. Peel the silicone away carefully while firm. Serve frozen with a brief softening period, understanding that the filling becomes soft again as it warms.
9. Serve
For chilled cups, let an individual portion stand a few minutes if needed to make the chocolate easier to crack. For frozen portions, start with about 5–10 minutes of softening and assess the center; very firm filling may need more time before it is comfortable to eat.
Do not bite hard frozen chocolate or filling forcefully. A spoon and serving dish can be easier than treating the dessert like a handheld candy.
Texture Expectations
Refrigerated filling should be creamy and thick, with a noticeable yogurt tang. It may firm as the powder hydrates, but it will not necessarily hold a freestanding muffin shape. The chocolate top adds structure only at the surface.
Frozen filling is firmer and may be icy depending on yogurt fat, sweetener, and added milk. After a full thaw, dairy can separate or become grainy. That is a quality difference from a smooth refrigerated batch, not a promise that freezing improves every version.
Choose the refrigerator method if creamy spoonability is most important. Choose freezing if convenient removable portions are your priority, accepting the different texture.
Tips for Better Results
Use a Familiar Protein Powder
Its flavor is prominent in a no-bake dessert. A powder you dislike in a shake is unlikely to become invisible here. Avoid relying on excessive sweetener to disguise it.
Stir the Peanut Butter
Evenly mixed natural peanut butter prevents oily pockets and dry lumps. Measure after stirring, not before.
Skip Unneeded Milk
A thick mixture is easier to portion and less likely to become icy when frozen. Add liquid only to solve a genuine mixing problem.
Spread Less Chocolate
A thin topping is easier to crack and better balanced with the filling. A thick refrigerated disc can separate in one piece rather than breaking neatly.
Match the Method to the Serving Style
Chilling and freezing are not interchangeable setting methods. Serve chilled portions in dishes and use freezing when you need firmer release from liners.
Variations
Peanut Butter Swirl
Reserve a small amount from the measured peanut butter and swirl through the mixed filling before portioning. Stop after a few strokes for visible ribbons rather than mixing completely.
Dark Chocolate Drizzle
Use the melted chocolate in thin lines instead of a full top layer. This makes the topping easier to eat cold and can be helpful for small or narrow dishes.
Salted Peanut Finish
Add a few chopped roasted peanuts and a very small pinch of flaky salt. Check whether your peanut butter is already salted before adding more.
Vanilla Powder Variation
Use vanilla protein powder with the listed cocoa for a lighter chocolate flavor. Taste before adding extra cocoa, which changes thickness and bitterness.
Another Nut Butter
Almond butter or a suitable seed butter creates a different flavor. Stir well and expect texture differences. For allergies, check every ingredient and prevent cross-contact rather than assuming a single swap is sufficient.
Serving and Meal Prep
Serve a cup as dessert or a snack, or pair with fruit as one part of breakfast. Add fresh fruit at serving rather than storing it on top for days, where it may release water.
For meal prep, use covered containers that fit the chosen method. Keep refrigerated portions cold during transport with an ice pack. Frozen portions also need appropriate cold storage; do not leave them on a desk for hours to soften.
Extra peanut butter drizzle, chips, and chopped peanuts add flavor but also change nutrition. Include them in calculations if you are tracking intake.
Storage
Refrigerator: Store covered at 40°F or below for up to 4 days, using fresh ingredients within their remaining usable dates. Preparation does not extend the life of older opened yogurt.
Freezer: Freeze well covered for up to 2 months for best quality. Once firm, separate portions with parchment if stacking. Packaging helps limit freezer odors and surface drying.
Softening: A 1–2 hour refrigerator rest may soften the exterior but does not guarantee a fully thawed center. Timing depends on portion size and container. Check texture rather than assuming a fixed time gives the same result in every batch.
Serving: Brief room-temperature softening is acceptable for a serving portion, but do not leave dairy desserts out more than 2 hours, or 1 hour above 90°F. Avoid repeated thawing and refreezing for the best texture.
Troubleshooting
The Cups Won’t Unmold
A refrigerated yogurt filling may simply be too soft. Serve in the liner with a spoon or freeze until firm before peeling silicone away. Do not present clean refrigerated release as guaranteed.
The Filling Is Chalky
The powder may be grainy or overly absorbent. Let it hydrate briefly, use a small milk adjustment if needed, and choose a smoother product next time. Adding more powder often makes the problem worse.
The Shell Is Too Hard
The layer may be thick or the portion frozen very firmly. Allow brief softening and break into small pieces with a spoon. Use a thinner layer or drizzle next time.
The Chocolate Became Thick in the Bowl
It may have overheated or contacted water. Use a dry bowl, short bursts, and thorough stirring. Keep damp utensils away from the melted chocolate.
Thawed Filling Has Separated
Yogurt can change after freezing. Serve as a frozen snack rather than fully thawing if that texture is preferable. For consistently creamy chilled cups, prepare and store the refrigerator version without freezing.
Frequently Asked Questions
Is This a Frozen Dessert or a Chilled One?
It can be either, but the results differ. Chilled cups are spoonable; frozen portions are firmer and easier to release from silicone liners. The recipe title alone does not establish a freestanding candy texture.
Can I Use Paper Liners?
They may stick to the moist yogurt mixture. Silicone is preferable for frozen release, while small dishes are easiest for chilled servings.
Can I Skip Protein Powder?
You can create a different variation, but it will have less protein and may be softer and less sweet. Omit milk unless needed and taste before adding sweetener. Do not expect identical setting behavior.
Are Sugar-Free Chips Calorie-Free?
No. They can still contain fat and other energy-providing ingredients. Check their labels and the sweetener used. They also vary in how they melt.
Are These Low Carb?
Not automatically. Yogurt, peanut butter, powder, sweetener, and chocolate all affect carbohydrates. Calculate from your actual products if following a specific target.
Is the Protein Estimate Realistic?
With many common ingredients, six portions may provide roughly 12–16 grams of protein each. The supplied 15–19 grams is possible with some high-protein products but should not be assumed. Add the batch total from labels and divide by six.
What About Calories?
Approximately 270 calories per cup may be plausible with some products and limited toppings. A rough range around 260–320 calories can also occur depending on yogurt, chocolate, peanut butter, and sweetener. These are estimates, not verified nutrition data. Include all optional finishes in your calculation.
Print
High-Protein Peanut Butter Chocolate Greek Yogurt Cups
Description
Prep time: 15 minutes
Chill: 2–3 hours for spoonable cups
Freeze: Approximately 4–6 hours or until firm for removable portions
Yield: 6 portions, depending on container capacity
Ingredients
Filling
- 1 1/2 cups plain thick Greek yogurt
- 1/2 cup creamy natural peanut butter, well stirred
- About 1 ounce chocolate protein powder
- 1 tablespoon unsweetened cocoa
- 2 tablespoons powdered sweetener or sugar, adjusted to taste and product strength
- 1 teaspoon vanilla
- Up to 1 tablespoon milk, only if needed
- A pinch of salt
Topping
- 1/2 cup dark or sugar-free chocolate chips
- 1 teaspoon coconut oil
- Optional chopped peanuts, peanut butter drizzle, chips, flaky salt, or cocoa
Instructions
- Prepare six small dishes for chilled servings or suitably sized silicone liners in a muffin pan for frozen portions.
- Mix yogurt and peanut butter until smooth. Stir in protein powder, cocoa, sweetener, vanilla, and salt.
- Rest briefly, then add milk a teaspoon at a time only if too stiff. Taste and adjust sweetness.
- Divide among containers and smooth the tops.
- Melt chocolate and coconut oil in a dry microwave-safe bowl in short intervals, stirring between each. Cool briefly while still fluid.
- Spread a thin layer or drizzle over each portion. Add optional peanuts or salt.
- Refrigerate 2–3 hours and serve in dishes, or freeze until fully firm before carefully peeling away silicone liners. Briefly soften frozen portions before eating.
Storage: Refrigerate covered for up to 4 days or freeze for up to 2 months for quality. Fully thawed yogurt may separate or become grainy. Chilled unmolding is not guaranteed.
Nutrition: Calculate from actual labels and the number of portions. Protein may be closer to roughly 12–16 grams per cup with many common products; optional toppings change both calories and protein.