
Sugar-Free Chocolate Chip Cookie Peanut Butter Pie
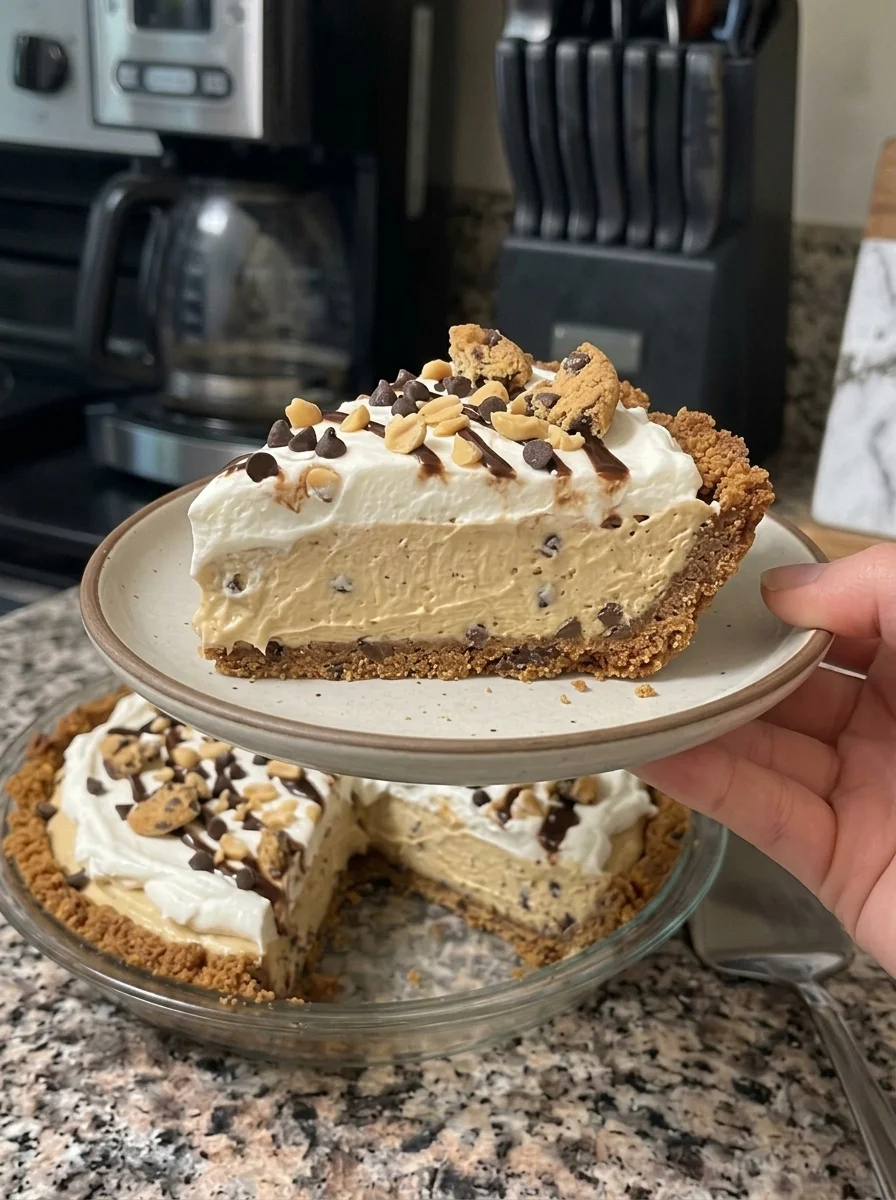
Creamy, rich, peanut buttery, and loaded with chocolate chip cookie flavor, this Sugar-Free Chocolate Chip Cookie Peanut Butter Pie is an easy no-bake dessert that delivers plenty of decadence without added sugar.
A buttery sugar-free chocolate chip cookie crust is filled with a smooth mixture of cream cheese, creamy peanut butter, powdered sugar substitute, vanilla, and freshly whipped cream. Sugar-free mini chocolate chips are folded directly into the filling, giving you little bursts of chocolate in every slice.
Finish the pie with fluffy whipped topping, chopped peanuts, more chocolate chips, and an optional drizzle of sugar-free chocolate sauce for an impressive dessert that requires no oven.
The hardest part is waiting for it to chill!
Why You’ll Love This Peanut Butter Pie
No baking required. The crust and filling set completely in the refrigerator.
Peanut butter and chocolate together. It’s a classic combination that works beautifully in a creamy pie.
Chocolate chip cookie crust. Sugar-free cookie crumbs give the dessert extra flavor and texture.
No added sugar. Sugar substitutes and sugar-free ingredients provide sweetness without traditional added sugar.
Rich and creamy. Cream cheese and peanut butter create a thick, indulgent filling.
Lightened with whipped cream. Folding whipped cream into the peanut butter mixture gives the filling a softer, fluffier texture.
Great make-ahead dessert. Prepare it the night before and let it chill until you’re ready to serve.
Freezer-friendly. Individual slices can be frozen for longer storage.
Easy to decorate. Chocolate chips, peanuts, cookie crumbs, whipped cream, and chocolate drizzle make the finished pie look impressive with very little effort.
What Is Sugar-Free Chocolate Chip Cookie Peanut Butter Pie?
This recipe is a no-bake peanut butter cream pie built on a chocolate chip cookie crumb crust.
Instead of using a traditional graham cracker crust, sugar-free chocolate chip cookies are crushed into fine crumbs and combined with melted butter.
The filling combines:
Cream cheese + peanut butter + powdered sweetener + vanilla + whipped cream + chocolate chips.
Cream cheese gives the filling structure and tanginess.
Peanut butter provides richness and its unmistakable nutty flavor.
Whipped heavy cream lightens the dense cream cheese and peanut butter mixture.
Mini chocolate chips add texture and chocolate flavor throughout the pie rather than limiting the chocolate to the topping.
After several hours in the refrigerator, the filling firms enough to slice.
Ingredients
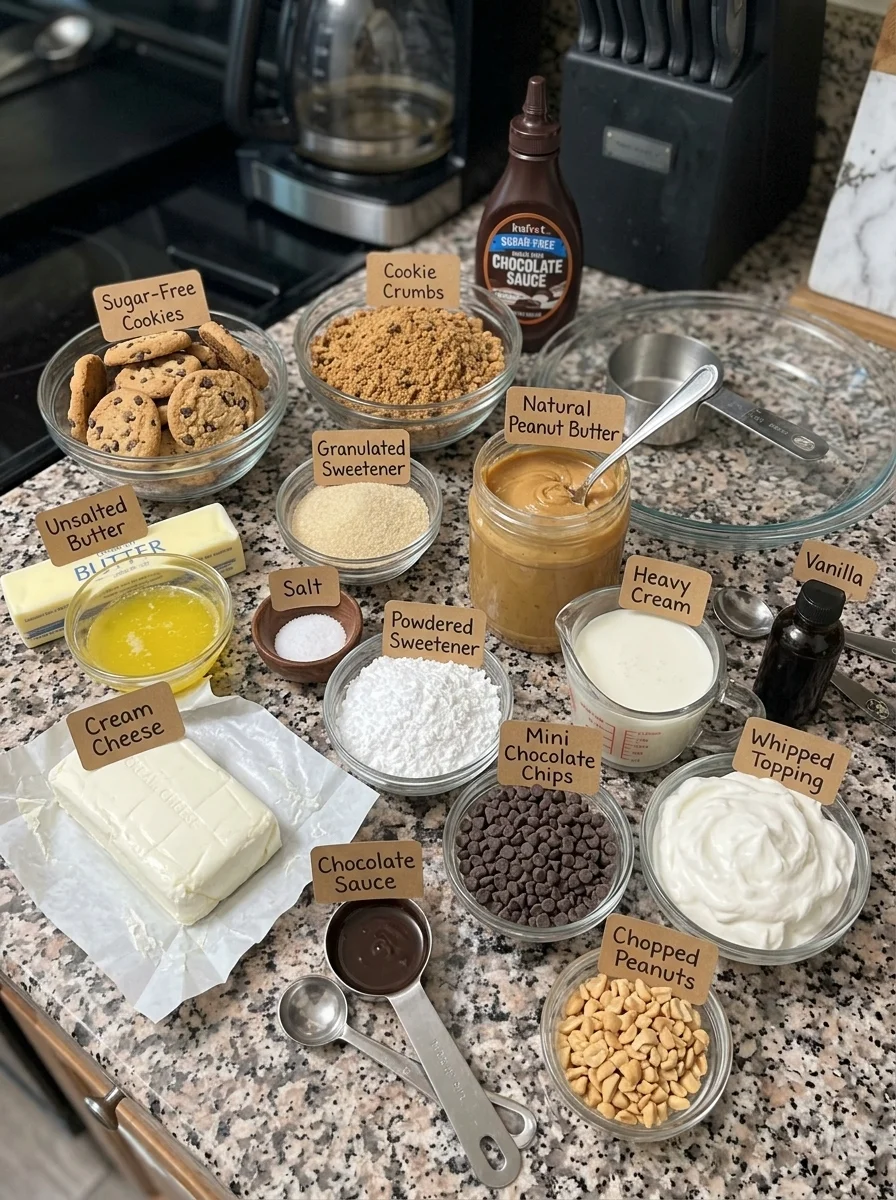
For the Crust
- 1 1/2 cups sugar-free chocolate chip cookie crumbs
- 5 tbsp unsalted butter, melted
- 1 tbsp granulated sugar substitute, optional
- Pinch of salt
For the Peanut Butter Filling
- 8 oz cream cheese, softened
- 1 cup creamy natural peanut butter
- 1/2 cup powdered sugar substitute
- 1 tsp vanilla extract
- 1/2 cup heavy whipping cream
- 1/2 cup sugar-free mini chocolate chips
For the Topping
- 1 cup sugar-free whipped topping or freshly whipped cream
- 2 tbsp sugar-free mini chocolate chips
- 2 tbsp chopped peanuts
- 2 tbsp sugar-free chocolate sauce, optional
- Crushed sugar-free chocolate chip cookies, optional
Ingredient Notes
Sugar-Free Chocolate Chip Cookies 🍪
The cookies form the entire foundation of the crust, so choose a variety you actually enjoy eating.
You’ll need approximately 1 1/2 cups finely crushed crumbs.
Different sugar-free cookies vary considerably in sweetness, texture, fat, and carbohydrate content.
That can slightly affect how much butter the crumbs need to hold together.
Unsalted Butter 🧈
Melted butter binds the cookie crumbs together.
Five tablespoons should create a mixture resembling damp sand that holds together when pressed.
Granulated Sugar Substitute
This is optional because the cookies may already be sweet enough.
Taste a small amount of the crumb mixture before deciding whether you need it.
Cream Cheese
Use a standard 8-ounce block of cream cheese, softened to room temperature.
Softening is important.
Cold cream cheese is much harder to blend smoothly and can leave small lumps in the filling.
Creamy Natural Peanut Butter 🥜
Peanut butter is the dominant flavor in this pie.
Use a creamy peanut butter with a texture suitable for mixing into desserts.
Natural peanut butter can separate, so stir it extremely well before measuring if oil has collected at the top.
A very thin or oily peanut butter can make the filling softer.
Powdered Sugar Substitute
Powdered sweetener works better than a coarse granulated substitute in the filling because it dissolves more readily and helps create a smoother texture.
Different sweeteners have different sweetness levels, so adjust according to the product you’re using.
Vanilla Extract
Vanilla rounds out the peanut butter and chocolate flavors.
Heavy Whipping Cream
Heavy cream gets whipped separately and then folded into the peanut butter mixture.
This is what prevents the filling from becoming excessively dense.
Make sure the cream is cold before whipping.
Sugar-Free Mini Chocolate Chips 🍫
Mini chips distribute more evenly throughout the filling than full-size chocolate chips.
You’ll use them both inside the pie and on top.
Whipped Topping
Use a sugar-free prepared whipped topping or freshly whipped cream.
Add it after the pie has fully chilled.
Chopped Peanuts
Peanuts add crunch and make the main flavor of the pie immediately recognizable.
Sugar-Free Chocolate Sauce
This optional topping gives the finished pie a dramatic chocolate-peanut-butter appearance.
Check the product label if maintaining a specific carbohydrate or sugar target is important.
How to Make Sugar-Free Chocolate Chip Cookie Peanut Butter Pie
Step 1: Crush the Cookies
Crush enough sugar-free chocolate chip cookies to make 1 1/2 cups of fine crumbs.
A food processor works particularly well.
You can also place the cookies inside a sealed bag and crush them with a rolling pin.
Try to avoid leaving many large pieces.
Fine crumbs compact more evenly and produce cleaner slices.
Step 2: Make the Cookie Crust 🍪
Place the cookie crumbs in a medium mixing bowl.
Add:
- 5 tablespoons melted unsalted butter
- 1 tablespoon granulated sugar substitute, if using
- A pinch of salt
Stir thoroughly.
Every crumb should be lightly coated with butter.
The mixture should resemble damp sand and hold together when squeezed.
Step 3: Press the Crust into the Pie Dish
Transfer the crumb mixture to a 9-inch pie dish.
Press it firmly and evenly across the bottom.
Bring the crumbs slightly up the sides of the dish.
The bottom of a flat measuring cup or drinking glass can help compact the crust evenly.
Firm pressure is important because this is a no-bake crust.
Step 4: Chill the Crust
Place the crust in the refrigerator for at least 20 minutes.
The butter will firm as it chills, helping the crust hold together.
Meanwhile, prepare the filling.
Why Chilling the Crust Matters
Because the crust isn’t baked, refrigeration is what helps solidify the melted butter holding the cookie crumbs together.
If you immediately add the filling to a warm, freshly mixed crust, the crumbs are more likely to shift.
Giving it at least 20 minutes in the refrigerator creates a firmer base for spreading the peanut butter filling.
Step 5: Beat the Cream Cheese and Peanut Butter 🥜
Place 8 ounces softened cream cheese and 1 cup creamy peanut butter in a large mixing bowl.
Beat with an electric mixer until completely smooth and creamy.
Stop and scrape the sides and bottom of the bowl as needed.
You don’t want streaks of plain cream cheese remaining.
Step 6: Add the Sweetener and Vanilla
Add:
- 1/2 cup powdered sugar substitute
- 1 teaspoon vanilla extract
Beat again until fully incorporated.
Taste the mixture.
Because sugar substitutes vary significantly in sweetness, this is the best time to decide whether the filling is sweet enough for your preference.
Step 7: Whip the Heavy Cream
Pour 1/2 cup cold heavy whipping cream into a separate clean bowl.
Beat until stiff peaks form.
When you lift the beaters, the cream should hold its shape.
Avoid continuing far beyond stiff peaks because heavy cream can eventually become grainy and begin turning into butter.
Step 8: Fold the Whipped Cream into the Peanut Butter Filling
Add approximately one-third of the whipped cream to the peanut butter mixture.
Gently fold it in.
Then add the remaining whipped cream and continue folding until the filling is evenly combined.
Avoid vigorous stirring.
The goal is to preserve some of the air incorporated into the whipped cream.
Why Fold Instead of Beat?
Cream cheese and peanut butter are naturally dense.
Whipped cream introduces air into the filling.
If you aggressively beat everything together after whipping the cream, you can knock out much of that air.
Folding creates a filling that’s still rich but noticeably lighter and fluffier.
Step 9: Add the Chocolate Chips 🍫
Add 1/2 cup sugar-free mini chocolate chips.
Fold gently until they’re distributed throughout the filling.
Step 10: Fill the Cookie Crust
Remove the chilled crust from the refrigerator.
Spoon the peanut butter filling into the crust.
Use an offset spatula or the back of a spoon to spread it evenly.
Smooth the top.
Step 11: Chill for at Least 4 Hours ❄️
Cover the pie and refrigerate for at least 4 hours.
For the firmest texture and easiest slicing, refrigerate it overnight.
Don’t rush this step.
The filling needs time to become sufficiently firm.
How Long Does No-Bake Peanut Butter Pie Need to Set?
Four hours is the minimum recommended chilling period.
However, an overnight chill is even better.
The cream cheese, peanut butter, and whipped cream become firmer as they cool, making the pie easier to cut into clean wedges.
If you’re preparing this dessert for a party or holiday, making it the night before is ideal.
Step 12: Add the Whipped Topping
Once the pie is completely chilled, spread or pipe 1 cup sugar-free whipped topping or freshly whipped cream over the surface.
You can cover the entire pie or decorate around the edges.
Step 13: Decorate 🍪🥜🍫
Sprinkle the top with:
- 2 tablespoons sugar-free mini chocolate chips
- 2 tablespoons chopped peanuts
If desired, add:
- 2 tablespoons sugar-free chocolate sauce
- Crushed sugar-free chocolate chip cookies
For the cleanest presentation, add cookie crumbs shortly before serving so they maintain more of their texture.
Step 14: Slice and Serve
Serve the pie chilled.
For especially clean slices, run a sharp knife under hot water.
Dry it thoroughly.
Cut one slice.
Wipe the knife clean and repeat between cuts.
Recipe Information ⏱️
Prep Time: 20 minutes
Crust Chill Time: 20 minutes
Final Chill Time: at least 4 hours
Total Time: approximately 4 hours 20 minutes, plus initial crust chilling as needed
Servings: 10 slices
Estimated Calories: approximately 390 calories per slice
Nutrition can vary substantially depending on the sugar-free cookies, peanut butter, chocolate chips, sweetener, whipped topping, chocolate sauce, and portion size used.
If exact calories, carbohydrates, or net carbs are important, calculate the recipe using the labels from your specific products.
Is This Pie Really Sugar-Free?
The recipe is designed around sugar-free ingredients and sugar substitutes rather than traditional added sugar.
However, product labeling matters.
Peanut butter, cookies, chocolate chips, whipped topping, and chocolate sauce can vary considerably between brands.
Some ingredients may also contain small amounts of naturally occurring sugars.
For that reason, check the labels of the products you’re using if you need to follow a specific dietary target.
Sugar-Free Does Not Automatically Mean Low-Carb
This distinction is particularly important with desserts.
A product can be labeled sugar-free while still containing carbohydrates from ingredients such as flour, starches, milk ingredients, or certain sweeteners.
The sugar-free chocolate chip cookies used for the crust will be one of the biggest variables.
The same applies to:
- Peanut butter
- Chocolate chips
- Whipped topping
- Chocolate sauce
- Sugar substitutes
If you’re making this pie specifically for a low-carb or keto-style diet, choose products that fit your carbohydrate target and calculate the finished recipe using their actual nutrition labels.
What Does This Peanut Butter Pie Taste Like?
Imagine combining three desserts:
Peanut butter cheesecake + chocolate chip cookies + chocolate cream pie.
The cream cheese gives the filling a subtle cheesecake-like tang.
Peanut butter makes it rich, nutty, and creamy.
Whipped cream softens the density of the filling.
Mini chocolate chips provide little chocolate bursts throughout every bite.
The buttery cookie crust provides a firmer, slightly crumbly contrast to the smooth filling.
Finally, chopped peanuts bring crunch while the optional chocolate drizzle reinforces the peanut-butter-and-chocolate combination.
Tips for the Best No-Bake Peanut Butter Pie
Soften the cream cheese completely. This is one of the easiest ways to prevent lumps.
Stir natural peanut butter before measuring. Separated oil can affect filling consistency.
Use powdered sweetener in the filling. It generally creates a smoother result than coarse granules.
Keep the heavy cream cold. Cold cream whips more reliably.
Whip to stiff peaks. This helps provide structure.
Fold gently. Preserve the air in your whipped cream.
Chill the crust first. It helps prevent the crumbs from moving when you add the filling.
Don’t rush the final chill. Four hours is the minimum; overnight is better.
Use a hot, dry knife. It makes cleaner slices.
Add crunchy garnishes near serving time. They’ll maintain better texture.
How to Prevent a Runny Peanut Butter Pie
A properly chilled peanut butter pie should be creamy but firm enough to slice.
If yours is too soft, consider these common causes.
The Cream Cheese Was Too Warm
Softened doesn’t mean melted.
Cream cheese should be pliable but still relatively cool.
The Peanut Butter Was Too Oily
Natural peanut butter sometimes separates considerably.
Stir it thoroughly before measuring.
If the product remains extremely runny even after stirring, it can produce a softer filling.
The Heavy Cream Wasn’t Whipped Enough
Whipping the cream to stiff peaks provides additional structure.
The Whipped Cream Was Overmixed
Aggressive stirring after whipping can remove the air that makes the filling fluffy.
The Pie Didn’t Chill Long Enough
Four hours is the minimum.
An overnight chill produces a noticeably firmer pie.
How to Get a Firm Cookie Crust
No-bake crumb crusts rely on two things:
Enough butter and firm compaction.
The melted butter coats the crumbs.
Once chilled, that butter firms and helps hold everything together.
Press the crust firmly into the dish rather than leaving the crumbs loose.
A flat-bottomed measuring cup works extremely well for this.
Then chill the crust before adding the filling.
What If My Crust Is Too Dry?
Different sugar-free cookies absorb butter differently.
If your crumb mixture remains completely loose and won’t hold together when squeezed, it may need a very small amount of additional melted butter.
Add it gradually.
Too much butter can make the crust greasy and overly hard once chilled.
What If My Crust Is Too Wet?
If the crumbs look saturated or greasy, you may have more butter than your particular cookies require.
Add a small amount of additional cookie crumbs until the mixture resembles damp sand.
How to Get Clean Pie Slices
For a photo-worthy slice:
- Chill the pie thoroughly, preferably overnight.
- Use a sharp knife.
- Warm the blade under hot water.
- Wipe it completely dry.
- Make one clean cut.
- Wipe the knife before making the next cut.
If the pie is especially soft, place it in the freezer for approximately 15–20 minutes before slicing.
You’re looking for additional firmness, not a completely frozen pie.
What to Serve with Peanut Butter Pie
This dessert is rich enough to serve on its own, but several simple additions work beautifully.
Fresh Berries 🍓
Strawberries or raspberries provide a tart, fresh contrast to the rich peanut butter.
Coffee ☕
Coffee balances the sweetness and richness of the pie.
Extra Whipped Cream
Add a small spoonful to individual slices.
Chopped Peanuts 🥜
Serve extra peanuts on the side for anyone who wants more crunch.
Sugar-Free Chocolate Sauce 🍫
Add a light drizzle immediately before serving.
Easy Variations
Double Chocolate Peanut Butter Pie 🍫
Use a sugar-free chocolate cookie crust instead of chocolate chip cookie crumbs.
Add a little unsweetened cocoa powder to the peanut butter filling if desired.
Peanut Butter Cup Pie 🥜🍫
Top the pie with chopped sugar-free peanut butter cups.
Extra-Crunchy Peanut Pie
Increase the chopped peanut topping or fold a small amount of finely chopped peanuts into the filling.
Chocolate Swirl Peanut Butter Pie
Drizzle sugar-free chocolate sauce over the filling and lightly swirl it with a knife before chilling.
Peanut Butter Cookie Pie 🍪
Use sugar-free peanut butter cookies for the crust instead of chocolate chip cookies.
Salted Chocolate Peanut Butter Pie
Finish individual slices with a tiny pinch of flaky salt.
The salt can emphasize both the chocolate and peanut butter flavors.
Mini Peanut Butter Pies
Divide the crumb crust and filling among individual cups or small jars.
Chill until firm and add toppings before serving.
This is especially convenient for parties because there’s no slicing required.
Can I Use Crunchy Peanut Butter?
Yes, if you want additional peanut texture.
The filling won’t be as uniformly smooth, but the flavor will still work.
For the classic creamy pie texture, smooth peanut butter is preferable.
Can I Use Regular Peanut Butter?
Yes.
Just remember that many conventional peanut butters contain added sugar.
If keeping the recipe free from added sugar is important, check the ingredient and nutrition labels before using it.
Can I Use Store-Bought Whipped Topping?
Yes.
A sugar-free whipped topping makes this recipe especially convenient.
You can also whip heavy cream yourself.
If using homemade whipped cream for decoration, keep the pie refrigerated until serving.
Can I Make This Pie Ahead of Time?
Absolutely.
This is actually one of the best features of the recipe.
Prepare the crust and filling the day before you plan to serve the pie.
Cover and refrigerate overnight.
Add the final whipped topping, chopped peanuts, chocolate chips, chocolate sauce, and cookie crumbs before serving.
That gives you a firm pie while keeping the garnishes looking fresh.
Storage Information 🥡
Cover the pie tightly and keep it refrigerated.
For best quality, enjoy it within 4 days.
Because the filling contains cream cheese and heavy cream, don’t leave the pie sitting at room temperature for extended periods.
Return leftovers to the refrigerator promptly.
Can You Freeze Peanut Butter Pie?
Yes.
This pie freezes well.
You can freeze the entire pie or individual slices.
For individual portions:
- Chill the pie completely.
- Cut it into slices.
- Place the slices on a parchment-lined tray.
- Freeze until firm.
- Transfer the slices to freezer-safe containers or wrap them carefully.
Freeze for up to 2 months for best quality.
Thaw the slices in the refrigerator before serving.
Should I Freeze the Pie with the Toppings?
You can, but the texture and appearance of some toppings may be better when they’re added fresh.
For the best presentation, freeze the pie or slices without the final whipped topping, cookie crumbs, and chocolate drizzle.
Add those after thawing.
Troubleshooting
Why is my filling lumpy?
The cream cheese was probably too cold.
Let it soften before beating it with the peanut butter.
Why is my filling too soft?
The peanut butter may have been oily, the cream may not have reached stiff peaks, or the pie may need more chilling time.
Why is my filling too dense?
The whipped cream may have lost too much air during mixing.
Fold rather than aggressively stirring.
Why is my crust falling apart?
It may not have been compacted firmly enough, or your cookie crumbs may require slightly more butter.
Why is my crust too hard?
Too much butter or excessive compaction can make a chilled crust extremely firm.
Why does my filling taste grainy?
Some sugar substitutes have a coarse texture.
Use a powdered sweetener designed for desserts.
Why did my natural peanut butter separate?
Natural peanut butter commonly separates during storage.
Stir it thoroughly before measuring.
Why isn’t my pie slicing cleanly?
It may need additional refrigeration.
An overnight chill usually gives the best slicing texture.
Why is the pie very rich?
Peanut butter, cream cheese, heavy cream, and butter are all rich ingredients.
Cutting the pie into 10 smaller slices keeps portions more manageable.
Frequently Asked Questions
Is this peanut butter pie baked?
No. It’s completely no-bake.
How long does it need to chill?
At least 4 hours, although overnight is ideal.
What size pie dish should I use?
A standard 9-inch pie dish works well.
Can I make the pie the night before?
Yes. That’s actually recommended for the firmest texture.
Can I use regular chocolate chip cookies?
Yes, but the finished dessert would no longer fit the intended sugar-free formulation.
Can I use regular chocolate chips?
Yes, with the same consideration regarding added sugar.
Is sugar-free peanut butter pie automatically low-carb?
No. Sugar-free and low-carb are not the same thing. Check the nutrition labels of your cookies, peanut butter, chocolate chips, sweetener, whipped topping, and sauce if carbohydrate intake matters.
Is this keto?
That depends entirely on the specific products and serving size. Don’t label the finished pie keto without calculating the carbohydrates from the exact ingredients used.
Can I use natural peanut butter?
Yes. Stir it thoroughly before measuring so the oil is fully incorporated.
Can I use crunchy peanut butter?
Yes, although the filling will have more texture.
Can I leave out the chocolate chips?
Absolutely. The filling will simply be a more traditional peanut butter cream filling.
Can I leave off the chocolate sauce?
Yes. It’s completely optional.
Can I freeze the pie?
Yes. Freeze it for up to 2 months for best quality.
How long does it last in the refrigerator?
Keep it covered and refrigerated for up to 4 days.
How do I get cleaner slices?
Chill thoroughly and use a sharp knife warmed with hot water and wiped dry between cuts.
Final Thoughts
This Sugar-Free Chocolate Chip Cookie Peanut Butter Pie brings together everything that makes peanut butter and chocolate such an irresistible dessert combination. 🍪🥜🍫🥧
A buttery sugar-free chocolate chip cookie crust supports a rich but fluffy filling made with cream cheese, creamy peanut butter, powdered sugar substitute, vanilla, whipped cream, and mini chocolate chips.
After a long refrigerator chill, top it with whipped cream, chopped peanuts, more chocolate chips, and an optional chocolate drizzle.
The key to the best result is simple: soften the cream cheese, thoroughly stir natural peanut butter, whip the cream to stiff peaks, fold gently, and give the pie plenty of time to chill.
Prepare it the night before and you’ll have a creamy, sliceable, make-ahead dessert ready for parties, holidays, family gatherings, or anytime you’re craving a serious peanut-butter-and-chocolate treat without traditional added sugar.
Print
Sugar-Free Chocolate Chip Cookie Peanut Butter Pie
- Total Time: approximately 4 hours 20 minutes, plus initial crust chilling as needed
Ingredients
For the Crust
- 1 1/2 cups sugar-free chocolate chip cookie crumbs
- 5 tbsp unsalted butter, melted
- 1 tbsp granulated sugar substitute, optional
- Pinch of salt
For the Peanut Butter Filling
- 8 oz cream cheese, softened
- 1 cup creamy natural peanut butter
- 1/2 cup powdered sugar substitute
- 1 tsp vanilla extract
- 1/2 cup heavy whipping cream
- 1/2 cup sugar-free mini chocolate chips
For the Topping
- 1 cup sugar-free whipped topping or freshly whipped cream
- 2 tbsp sugar-free mini chocolate chips
- 2 tbsp chopped peanuts
- 2 tbsp sugar-free chocolate sauce, optional
- Crushed sugar-free chocolate chip cookies, optional
Instructions
Step 1: Crush the Cookies
Crush enough sugar-free chocolate chip cookies to make 1 1/2 cups of fine crumbs.
A food processor works particularly well.
You can also place the cookies inside a sealed bag and crush them with a rolling pin.
Try to avoid leaving many large pieces.
Fine crumbs compact more evenly and produce cleaner slices.
Step 2: Make the Cookie Crust 🍪
Place the cookie crumbs in a medium mixing bowl.
Add:
- 5 tablespoons melted unsalted butter
- 1 tablespoon granulated sugar substitute, if using
- A pinch of salt
Stir thoroughly.
Every crumb should be lightly coated with butter.
The mixture should resemble damp sand and hold together when squeezed.
Step 3: Press the Crust into the Pie Dish
Transfer the crumb mixture to a 9-inch pie dish.
Press it firmly and evenly across the bottom.
Bring the crumbs slightly up the sides of the dish.
The bottom of a flat measuring cup or drinking glass can help compact the crust evenly.
Firm pressure is important because this is a no-bake crust.
Step 4: Chill the Crust
Place the crust in the refrigerator for at least 20 minutes.
The butter will firm as it chills, helping the crust hold together.
Meanwhile, prepare the filling.
Why Chilling the Crust Matters
Because the crust isn’t baked, refrigeration is what helps solidify the melted butter holding the cookie crumbs together.
If you immediately add the filling to a warm, freshly mixed crust, the crumbs are more likely to shift.
Giving it at least 20 minutes in the refrigerator creates a firmer base for spreading the peanut butter filling.
Step 5: Beat the Cream Cheese and Peanut Butter 🥜
Place 8 ounces softened cream cheese and 1 cup creamy peanut butter in a large mixing bowl.
Beat with an electric mixer until completely smooth and creamy.
Stop and scrape the sides and bottom of the bowl as needed.
You don’t want streaks of plain cream cheese remaining.
Step 6: Add the Sweetener and Vanilla
Add:
- 1/2 cup powdered sugar substitute
- 1 teaspoon vanilla extract
Beat again until fully incorporated.
Taste the mixture.
Because sugar substitutes vary significantly in sweetness, this is the best time to decide whether the filling is sweet enough for your preference.
Step 7: Whip the Heavy Cream
Pour 1/2 cup cold heavy whipping cream into a separate clean bowl.
Beat until stiff peaks form.
When you lift the beaters, the cream should hold its shape.
Avoid continuing far beyond stiff peaks because heavy cream can eventually become grainy and begin turning into butter.
Step 8: Fold the Whipped Cream into the Peanut Butter Filling
Add approximately one-third of the whipped cream to the peanut butter mixture.
Gently fold it in.
Then add the remaining whipped cream and continue folding until the filling is evenly combined.
Avoid vigorous stirring.
The goal is to preserve some of the air incorporated into the whipped cream.
Why Fold Instead of Beat?
Cream cheese and peanut butter are naturally dense.
Whipped cream introduces air into the filling.
If you aggressively beat everything together after whipping the cream, you can knock out much of that air.
Folding creates a filling that’s still rich but noticeably lighter and fluffier.
Step 9: Add the Chocolate Chips 🍫
Add 1/2 cup sugar-free mini chocolate chips.
Fold gently until they’re distributed throughout the filling.
Step 10: Fill the Cookie Crust
Remove the chilled crust from the refrigerator.
Spoon the peanut butter filling into the crust.
Use an offset spatula or the back of a spoon to spread it evenly.
Smooth the top.
Step 11: Chill for at Least 4 Hours ❄️
Cover the pie and refrigerate for at least 4 hours.
For the firmest texture and easiest slicing, refrigerate it overnight.
Don’t rush this step.
The filling needs time to become sufficiently firm.
How Long Does No-Bake Peanut Butter Pie Need to Set?
Four hours is the minimum recommended chilling period.
However, an overnight chill is even better.
The cream cheese, peanut butter, and whipped cream become firmer as they cool, making the pie easier to cut into clean wedges.
If you’re preparing this dessert for a party or holiday, making it the night before is ideal.
Step 12: Add the Whipped Topping
Once the pie is completely chilled, spread or pipe 1 cup sugar-free whipped topping or freshly whipped cream over the surface.
You can cover the entire pie or decorate around the edges.
Step 13: Decorate 🍪🥜🍫
Sprinkle the top with:
- 2 tablespoons sugar-free mini chocolate chips
- 2 tablespoons chopped peanuts
If desired, add:
- 2 tablespoons sugar-free chocolate sauce
- Crushed sugar-free chocolate chip cookies
For the cleanest presentation, add cookie crumbs shortly before serving so they maintain more of their texture.
Step 14: Slice and Serve
Serve the pie chilled.
For especially clean slices, run a sharp knife under hot water.
Dry it thoroughly.
Cut one slice.
Wipe the knife clean and repeat between cuts.
- Prep Time: 20 minutes
- Cook Time: 20 minutes
Nutrition
- Serving Size: 10 slices
- Calories: approximately 390 calories per slice