
Rocky Road Fudge: Indulge in Creamy Chocolate Bliss!
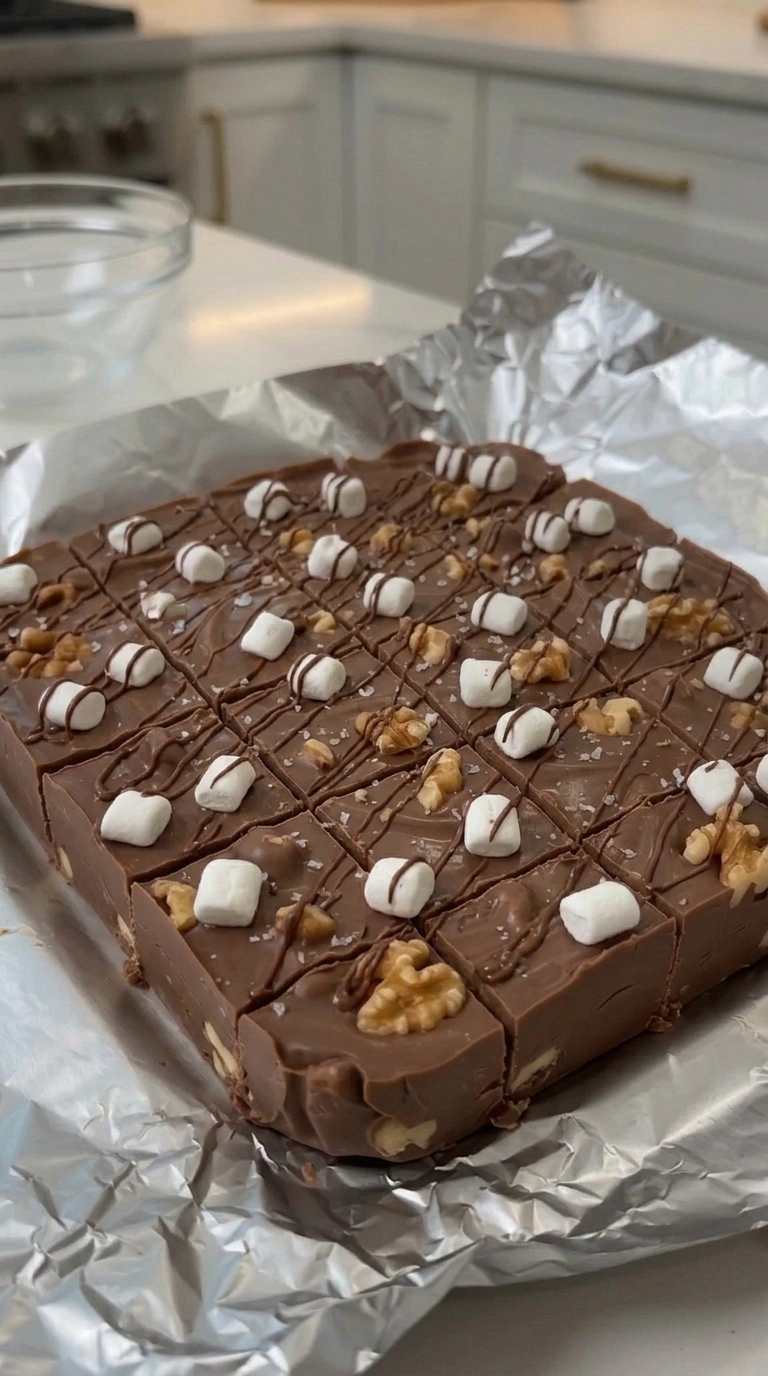
Step-by-Step Guide to Perfect Rocky Road Fudge
Now that you have all your ingredients ready, let’s dive into the delightful process of making Rocky Road Fudge. This is where the magic happens, and I promise, it’s easier than you might think! With just a few simple steps, you’ll be on your way to creating a creamy, chocolatey treat that will have everyone begging for more.
- Line the Pan: Start by lining an 8×8-inch baking pan with parchment paper, leaving an overhang on the sides. This little trick will make it a breeze to lift the fudge out later. Trust me, you’ll thank yourself!
- Combine Ingredients: In a medium saucepan over low heat, combine the semi-sweet chocolate chips, milk chocolate chips, sweetened condensed milk, butter, and salt. Stir continuously for about 5-7 minutes until the chocolate is completely melted and the mixture is smooth and glossy. The aroma of melting chocolate will fill your kitchen, and it’s pure bliss!
- Add Vanilla: Remove the saucepan from the heat and stir in the vanilla extract. This adds a lovely depth of flavor that complements the chocolate beautifully.
- Cool Down: Allow the mixture to cool for about 3–4 minutes. You want it warm but not hot enough to melt the marshmallows. This step is crucial for achieving that perfect fluffy texture!
- Fold in the Goodies: Gently fold in the mini marshmallows and chopped walnuts until they are evenly distributed throughout the chocolate mixture. The contrast of textures here is what makes this fudge so special!
- Spread the Mixture: Pour the mixture into the prepared baking pan and spread it evenly with a spatula. Don’t worry if it’s a bit sticky; that’s just part of the charm!
- Top It Off: If you’re feeling extra indulgent, sprinkle some extra marshmallows and walnuts on top, gently pressing them into the fudge. This adds a delightful visual appeal and a little extra crunch.
- Chill Out: Refrigerate the fudge for 3–4 hours, or until it’s completely firm. This is the hardest part—waiting! But I promise, it’s worth it.
- Cut and Serve: Once firm, lift the fudge from the pan using the parchment paper and cut it into small squares with a sharp knife. Serve chilled or at room temperature, and watch as everyone’s eyes light up with joy!
And there you have it! A step-by-step guide to making the most delicious Rocky Road Fudge that’s sure to impress. Remember, the key is in the details, so take your time and enjoy the process. Happy cooking!
Sensory-Rich Introduction with Immediate Craving
Imagine sinking your teeth into a piece of Rocky Road Fudge, where the rich, creamy texture of melted chocolate envelops your senses. The glossy surface glistens under the light, inviting you to indulge. As you take a bite, the fluffy mini marshmallows burst with sweetness, perfectly complementing the crunchy walnuts that add a delightful contrast. The aroma of chocolate wafts through the air, wrapping you in a warm embrace of nostalgia and comfort.
I still remember the first time I made Rocky Road Fudge—it was a chilly winter afternoon, and my family was gathered around the kitchen, eagerly awaiting a sweet treat. As the chocolate melted and the marshmallows folded in, laughter filled the room. The joy on my children’s faces when they took their first bites was priceless. It became a cherished tradition, a recipe passed down through generations, bringing us together during holidays and special occasions.
This fudge isn’t just a dessert; it’s a celebration of togetherness. Whether it’s a birthday party, a cozy movie night, or a festive holiday gathering, Rocky Road Fudge is the perfect treat to share. It’s a crowd-pleaser that brings smiles and sweet memories, making every occasion a little more special. So, gather your loved ones, and let’s create some delicious moments together!
Why You’ll Love This Rocky Road Fudge
Let me tell you, there are countless reasons to fall head over heels for Rocky Road Fudge. It’s not just a treat; it’s an experience that tantalizes your taste buds and warms your heart. Here’s why this fudge is destined to become a favorite in your home:
- Texture Contrast: The smooth, velvety chocolate base melts in your mouth, while the crunchy walnuts and fluffy marshmallows provide a delightful contrast. Each bite is a symphony of textures that keeps you coming back for more!
- Flavor Balance: The rich sweetness of the chocolate and marshmallows is perfectly balanced by the nutty crunch of walnuts and a hint of salt. It’s a harmonious blend that dances on your palate, making it hard to resist just one piece.
- Versatility: One of the best things about this fudge is its adaptability. You can easily customize it with various nuts, toppings, or even flavored extracts like almond or peppermint to suit your personal taste. The possibilities are endless!
- Ease of Preparation: This is a quick and simple no-bake recipe that requires minimal cooking skills. Even if you’re a kitchen novice, you’ll find that making Rocky Road Fudge is a breeze. It’s perfect for those busy days when you want to whip up something delicious without spending hours in the kitchen.
- Universal Appeal: Loved by both kids and adults alike, this fudge is a true crowd-pleaser. Whether you’re serving it at a birthday party, holiday gathering, or just a cozy night in, you can be sure it will bring smiles and satisfaction to everyone.
So, whether you’re indulging in a piece yourself or sharing it with loved ones, Rocky Road Fudge is sure to create sweet memories that last a lifetime. Trust me, once you try it, you’ll understand why it holds a special place in my heart and in the hearts of many!
Essential Tools & Preparation Strategy
Before we dive into the delicious world of Rocky Road Fudge, let’s make sure you have all the right tools at your disposal. Having the right equipment not only makes the process smoother but also ensures that your fudge turns out perfectly every time. Here’s what you’ll need:
- Medium Saucepan: This is essential for melting the chocolate and combining all the ingredients. If you prefer, you can use a double boiler for a gentler melting process, which helps prevent burning.
- Spatula: A good spatula is crucial for mixing and spreading the fudge evenly in the pan. I recommend a silicone spatula for easy scraping and to ensure you get every last bit of that delicious mixture!
- 8×8-inch Baking Pan: This is the ideal size for achieving the perfect thickness of fudge. If you want thinner pieces, you can substitute it with a 9×9-inch pan, but keep an eye on the chilling time.
- Parchment Paper: This little gem ensures easy removal of the fudge from the pan. If you don’t have parchment paper on hand, aluminum foil can work in a pinch, but be sure to grease it lightly.
- Sharp Knife: A sharp knife is necessary for cutting the fudge into neat squares. If your fudge is on the softer side, a plastic knife can also do the trick without making a mess.
- Measuring Cups and Spoons: Accurate measurements are key to achieving the right texture and flavor. If you want to be extra precise, consider using digital scales for measuring your ingredients.
- Refrigerator: This is essential for chilling the fudge until it’s firm. Make sure you have enough space in your fridge for the baking pan, as patience is key in this step!
With these tools in hand, you’re all set to embark on your fudge-making adventure! Remember, the right preparation can make all the difference, so take a moment to gather everything before you start. Let’s get ready to create some chocolatey magic!
Ingredients & Their Roles in This Rocky Road Fudge
Understanding the ingredients in Rocky Road Fudge is key to mastering this delightful treat. Each component plays a vital role in creating the perfect balance of flavor and texture. Let’s break it down:
- Chocolate Mixture:
- 3 cups semi-sweet chocolate chips: These provide the rich chocolate flavor that forms the base of our fudge. Their smooth melting quality ensures a luscious texture.
- 1 cup milk chocolate chips: Adding sweetness and creaminess, these chips enhance the overall flavor profile, making the fudge irresistibly indulgent.
- 1 can (14 oz) sweetened condensed milk: This acts as a binding agent, bringing all the ingredients together while adding a creamy richness that’s hard to resist.
- 4 tbsp unsalted butter: Enhancing the smooth texture and richness, butter adds a velvety mouthfeel that elevates the fudge to a whole new level.
- 1/4 tsp salt: A pinch of salt balances the sweetness and enhances the overall flavor, making each bite even more satisfying.
- Add-ins:
- 2 cups mini marshmallows: These fluffy delights contribute sweetness and a light, airy texture that contrasts beautifully with the dense chocolate.
- 1 cup chopped walnuts (or pecans): Adding a delightful crunch and nutty flavor, these nuts provide a satisfying texture that complements the smooth fudge.
- Optional Toppings:
- Extra mini marshmallows
- Chopped walnuts
- Chocolate drizzle
- Flaky sea salt
These toppings not only add extra texture but also enhance the visual appeal of your Rocky Road Fudge, making it even more tempting to indulge!
With these ingredients, you’re well on your way to creating a batch of Rocky Road Fudge that’s sure to impress. Each element works in harmony to deliver a treat that’s rich, creamy, and utterly delicious!
Step-by-Step Guide to Perfect Rocky Road Fudge
Now that you have all your ingredients ready, let’s dive into the delightful process of making Rocky Road Fudge. This is where the magic happens, and I promise, it’s easier than you might think! With just a few simple steps, you’ll be on your way to creating a creamy, chocolatey treat that will have everyone begging for more.
- Line the Pan: Start by lining an 8×8-inch baking pan with parchment paper, leaving an overhang on the sides. This little trick will make it a breeze to lift the fudge out later. Trust me, you’ll thank yourself!
- Combine Ingredients: In a medium saucepan over low heat, combine the semi-sweet chocolate chips, milk chocolate chips, sweetened condensed milk, butter, and salt. Stir continuously for about 5-7 minutes until the chocolate is completely melted and the mixture is smooth and glossy. The aroma of melting chocolate will fill your kitchen, and it’s pure bliss!
- Add Vanilla: Remove the saucepan from the heat and stir in the vanilla extract. This adds a lovely depth of flavor that complements the chocolate beautifully.
- Cool Down: Allow the mixture to cool for about 3–4 minutes. You want it warm but not hot enough to melt the marshmallows. This step is crucial for achieving that perfect fluffy texture!
- Fold in the Goodies: Gently fold in the mini marshmallows and chopped walnuts until they are evenly distributed throughout the chocolate mixture. The contrast of textures here is what makes this fudge so special!
- Spread the Mixture: Pour the mixture into the prepared baking pan and spread it evenly with a spatula. Don’t worry if it’s a bit sticky; that’s just part of the charm!
- Top It Off: If you’re feeling extra indulgent, sprinkle some extra marshmallows and walnuts on top, gently pressing them into the fudge. This adds a delightful visual appeal and a little extra crunch.
- Chill Out: Refrigerate the fudge for 3–4 hours, or until it’s completely firm. This is the hardest part—waiting! But I promise, it’s worth it.
- Cut and Serve: Once firm, lift the fudge from the pan using the parchment paper and cut it into small squares with a sharp knife. Serve chilled or at room temperature, and watch as everyone’s eyes light up with joy!
And there you have it! A step-by-step guide to making the most delicious Rocky Road Fudge that’s sure to impress. Remember, the key is in the details, so take your time and enjoy the process. Happy cooking!
Chef’s Notes & Pro Tips for Flawless Results
As you embark on your Rocky Road Fudge journey, here are some invaluable tips and tricks that I’ve gathered over the years to ensure your fudge turns out perfectly every time. Trust me, these little nuggets of wisdom can make all the difference!
- Make-ahead Instructions: One of the best things about this fudge is that it can be made up to 2 weeks in advance. Just store it in the refrigerator, and you’ll have a delicious treat ready to go whenever you need it!
- Storage Tips: To keep your fudge fresh, store it in an airtight container with parchment paper between the layers. This prevents sticking and keeps it nice and moist. You can refrigerate it for up to 2 weeks or freeze it for up to 3 months. Just remember to let frozen fudge thaw in the refrigerator before serving!
- Equipment Recommendations: For the best results, use a heavy-bottomed saucepan to prevent burning. A silicone spatula is ideal for mixing, as it allows you to scrape every last bit of that luscious chocolate mixture without leaving any behind.
- Customization Options: Don’t be afraid to get creative! Experiment with different nuts like almonds or hazelnuts, add dried fruits like cherries or cranberries for a fruity twist, or use flavored extracts like almond or peppermint to elevate the flavor profile of your fudge.
With these pro tips in your back pocket, you’re well-equipped to create a batch of Rocky Road Fudge that will impress everyone. Remember, cooking is all about having fun and making it your own, so let your creativity shine!
Avoid These Common Cooking Mistakes
Even the most seasoned cooks can run into a few hiccups when making Rocky Road Fudge. But don’t worry! I’ve compiled a list of common mistakes and their solutions to help you navigate the fudge-making process like a pro. Let’s ensure your fudge turns out perfectly every time!
- Not stirring continuously: This can lead to burnt chocolate, which is a tragedy we want to avoid! Solution: Keep stirring until fully melted. The chocolate should be smooth and glossy, not gritty or burnt.
- Overheating the chocolate: If the chocolate gets too hot, it can seize up and become unusable. Solution: Use low heat and remove from heat as soon as melted. Patience is key here!
- Not cooling the mixture before adding marshmallows: Adding marshmallows to a hot mixture can cause them to melt, ruining that fluffy texture. Solution: Allow the mixture to cool for 3-4 minutes before folding in the marshmallows.
- Using a dull knife to cut: This can result in uneven pieces that don’t look as appealing. Solution: Use a sharp knife for clean cuts. A warm knife can also help if the fudge is particularly firm.
- Not lining the pan properly: This can make removal difficult and lead to a messy situation. Solution: Ensure parchment paper is used correctly, leaving an overhang for easy lifting.
- Skipping the refrigeration step: If you skip this, you’ll end up with soft fudge that doesn’t hold its shape. Solution: Refrigerate until firm, which usually takes about 3-4 hours.
- Not measuring ingredients accurately: This can affect the texture and flavor of your fudge. Solution: Use measuring cups and spoons for precision. Trust me, it makes a world of difference!
By keeping these common pitfalls in mind, you’ll be well on your way to creating a batch of Rocky Road Fudge that’s not only delicious but also visually stunning. Happy cooking!
Creative Variations & Customizations
One of the best things about Rocky Road Fudge is its versatility! You can easily customize this delightful treat to suit your taste preferences or to celebrate the seasons. Here are some creative variations and customizations that will take your fudge to the next level:
- Nut-Free Version: If you’re looking for a nut-free alternative, simply omit the walnuts and replace them with sunflower seeds. They add a delightful crunch without the allergens, making it perfect for school lunches or gatherings.
- Seasonal Twist: For a festive holiday version, add crushed peppermint candies to the mix. The refreshing mint flavor pairs beautifully with the rich chocolate, creating a seasonal treat that’s sure to impress!
- Vegan Option: Want to make this fudge vegan? No problem! Use dairy-free chocolate chips and substitute the sweetened condensed milk with coconut cream. This will give you a creamy texture while keeping it plant-based.
- Spicy Kick: If you’re feeling adventurous, incorporate a pinch of cayenne pepper into the chocolate mixture for a surprising heat. The combination of sweet and spicy will tantalize your taste buds and add an exciting twist!
- Fruit-Infused: For a fruity contrast, add dried cherries or cranberries to the fudge. Their tartness complements the sweetness of the chocolate and marshmallows, creating a delightful balance of flavors.
These variations not only enhance the flavor profile of your Rocky Road Fudge but also allow you to express your creativity in the kitchen. So, don’t hesitate to experiment and make this recipe your own. Happy fudging!
Perfect Pairings: What to Serve With Rocky Road Fudge
When it comes to enjoying Rocky Road Fudge, the right accompaniments can elevate your experience to new heights. Here are some delightful pairings that will complement the rich, chocolatey goodness of your fudge:
- Vanilla Ice Cream: The cold creaminess of vanilla ice cream perfectly complements the rich fudge, creating a delightful contrast in temperature and texture. It’s like a match made in dessert heaven!
- Hot Coffee: A warm cup of coffee enhances the chocolate flavors and provides a cozy contrast to the sweetness of the fudge. The bitterness of the coffee balances the richness beautifully.
- Whipped Cream: A dollop of whipped cream adds lightness and a touch of sweetness, making each bite even more indulgent. It’s a simple yet effective way to elevate your fudge experience.
- Fresh Strawberries: The refreshing fruity balance of fresh strawberries offers a delightful contrast to the richness of the fudge. Their natural sweetness and slight tartness make for a perfect pairing!
- Cold Milk: You can’t go wrong with a classic! A glass of cold milk complements the richness of the fudge and is a nostalgic pairing that many of us cherish.
- Brownies: For the ultimate indulgence, use Rocky Road Fudge as a topping for brownies. The combination of fudgy textures will leave everyone craving more!
- Nutty Stout Beer: If you’re feeling adventurous, try pairing your fudge with a nutty stout beer. The deep flavors of the beer enhance the chocolate and nutty notes in the fudge, creating a unique flavor experience.
- Dessert Platter: Include your Rocky Road Fudge on a dessert platter alongside other chocolates and candies for a variety of sweet treats. It’s perfect for parties and gatherings, allowing everyone to indulge in a little bit of everything!
These pairings not only enhance the enjoyment of your Rocky Road Fudge but also create opportunities for delightful flavor combinations. So, gather your favorite accompaniments and get ready to indulge in a truly satisfying dessert experience!
Storage & Meal Prep Instructions
Once you’ve created your delicious batch of Rocky Road Fudge, it’s important to know how to store it properly to maintain its rich flavor and texture. Here are some simple yet effective storage and meal prep instructions to keep your fudge fresh and ready to enjoy:
- Refrigeration: Store your fudge in an airtight container in the fridge for up to 2 weeks. This will help preserve its creamy texture and prevent it from drying out. Just make sure to place parchment paper between layers if you stack them to avoid sticking!
- Freezing: If you want to keep your fudge for a longer period, you can freeze it for up to 3 months. To do this, layer the fudge with parchment paper in an airtight container to prevent sticking. When you’re ready to enjoy it, simply remove the desired amount from the freezer.
- Reheating: To thaw frozen fudge, place it in the refrigerator for a few hours or overnight. This gentle thawing method helps maintain its texture. Once thawed, your fudge can be enjoyed chilled or at room temperature, making it a versatile treat for any occasion!
By following these storage and meal prep instructions, you can ensure that your Rocky Road Fudge remains a delightful indulgence for weeks to come. So go ahead, make a big batch, and savor the sweet moments!
Nutrition Facts & Health Insights
As we indulge in the delightful world of Rocky Road Fudge, it’s important to consider not just the taste but also the nutritional aspects of this sweet treat. Here’s a closer look at the nutrition facts and some health insights that might surprise you!
| Nutrient | Amount per Serving |
|---|---|
| Serving Size | 1 piece (approximately 1 inch square) |
| Calories | 170 |
| Sugar | 18 grams |
| Sodium | 50 milligrams |
| Fat | 9 grams |
| Saturated Fat | 4 grams |
| Unsaturated Fat | 4 grams |
| Trans Fat | 0 grams |
| Carbohydrates | 22 grams |
| Fiber | 1 gram |
| Protein | 2 grams |
| Cholesterol | 5 milligrams |
Now, let’s talk about some of the health benefits of the key ingredients in Rocky Road Fudge:
- Dark Chocolate: Rich in antioxidants, dark chocolate can help improve heart health and lower blood pressure. It’s a delicious way to indulge while still getting some health benefits!
- Walnuts: These little powerhouses are packed with healthy fats, including omega-3 fatty acids, which are great for brain health. They also provide protein and fiber, making your fudge a bit more nutritious.
While Rocky Road Fudge is certainly a treat to enjoy in moderation, knowing the nutritional value can help you savor each bite even more. So go ahead, indulge a little, and enjoy the sweet balance of flavor and nutrition!
Frequently Asked Questions
As you embark on your Rocky Road Fudge adventure, you might have a few questions along the way. Don’t worry; I’ve got you covered! Here are some of the most common queries I receive, along with helpful answers to guide you through the process:
- Can I use dark chocolate instead of semi-sweet?
Absolutely! Dark chocolate will give your fudge a richer flavor and a slightly more intense chocolate experience. Just keep in mind that it may alter the sweetness level, so you might want to adjust the amount of sweetened condensed milk accordingly. - What can I substitute for sweetened condensed milk?
If you’re looking for a substitute, you can use coconut cream or homemade evaporated milk mixed with sugar. For a vegan option, try using a dairy-free sweetened condensed milk alternative available in stores. - How do I prevent the fudge from being too soft?
To ensure your fudge sets properly, make sure to refrigerate it for the full 3-4 hours until it’s completely firm. If it’s still too soft, it may be due to not enough chilling time or too much liquid in the mixture. Adjusting the ratio of chocolate to sweetened condensed milk can also help. - Can I add other mix-ins like dried fruit?
Yes! Feel free to get creative with your mix-ins. Dried fruits like cherries, cranberries, or even raisins can add a delightful sweetness and chewiness to your fudge. Just be sure to chop them into smaller pieces for even distribution. - How long does the fudge last in the fridge?
Your Rocky Road Fudge can last in the refrigerator for up to 2 weeks when stored in an airtight container. Just make sure to place parchment paper between layers to prevent sticking! - Is it possible to make this fudge dairy-free?
Yes, you can easily make this fudge dairy-free by using dairy-free chocolate chips and substituting the sweetened condensed milk with coconut cream or a dairy-free alternative. It’s a delicious way to enjoy fudge without the dairy! - What’s the best way to cut the fudge?
For clean cuts, use a sharp knife. If your fudge is particularly firm, you can warm the knife slightly under hot water and dry it off before cutting. This will help create smooth, even squares. - Can I use a different type of nut?
Absolutely! While walnuts are traditional, you can substitute them with pecans, almonds, or even hazelnuts. Each nut will bring its unique flavor and texture to the fudge, so feel free to experiment! - How do I store leftover fudge?
Store any leftover fudge in an airtight container in the refrigerator for up to 2 weeks. If you want to keep it longer, you can freeze it for up to 3 months. Just remember to layer it with parchment paper to prevent sticking! - What’s the best way to serve this fudge?
You can serve Rocky Road Fudge chilled or at room temperature. It pairs wonderfully with vanilla ice cream, a hot cup of coffee, or even a drizzle of chocolate sauce for an extra indulgent treat!
With these FAQs answered, you’re all set to create your own batch of Rocky Road Fudge with confidence. Enjoy the process, and don’t forget to share your delicious results!
Final Inspiration & Kitchen Confidence
As you stand in your kitchen, ready to embark on the delightful journey of making Rocky Road Fudge, I want to take a moment to remind you of the joy that comes from creating something delicious. There’s a certain magic that happens when you combine simple ingredients and transform them into a treat that brings smiles and satisfaction. It’s not just about the fudge; it’s about the memories you’ll create along the way.
Imagine the laughter and joy as you share your homemade fudge with family and friends. Each piece is a little morsel of love, a sweet reminder of the time spent together in the kitchen. Whether it’s a birthday celebration, a cozy movie night, or just a casual gathering, your Rocky Road Fudge will be the star of the show, sparking conversations and creating lasting memories.
So, I encourage you to embrace your creativity! Don’t hesitate to experiment with your own variations—add your favorite nuts, try different toppings, or even infuse it with unique flavors. The beauty of cooking lies in the freedom to make it your own. Share your creations with friends and family, and let them in on the joy of your culinary adventure. Who knows? You might just inspire someone else to whip up their own batch of fudge!
Now, roll up your sleeves, gather your ingredients, and let’s make some magic happen in the kitchen. Your Rocky Road Fudge awaits, and I can’t wait for you to experience the joy of sharing it with those you love. Happy cooking!
Print
Rocky Road Fudge: Indulge in Creamy Chocolate Bliss!
- Total Time: 4 hours 25 minutes
- Yield: 36 pieces 1x
- Diet: Vegetarian
Description
Rocky Road Fudge is a decadent treat that combines the rich, creamy texture of melted chocolate with the delightful crunch of walnuts and the fluffy sweetness of mini marshmallows. Each bite offers a harmonious blend of flavors, with the chocolate’s deep sweetness perfectly balanced by the nuttiness and a hint of salt.
Ingredients
- Chocolate Mixture:
- 3 cups semi-sweet chocolate chips
- 1 cup milk chocolate chips
- 1 can (14 oz) sweetened condensed milk
- 4 tbsp unsalted butter
- 1/4 tsp salt
- Add-ins:
- 2 cups mini marshmallows
- 1 cup chopped walnuts (or pecans)
- Optional Toppings:
- Extra mini marshmallows
- Chopped walnuts
- Chocolate drizzle
- Flaky sea salt
Instructions
- Line an 8×8-inch baking pan with parchment paper, leaving an overhang on the sides for easy removal.
- In a medium saucepan over low heat, combine the semi-sweet chocolate chips, milk chocolate chips, sweetened condensed milk, butter, and salt.
- Stir continuously until the chocolate is completely melted and the mixture is smooth and glossy.
- Remove the saucepan from the heat and stir in the vanilla extract.
- Allow the mixture to cool for about 3–4 minutes so it’s warm but not hot enough to melt the marshmallows.
- Fold in the mini marshmallows and chopped walnuts until evenly distributed.
- Pour the mixture into the prepared baking pan and spread it evenly with a spatula.
- Sprinkle extra marshmallows and walnuts over the top if desired, gently pressing them into the fudge.
- Refrigerate for 3–4 hours, or until the fudge is completely firm.
- Lift the fudge from the pan using the parchment paper and cut into small squares with a sharp knife.
- Serve chilled or at room temperature.
Notes
- Make-ahead: This fudge can be made up to 2 weeks in advance and stored in the refrigerator.
- Storage: Store the fudge in an airtight container with parchment paper between the layers. Keep it in the refrigerator for up to 2 weeks or freeze for up to 3 months. Let frozen fudge thaw in the refrigerator before serving.
- Substitutions: Use pecans instead of walnuts for a different nutty flavor, or omit nuts entirely for a nut-free version.
- Prep Time: 15 minutes
- Cook Time: 10 minutes
- Category: desserts
- Method: no-bake
- Cuisine: American
Nutrition
- Serving Size: 1 piece (approximately 1 inch square)
- Calories: 170
- Sugar: 18 grams
- Sodium: 50 milligrams
- Fat: 9 grams
- Saturated Fat: 4 grams
- Unsaturated Fat: 4 grams
- Trans Fat: 0 grams
- Carbohydrates: 22 grams
- Fiber: 1 gram
- Protein: 2 grams
- Cholesterol: 5 milligrams
Keywords: Rocky Road Fudge, chocolate fudge, dessert recipes, no-bake fudge, easy fudge, chocolate desserts, marshmallow fudge, walnut fudge, sweet treats, holiday desserts, homemade fudge, creamy chocolate, indulgent desserts