
High-Protein Peanut Butter Chocolate Swirl Fluff Cups
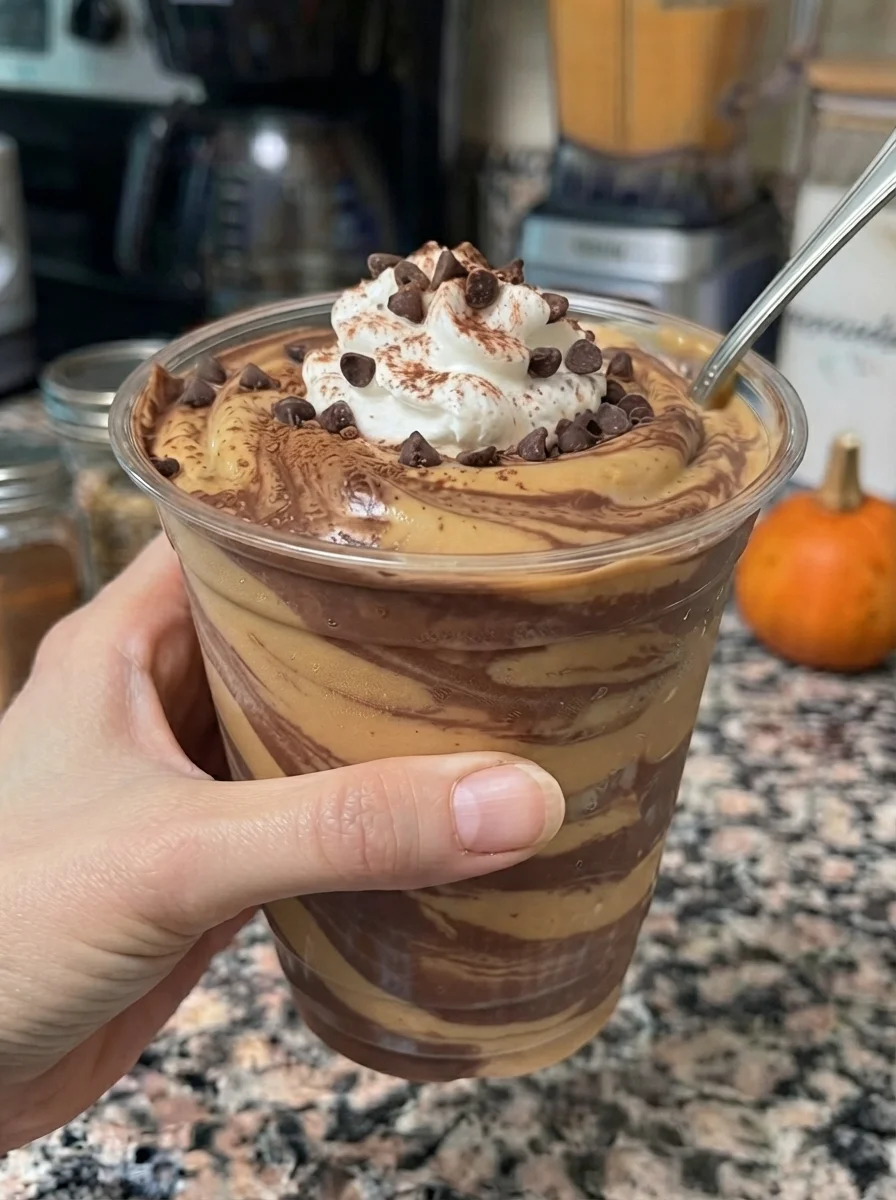
These High-Protein Peanut Butter Chocolate Swirl Fluff Cups combine creamy Greek yogurt, peanut butter, and vanilla protein powder with a ribbon of cocoa-flavored cream. They deliver the familiar chocolate-and-peanut-butter combination in a quick, chilled dessert that needs no baking.
The method is simple: mix one peanut butter base, set aside a portion for chocolate, and layer the two mixtures into small glasses. A few gentle passes with a skewer create the swirl without blending the colors completely together.
A short chill lets the protein powder hydrate and gives the dessert a thicker consistency. Keep the cups covered in the refrigerator for convenient snacks, adding any chocolate chips just before serving.
Although called fluff cups, the base is thick and creamy rather than an airy whipped mousse. Whisking makes it smooth and may incorporate a little air, but Greek yogurt and protein powder do not whip into the same stable foam as heavy cream. Expect a spoonable yogurt dessert with a rich peanut butter flavor.
Recipe Overview
- Yield: 2 generous dessert cups or 3 smaller cups
- Preparation: About 10 minutes
- Chilling: 15–30 minutes
- Total: About 25–40 minutes
- Cooking: None
- Equipment: Two bowls, a whisk or spatula, serving containers, and a skewer
This article expands the supplied recipe with consistency and portioning guidance. It has not been independently kitchen-tested for this article. Protein powder, yogurt thickness, and peanut butter consistency affect the amount of milk needed and the final set.
Why the Ingredients Work Together
Greek yogurt provides the thick, tangy base and some of the recipe’s protein. Peanut butter adds richness and a rounded, savory flavor that balances the cocoa.
Vanilla protein powder contributes sweetness, flavor, and additional body. Some powders continue thickening as they hydrate, which explains why the mixture can feel firmer after chilling than when first stirred.
Cocoa powder turns part of the same base into the chocolate layer. Because cocoa absorbs moisture and tastes bitter without enough sweetness, that smaller portion may need a little extra milk and a separate taste adjustment.
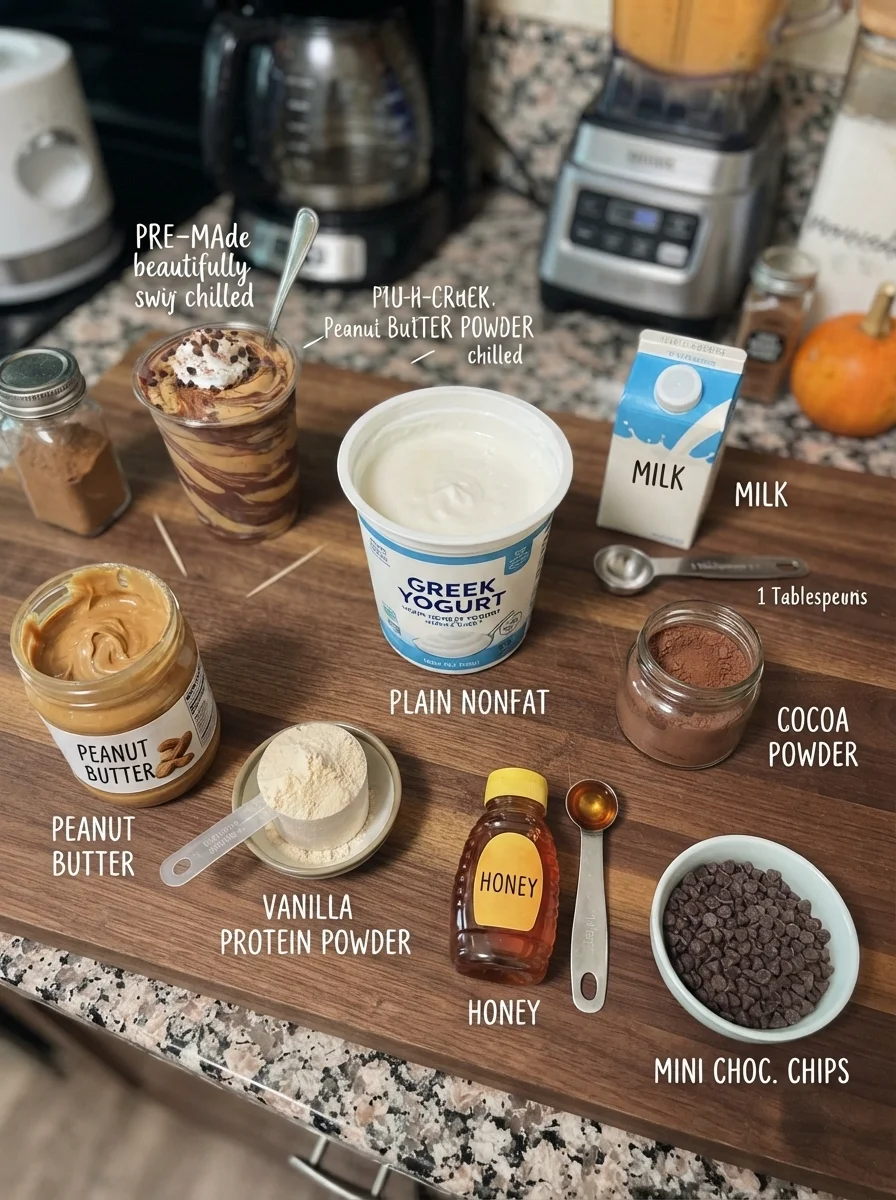
Ingredients
Peanut Butter Base
- 1 cup plain nonfat Greek yogurt
- 2 tablespoons creamy peanut butter, well stirred
- 1 labeled serving vanilla protein powder, usually about one scoop
- 1–2 tablespoons milk, divided and added only as needed
- 1–2 teaspoons powdered sweetener or honey, optional and adjusted to taste
Chocolate Swirl
- About one-third of the prepared peanut butter base
- 1 tablespoon unsweetened cocoa powder
- A little of the measured milk, or an additional teaspoon if needed
Optional Topping
- 1 teaspoon mini chocolate chips, divided among all the cups
Measure protein powder according to its label. Scoop sizes vary, so one scoop is not a standard serving across products. A concentrated sweetener should also be measured according to its instructions rather than substituted teaspoon for teaspoon for honey.
Ingredient Notes
Greek Yogurt
Use thick, plain Greek yogurt. Regular yogurt generally contains more free liquid and may make the cups softer.
Nonfat yogurt is the starting point for the nutrition estimates. Higher-fat yogurt can make a richer dessert but contributes more calories. Greek-style products vary, so check both consistency and protein content.
If using sweetened vanilla yogurt, start without extra sweetener. The yogurt and protein powder may already provide enough sweetness before you add the cocoa.
Peanut Butter
A smooth peanut butter works best for a clean swirl. If using natural peanut butter, stir the jar thoroughly before measuring so the oil and solids are evenly distributed.
Peanut butter taken from the dry bottom of a separated jar can make the base unusually stiff. Mostly oil from the top can make it looser. Correct jar mixing is more useful than trying to compensate with repeated additions of milk or powder.
Unsweetened peanut butter keeps the flavor less sweet, but it still contains natural sugars and carbohydrates. Check the label rather than assuming every natural product has the same ingredients.
Protein Powder
Choose a vanilla powder you enjoy. Yogurt and peanut butter can soften its flavor, but they will not necessarily hide a strongly chalky or artificial taste.
Casein-heavy blends can become particularly thick. Some whey products stay softer, while plant-based powders may absorb more liquid and remain a little grainy. Use the milk as an adjustment rather than expecting identical results with every powder.
Cocoa Powder
Use unsweetened cocoa, not a sweetened chocolate drink mix. Natural or Dutch-process cocoa can work in this no-bake recipe; their flavors differ, but there is no baking soda reaction to manage.
Sift cocoa if it is lumpy. Mixing dry lumps into an already thick base can leave bitter pockets that are difficult to remove without overworking the mixture.
Milk
Dairy milk or an unsweetened plant milk can work. Add it gradually, reserving some for the chocolate portion.
The listed quantity is a starting range, not an amount you must use completely. A thick yogurt and absorbent powder may need more, while a softer combination may need almost none.
Equipment and Portion Size
A whisk or sturdy spatula is sufficient. A hand mixer can smooth the base, but it does not create a traditional whipped mousse from these ingredients.
Use two or three small glasses or jars with lids. “Two to three cups” refers to individual serving containers, not a guaranteed two to three measuring cups of finished dessert.
A skewer, toothpick, or narrow blunt utensil makes a simple swirl. You do not need a piping bag unless you want a more decorative layered presentation.
How to Make the Fluff Cups
1. Mix the Peanut Butter Base
Place Greek yogurt, peanut butter, and protein powder in a bowl. Stir slowly at first to moisten the powder, then whisk until evenly combined.
Add about 1 teaspoon of milk if needed rather than starting with a large pour. Scrape the sides and bottom so no dry powder remains.
The mixture should be thick and smooth enough to spread with a spoon. If it is already soft, keep the remaining milk for the cocoa portion.
2. Let the Powder Hydrate Briefly
Allow the mixture to stand for about 2–3 minutes, then stir again. This gives the powder a chance to absorb moisture before you decide whether more liquid is needed.
If it becomes too stiff to stir comfortably, add milk a teaspoon at a time. Stop when it is creamy rather than pourable.
3. Adjust Sweetness
Taste with a clean spoon. Add optional honey or powdered sweetener in small amounts, remembering that the protein powder may already be sweetened.
Honey adds both sweetness and a little liquid. Powdered sweeteners vary in strength and bulk, so do not assume the same volume tastes identical.
4. Make the Chocolate Portion
Transfer about one-third of the base to a second bowl. Keep the remaining two-thirds in the original bowl.
Stir cocoa into the smaller portion. Add a little reserved milk until its consistency is close to the peanut butter portion. The cocoa mixture will usually need more moisture because cocoa thickens it.
Taste again and sweeten slightly if needed. The chocolate portion can be a little stronger than the plain base, but it should not taste unpleasantly bitter.
5. Layer the Mixtures
Divide about half the plain peanut butter mixture among the serving cups. Add small spoonfuls of chocolate mixture, then repeat with the remaining mixtures.
Distribute both portions evenly so each serving contains the same general balance of chocolate and peanut butter. Scrape the bowls well rather than leaving most of one flavor behind.
6. Create the Swirl
Insert the skewer down through a few layers and make one or two slow figure-eight or curved motions. Turn the glass slightly if needed, then stop while distinct ribbons remain.
Too much stirring merges the colors into a uniform chocolate mixture. That still tastes good, but it will not have the striped appearance.
If the mixtures are too stiff to swirl, add a tiny amount of milk to them before filling the next cup. If too loose, chill briefly before attempting a decorative swirl.
7. Chill
Cover and refrigerate for 15–30 minutes. The dessert should become firmer and more cohesive as the powder hydrates.
A longer chill can thicken some powders considerably. Judge the serving consistency after stirring a small edge portion rather than assuming every brand needs the same time.
8. Finish and Serve
Divide the optional teaspoon of mini chocolate chips across the cups just before serving. Serve chilled with a spoon.
An extra peanut butter drizzle is optional and additional to the measured 2 tablespoons. If warming a teaspoon for drizzling, let it become fluid rather than hot so it does not warm the chilled dessert unnecessarily.
Tips for a Visible Chocolate Swirl
Keep both mixtures close in thickness. A stiff chocolate paste sinks awkwardly into a soft base, while a runny chocolate layer quickly blends away.
Layer before swirling. Placing all the chocolate on top and stirring only the surface may leave the bottom entirely plain.
Use small spoonfuls and minimal movement. A few visible streaks look better than repeatedly circling until the colors disappear.
Serve in clear containers when you want to display the ribbons. Opaque ramekins work just as well for eating, but the side layers will not be visible.
Keep the color contrast realistic. Cocoa gives a brown swirl; it does not form a glossy melted-chocolate ribbon without an additional chocolate ingredient.
Troubleshooting
| Problem | Possible reason | Adjustment |
|---|---|---|
| Base is chalky | Protein powder flavor or incomplete hydration | Rest briefly, stir well, and choose a powder you enjoy. |
| Mixture is too stiff | Absorbent powder or dry peanut butter | Add milk a teaspoon at a time. |
| Cups are runny | Excess liquid or thin yogurt | Use thicker yogurt and less milk next time; chill before judging. |
| Cocoa forms lumps | Lumpy powder added to a thick mixture | Sift first and stir thoroughly. |
| Chocolate tastes bitter | Unsweetened cocoa needs balancing | Add a little sweetener to the chocolate portion. |
| Swirl disappears | Too much mixing | Layer and use only one or two gentle passes. |
| Texture is creamy rather than airy | No separately whipped ingredient | Expect a thick dairy dessert rather than a stable mousse. |
| Mixture firms overnight | Continued powder hydration | Loosen the serving portion carefully with a little milk if needed. |
Variations
Chocolate Protein Powder
Chocolate powder can replace vanilla, but it darkens the entire base and reduces the contrast between the two portions. Use vanilla for the clearest peanut butter-and-chocolate swirl.
Powdered Peanut Butter
Powdered peanut butter changes fat content, flavor, and liquid needs. It is not a direct equal-volume replacement for creamy peanut butter. Follow the product’s preparation guidance and expect to adjust the formula.
Almond Butter
Smooth almond butter offers a different nut flavor. Stir thoroughly and adjust milk cautiously. It still contains a major allergen and changes nutrition.
Extra Airiness
Fold a small amount of prepared whipped topping or separately whipped cream into the base as an optional variation. This adds ingredients and changes nutrition. Whisking the original yogurt mixture for longer does not produce the same structure.
Berry Finish
Serve with a few sliced strawberries or raspberries for a fresh contrast. Add them shortly before eating to limit moisture release and preserve the swirl.
Serving Ideas
Two portions make a more substantial snack or dessert, while three smaller portions work well after a meal. Divide toppings along with the base so the portions stay reasonably consistent.
For breakfast, pair a smaller cup with another food you enjoy rather than assuming one small jar will suit every appetite.
The unlayered base can also be served as a chilled dip with fruit. Keep the serving portion separate from stored leftovers and use clean utensils.
Meal Prep and Storage
Cover and refrigerate promptly at 40°F or below for up to 3 days, using fresh ingredients. Follow an earlier storage limit if a dairy ingredient was already close to the end of its usable period.
Keep room-temperature handling within 2 hours, or 1 hour when temperatures exceed 90°F. Add toppings close to serving rather than leaving them on the cups through several days of storage.
The mixture may become thicker as the protein powder hydrates. For a prepared swirl, try letting the serving portion stand briefly while still cool before stirring in milk. Stirring the whole cup will blur the design, so texture correction and a perfect swirl may not both be possible.
Freezing is not recommended for the intended texture. Greek yogurt can separate or become grainy after thawing, and the decorative swirl may not remain distinct.
If liquid separates slightly during refrigeration, gently stir the portion before eating, accepting that the swirl will blend. Discard food with mold or unexpected spoilage signs; storage time and temperature matter even when appearance seems normal.
Nutrition Estimates
Using plain nonfat Greek yogurt, 2 tablespoons peanut butter, a typical protein powder serving, unsweetened milk, and a noncaloric sweetener, a broad estimate is approximately 450–520 calories and 48–58 grams of protein for the full batch, before optional chips or extra drizzle.
| Portioning | Approximate calories | Approximate protein |
|---|---|---|
| 2 cups | 225–260 per cup | 24–29 grams per cup |
| 3 cups | 150–175 per cup | 16–19 grams per cup |
These are illustrative estimates, not a calculated nutrition label. Protein powder serving size and yogurt brand make a substantial difference. Honey, chocolate chips, and additional peanut butter contribute extra calories.
The original 20–30-gram protein estimate is more plausible for two portions than for three. Dividing the same batch into more containers reduces the amount in each one.
The recipe contains dairy and peanuts, plus other allergens depending on the milk and powder. It is not automatically sugar-free or low-carb; check every label and count honey or toppings if used.
Frequently Asked Questions
Can I make it without protein powder?
You can make a yogurt-and-peanut-butter dessert, but it will contain less protein and may be softer. Begin without added milk and adjust sweetness separately.
Can I use regular yogurt?
It is generally thinner than Greek yogurt. The resulting cups may not support a clear swirl or the same thick consistency.
Why is the chocolate portion thicker?
Cocoa absorbs moisture. Add a little of the reserved milk until it is close to the plain portion’s consistency.
Can I use a blender?
You can blend the base, but this small quantity may be easier to mix in a bowl. Keep the chocolate portion separate and swirl by hand at the end.
Are the cups actually fluffy?
They are creamy and thick, with some air from mixing. They are not a whipped mousse unless you add a separately whipped ingredient.
Can I prepare them the night before?
Yes. Keep covered and chilled, and expect some additional thickening. Save toppings for serving.
Does one scoop always provide the same protein?
No. Use the label’s serving weight and protein amount. Scoops differ across products.
Can I double the recipe?
Yes. Mix in a larger bowl, then divide about one-third for cocoa. Add milk gradually because a different powder or yogurt can still alter the consistency.
Recipe Card
High-Protein Peanut Butter Chocolate Swirl Fluff Cups
A creamy peanut butter yogurt base with cocoa ribbons, portioned into chilled dessert cups.
Yield: 2 generous or 3 smaller cups
Prep: 10 minutes
Chill: 15–30 minutes
Total: 25–40 minutes
Ingredients
- 1 cup plain nonfat Greek yogurt
- 2 tablespoons creamy peanut butter, well stirred
- 1 labeled serving vanilla protein powder
- 1–2 tablespoons milk, divided, only as needed; a little more may be needed for cocoa
- 1 tablespoon unsweetened cocoa powder
- 1–2 teaspoons powdered sweetener or honey, optional, to taste
- 1 teaspoon mini chocolate chips, optional, divided among servings
Instructions
- Stir yogurt, peanut butter, and protein powder until smooth. Add milk sparingly if needed. Rest 2–3 minutes, then reassess thickness.
- Taste and add optional sweetener gradually.
- Transfer about one-third to another bowl. Mix in cocoa and a little reserved milk until its consistency matches the plain base. Taste and sweeten if needed.
- Layer both mixtures among two or three cups. Use a skewer for one or two gentle passes through the layers, leaving distinct ribbons.
- Cover and refrigerate 15–30 minutes. Divide optional chips over the cups just before serving.
Storage: Refrigerate at 40°F or below up to 3 days. Freezing changes the intended texture. Stirring in milk after storage will soften the swirl pattern.
Estimated nutrition: At two portions, about 225–260 calories and 24–29 grams protein each. At three, about 150–175 calories and 16–19 grams protein each. Optional caloric sweetener and toppings are additional; brands vary.
Texture note: Thick and creamy rather than a stable whipped mousse. Matching the consistency of both portions makes swirling easier.
Print
High-Protein Peanut Butter Chocolate Swirl Fluff Cups
Description
A creamy peanut butter yogurt base with cocoa ribbons, portioned into chilled dessert cups.
Yield: 2 generous or 3 smaller cups
Prep: 10 minutes
Chill: 15–30 minutes
Total: 25–40 minutes
Ingredients
- 1 cup plain nonfat Greek yogurt
- 2 tablespoons creamy peanut butter, well stirred
- 1 labeled serving vanilla protein powder
- 1–2 tablespoons milk, divided, only as needed; a little more may be needed for cocoa
- 1 tablespoon unsweetened cocoa powder
- 1–2 teaspoons powdered sweetener or honey, optional, to taste
- 1 teaspoon mini chocolate chips, optional, divided among servings
Instructions
- Stir yogurt, peanut butter, and protein powder until smooth. Add milk sparingly if needed. Rest 2–3 minutes, then reassess thickness.
- Taste and add optional sweetener gradually.
- Transfer about one-third to another bowl. Mix in cocoa and a little reserved milk until its consistency matches the plain base. Taste and sweeten if needed.
- Layer both mixtures among two or three cups. Use a skewer for one or two gentle passes through the layers, leaving distinct ribbons.
- Cover and refrigerate 15–30 minutes. Divide optional chips over the cups just before serving.
Storage: Refrigerate at 40°F or below up to 3 days. Freezing changes the intended texture. Stirring in milk after storage will soften the swirl pattern.
Estimated nutrition: At two portions, about 225–260 calories and 24–29 grams protein each. At three, about 150–175 calories and 16–19 grams protein each. Optional caloric sweetener and toppings are additional; brands vary.
Texture note: Thick and creamy rather than a stable whipped mousse. Matching the consistency of both portions makes swirling easier.