
Crispy Chicken Chimichangas
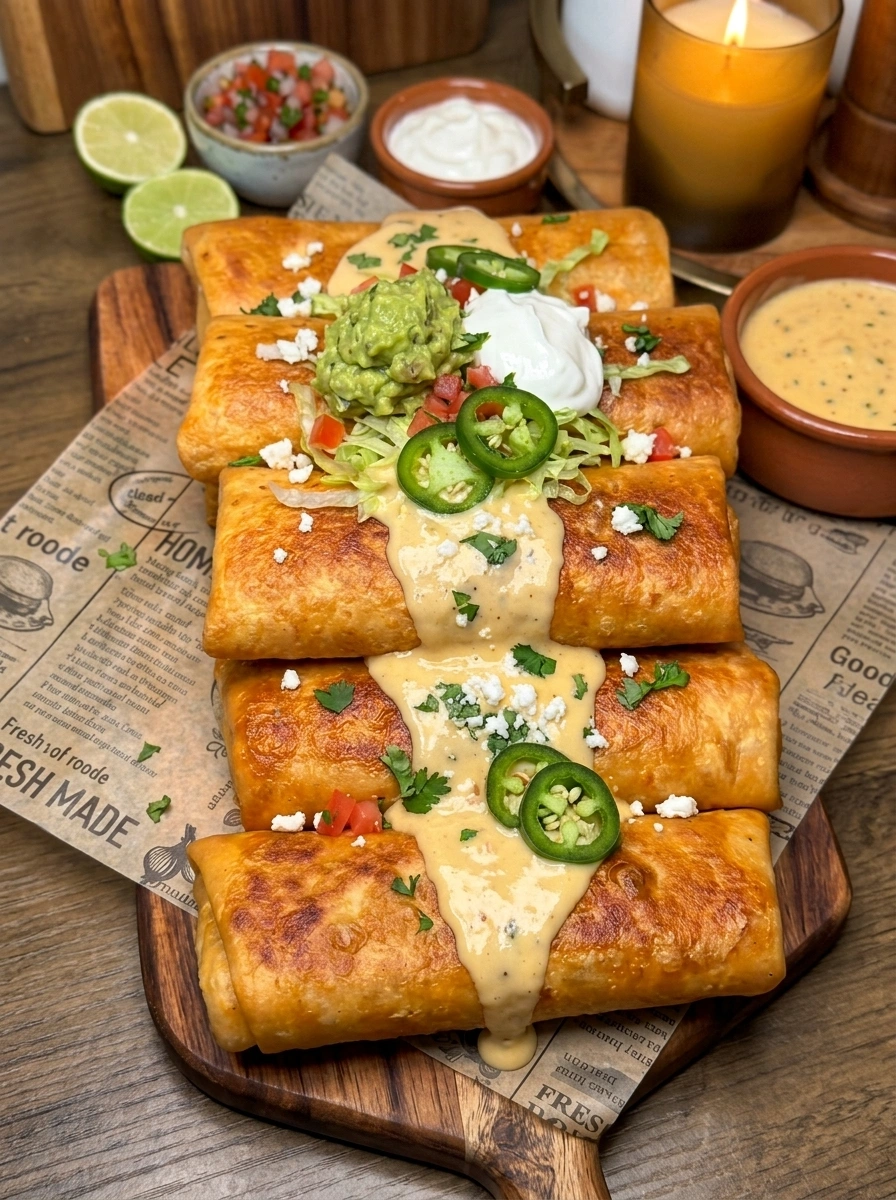
Crispy Chicken Chimichangas (Better Than Restaurant Style!)
If you’ve ever wondered why chimichangas taste so much better at your favorite Mexican restaurant, the secret is simpler than you think: a perfectly seasoned, cheesy chicken filling wrapped tight and fried until deeply golden and shatteringly crisp. These Crispy Chicken Chimichangas deliver every bit of that restaurant magic right from your own kitchen, and honestly? They might just be better.
Picture this: a warm flour tortilla fried to crackling perfection, hiding a filling of juicy shredded chicken, melty Monterey Jack and sharp cheddar, tangy cream cheese, and a punch of smoky, spicy seasoning. Top it all off with warm queso, fresh salsa, cool sour cream, and a squeeze of lime, and you’ve got the ultimate Tex-Mex comfort food. This isn’t a “maybe good” recipe — this is the one you’ll be making on repeat for taco nights, game days, and every craving in between.
The best part? These chimichangas come together with pantry staples and a rotisserie chicken shortcut, so you’re looking at real, restaurant-quality results in under an hour. Let’s get into why this recipe works so well, and exactly how to make it happen in your own kitchen.
Why You’ll Love This Crispy Chicken Chimichangas Recipe
There’s a reason chimichangas have earned a permanent spot on Tex-Mex menus everywhere, and this homemade version checks every box that makes the restaurant favorite so craveable.
- Insanely crispy exterior. Frying the tortillas creates that signature crunchy shell that shatters with every bite — something you just can’t get from baking alone.
- Rich, cheesy, ultra-flavorful filling. Three types of cheese plus warm spices like cumin, chili powder, and smoked paprika make the filling taste like it came straight from a Tex-Mex kitchen.
- Quick shortcut with rotisserie chicken. Using pre-cooked shredded chicken means you skip a step and get dinner on the table faster.
- Fully customizable toppings. From queso to guacamole to pico de gallo, you can build your own chimichanga topping bar based on what you’re craving.
- Great for meal prep and freezing. These chimichangas freeze beautifully, so you can always have a batch ready to fry or reheat.
- Perfect for any occasion. Weeknight dinners, game day spreads, or a fun taco-night twist — this recipe fits right in.
What Is a Chimichanga?
A chimichanga is essentially a deep-fried burrito, and it’s widely believed to have originated in Arizona, where Tex-Mex and Sonoran-style Mexican cooking meet. The name itself is thought to be a playful, made-up word — legend has it a cook accidentally dropped a burrito into a deep fryer and blurted out something close to “chimichanga” instead of cursing in front of children. Whether or not that story is entirely true, what matters is the result: a rolled tortilla filled with meat, cheese, and seasonings, then fried until golden and crunchy, similar in spirit to a fried burrito but with its own crispy identity.
Ingredients You’ll Need
Here’s a breakdown of what goes into these crispy chicken chimichangas and why each ingredient matters.
For the Chicken Filling
- 2 cups cooked shredded chicken — Rotisserie chicken is the easiest option here, adding great flavor with zero extra cooking time. Leftover grilled or baked chicken works too.
- 1 tablespoon olive oil — Used to sauté the onion and garlic and build the flavor base.
- 1 small onion, finely diced — Adds sweetness and texture to the filling.
- 2 cloves garlic, minced — For that essential aromatic depth.
- 1 (4 oz) can diced green chiles — Brings mild heat and a classic Southwestern flavor.
- 1 teaspoon ground cumin — Earthy and warm, a must-have in Tex-Mex seasoning.
- 1 teaspoon chili powder — Adds a mild, well-rounded spice.
- ½ teaspoon smoked paprika — Contributes a subtle smokiness that makes the filling taste more complex.
- ½ teaspoon garlic powder — Layers in extra savory flavor alongside the fresh garlic.
- ½ teaspoon onion powder — Same idea — it reinforces the fresh onion for a deeper flavor.
- ½ teaspoon kosher salt — Balances and enhances all the other flavors.
- ¼ teaspoon black pepper — Adds a touch of gentle heat.
- 4 oz cream cheese, softened — This is the secret to a creamy, cohesive filling that holds together perfectly.
- 1 cup shredded Monterey Jack cheese — Melts beautifully and adds mild, creamy flavor.
- 1 cup shredded sharp cheddar cheese — Brings a bolder, tangier cheese flavor to balance the Jack cheese.
- ¼ cup chopped fresh cilantro — Adds brightness and a pop of herby freshness.
For the Chimichangas
- 6 large burrito-size flour tortillas — Large tortillas are essential so you have enough room to fold and roll tightly without the filling spilling out.
- Vegetable oil, for frying — A neutral oil with a high smoke point works best for deep frying.
Optional Toppings
This is where you can really make the recipe your own:
- Warm queso dip
- Salsa or pico de gallo
- Guacamole
- Sour cream
- Shredded lettuce
- Diced tomatoes
- Sliced jalapeños
- Chopped cilantro
- Crumbled queso fresco
- Lime wedges
- Hot sauce
How to Make Crispy Chicken Chimichangas
Step 1: Build the Flavor Base
Heat the olive oil in a large skillet over medium heat. Add the diced onion and cook for 3–4 minutes until softened. Stir in the garlic and cook for about 30 seconds, just until fragrant — you don’t want it to brown or burn.
Step 2: Toast the Spices
Add the diced green chiles, cumin, chili powder, smoked paprika, garlic powder, onion powder, salt, and black pepper to the skillet. Cook for 1 minute, stirring constantly. This quick toasting step wakes up the spices and deepens their flavor — don’t skip it.
Step 3: Add the Chicken
Add the shredded chicken to the skillet and stir until it’s evenly coated in all those toasted spices and aromatics.
Step 4: Make It Creamy
Mix in the softened cream cheese, stirring until it’s completely melted and the mixture looks smooth and creamy. This step is what gives the filling its rich, cohesive texture.
Step 5: Fold in the Cheese and Cilantro
Fold in the Monterey Jack cheese, cheddar cheese, and chopped cilantro. Stir just until everything is combined — the residual heat will help the shredded cheese start to melt slightly.
Step 6: Cool the Filling
Remove the filling from the heat and let it cool for about 5 minutes. This matters more than you might think — filling that’s too hot can make the tortillas soggy or tear as you roll them.
Step 7: Warm the Tortillas
Warm the tortillas for 15–20 seconds in the microwave so they become soft and flexible. Cold or stiff tortillas are much more likely to crack when you fold them.
Step 8: Fill and Roll
Divide the chicken filling evenly among the tortillas, placing it slightly below the center of each one. Fold the sides inward, then roll each tortilla tightly into a burrito shape, tucking in the ends securely as you go. A tight roll is key — it keeps the filling from leaking out during frying.
Step 9: Heat the Oil
Heat about 2 inches of vegetable oil in a deep skillet or Dutch oven to 350°F (175°C). A kitchen thermometer is the best way to keep this temperature accurate — oil that’s too cool will make the chimichangas greasy, while oil that’s too hot can burn the outside before the inside heats through.
Step 10: Fry Until Golden
Carefully fry 2–3 chimichangas at a time for 3–4 minutes per side, turning until they’re evenly golden brown and crispy all over. Frying in batches keeps the oil temperature stable and gives each chimichanga room to crisp up properly.
Step 11: Drain and Serve
Transfer the fried chimichangas to a paper towel-lined plate to drain any excess oil. Serve immediately, topped with warm queso, salsa, guacamole, sour cream, shredded lettuce, diced tomatoes, jalapeños, cilantro, and a good squeeze of fresh lime.
Tips for the Crispiest Chimichangas
- Don’t overfill the tortillas. It’s tempting to pile on extra filling, but overstuffed chimichangas are much harder to roll tightly and more likely to burst open in the fryer.
- Roll them tight. A loosely rolled chimichanga will let oil seep inside during frying, making it greasy instead of crispy.
- Keep the oil temperature steady. Use a thermometer and adjust the heat as needed between batches — the oil temperature drops each time you add cold chimichangas.
- Let the filling cool slightly before rolling. This prevents soggy or torn tortillas and makes them much easier to handle.
- Secure the ends well. Tucking in both ends before the final roll keeps the filling locked inside as it fries.
- Don’t overcrowd the pan. Frying too many at once lowers the oil temperature and leads to uneven, greasy results.
Baking or Air Frying Instead of Deep Frying
While deep frying gives the most authentic, ultra-crispy texture, you can lighten things up with a baked or air-fried version:
- Baking: Brush the rolled chimichangas generously with oil and bake at 425°F (220°C) for 20–25 minutes, flipping halfway through, until golden and crisp.
- Air Frying: Lightly spray the chimichangas with oil and air fry at 380°F (193°C) for 12–15 minutes, flipping halfway through, until crispy and golden.
Both methods won’t be quite as crunchy as deep frying, but they still deliver a satisfying crisp with less oil.
What to Serve with Chicken Chimichangas
These chimichangas are hearty enough to be a meal on their own with toppings, but they also pair beautifully with classic Tex-Mex sides:
- Mexican rice or cilantro-lime rice
- Refried beans or black beans
- A simple corn and black bean salad
- Chips and salsa or queso
- A crisp side salad with lime vinaigrette
- Elote (Mexican street corn)
Frequently Asked Questions
Can I make the filling ahead of time? Yes! The chicken filling can be made up to 2 days in advance and stored in an airtight container in the refrigerator. Just let it come closer to room temperature before rolling so the tortillas don’t seize up from the cold.
Can I bake these instead of frying them? Absolutely. See the baking and air frying instructions above for a lighter alternative that still delivers great texture.
What kind of tortillas work best? Large, burrito-size flour tortillas work best because they’re pliable and give you enough surface area to fold and roll tightly without tearing.
Why did my chimichangas fall apart while frying? This usually happens when the tortillas aren’t rolled tightly enough or the ends aren’t tucked in securely. Make sure to fold the sides in first, then roll tightly, sealing the seam side down when you place them in the oil.
Can I use a different protein? Yes, this recipe works well with shredded beef, pulled pork, or seasoned ground beef in place of chicken. You can also make a vegetarian version with seasoned black beans and extra cheese.
How do I keep chimichangas crispy after frying? Place them on a wire rack instead of a plate after frying — this prevents steam from collecting underneath and keeps the bottom from getting soggy.
Can I freeze chimichangas before frying? Yes, you can freeze them uncooked. Wrap each one individually, then fry directly from frozen, adding a couple of extra minutes to the frying time, or thaw overnight in the refrigerator first.
Storage Information
Refrigerator: Store leftover chimichangas in an airtight container in the refrigerator for up to 4 days.
Reheating: Reheat in a 375°F (190°C) oven or air fryer for 8–10 minutes until hot and crispy again. Avoid microwaving, as it will make the tortilla soft and chewy instead of crispy.
Freezer: Freeze uncooked or cooked chimichangas individually wrapped for up to 3 months. Thaw overnight in the refrigerator before reheating or frying.
Crispy Chicken Chimichangas
Ingredients
For the Chicken Filling
- 2 cups cooked shredded chicken (rotisserie works great)
- 1 tbsp olive oil
- 1 small onion, finely diced
- 2 cloves garlic, minced
- 1 (4 oz) can diced green chiles
- 1 tsp ground cumin
- 1 tsp chili powder
- ½ tsp smoked paprika
- ½ tsp garlic powder
- ½ tsp onion powder
- ½ tsp kosher salt
- ¼ tsp black pepper
- 4 oz cream cheese, softened
- 1 cup shredded Monterey Jack cheese
- 1 cup shredded sharp cheddar cheese
- ¼ cup chopped fresh cilantro
For the Chimichangas
- 6 large burrito-size flour tortillas
- Vegetable oil, for frying
Optional Toppings
- Warm queso dip
- Salsa or pico de gallo
- Guacamole
- Sour cream
- Shredded lettuce
- Diced tomatoes
- Sliced jalapeños
- Chopped cilantro
- Crumbled queso fresco
- Lime wedges
- Hot sauce
Instructions
- Heat the olive oil in a large skillet over medium heat.
- Add the diced onion and cook for 3–4 minutes until softened.
- Stir in the garlic and cook for 30 seconds until fragrant.
- Add the diced green chiles, cumin, chili powder, smoked paprika, garlic powder, onion powder, salt, and black pepper. Cook for 1 minute, stirring constantly to toast the spices.
- Add the shredded chicken and stir until evenly coated.
- Mix in the cream cheese until completely melted and creamy.
- Fold in the Monterey Jack cheese, cheddar cheese, and chopped cilantro.
- Remove the filling from the heat and let it cool for 5 minutes.
- Warm the tortillas for 15–20 seconds in the microwave so they become flexible.
- Divide the chicken filling evenly among the tortillas, placing it slightly below the center.
- Fold the sides inward, then roll each tortilla tightly into a burrito, tucking in the ends securely.
- Heat about 2 inches of vegetable oil in a deep skillet or Dutch oven to 350°F (175°C).
- Carefully fry 2–3 chimichangas at a time for 3–4 minutes per side, turning until evenly golden brown and crispy.
- Transfer to a paper towel-lined plate to drain excess oil.
- Serve immediately topped with warm queso, salsa, guacamole, sour cream, shredded lettuce, tomatoes, jalapeños, cilantro, and a squeeze of fresh lime.