
Cheesy Crab Stuffed Bombs That Will Delight Your Taste Buds!
Introduction to Cheesy Crab Stuffed Bombs
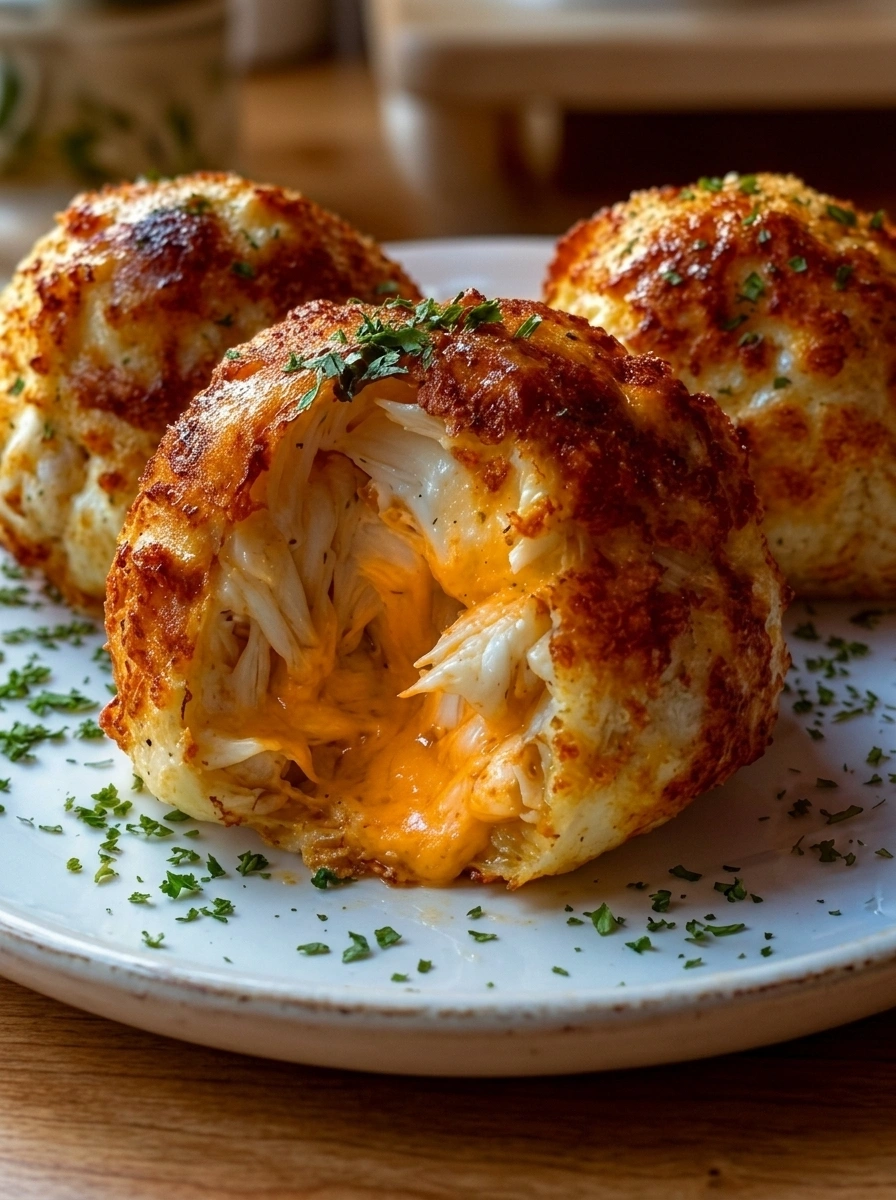
Welcome to a culinary adventure that’s sure to tickle your taste buds! If you’re like me, juggling a busy life while trying to whip up something delicious can feel overwhelming. That’s where these Cheesy Crab Stuffed Bombs come in. They’re quick, easy, and oh-so-satisfying! Perfect for a last-minute gathering or a cozy family night, these bite-sized treats are filled with creamy crab and cheese goodness. Trust me, they’ll impress your loved ones and make you feel like a kitchen superstar, all without breaking a sweat!
Why You’ll Love This Cheesy Crab Stuffed Bombs
These Cheesy Crab Stuffed Bombs are a game-changer for busy moms and professionals alike. They come together in just 35 minutes, making them a perfect solution for those hectic days. The delightful combination of creamy crab and melty cheese will have everyone asking for seconds. Plus, they’re versatile enough to serve at parties or as a cozy snack at home. Who wouldn’t love that?
Ingredients for Cheesy Crab Stuffed Bombs
Gathering the right ingredients is the first step to creating these delightful Cheesy Crab Stuffed Bombs. Here’s what you’ll need:
- Crab meat: Fresh or canned, this is the star of the show. It brings a sweet, oceanic flavor that pairs beautifully with cheese.
- Cream cheese: This adds a rich, creamy texture that binds everything together. It’s the secret to that luscious filling!
- Shredded cheddar cheese: For a sharp, tangy kick, cheddar is a must. It melts perfectly and adds depth to the flavor.
- Green onions: These add a fresh, mild onion flavor and a pop of color. They’re a great way to brighten up the filling.
- Garlic powder: A sprinkle of this brings warmth and depth. It’s a simple way to elevate the taste without overpowering the crab.
- Old Bay seasoning: This classic seafood seasoning adds a unique blend of spices that enhances the crab’s natural flavor.
- Crescent roll dough: The flaky, buttery dough wraps around the filling, creating a delightful contrast in textures. It’s easy to work with and perfect for busy cooks.
- Egg (for egg wash): A beaten egg brushed on top gives the bombs a beautiful golden color and a shiny finish.
For those looking to spice things up, consider adding diced jalapeños to the filling for a kick! You can also make these ahead of time and freeze them before baking. Just pull them out when you need a quick snack or appetizer. If you’re curious about exact measurements, they’re available at the bottom of the article for easy printing!
How to Make Cheesy Crab Stuffed Bombs
Now that you have all your ingredients ready, let’s dive into the fun part: making these Cheesy Crab Stuffed Bombs! Follow these simple steps, and you’ll have a delicious appetizer in no time.
Step 1: Preheat the Oven
First things first, preheat your oven to 375°F (190°C). Preheating is crucial because it ensures even cooking. You want those bombs to bake perfectly, turning golden brown and crispy on the outside while staying gooey on the inside. Trust me, your taste buds will thank you!
Step 2: Prepare the Filling
In a mixing bowl, combine the crab meat, cream cheese, shredded cheddar cheese, green onions, garlic powder, and Old Bay seasoning. Mix everything together until it’s well blended. This step is where the magic happens! The flavors meld beautifully, creating a creamy, savory filling that’s simply irresistible.
Step 3: Unroll the Dough
Next, grab your package of crescent roll dough. Carefully unroll it on a clean surface. You’ll see it’s divided into triangles. Gently separate each triangle, being careful not to tear the dough. This flaky dough is what makes these Cheesy Crab Stuffed Bombs so delightful!
Step 4: Fill the Dough
Now comes the fun part! Take a spoonful of the crab mixture and place it at the wide end of each triangle. Don’t overfill; about a tablespoon should do. Then, roll the dough around the filling, starting from the wide end. Pinch the edges to seal them tightly. This will keep all that cheesy goodness inside while baking!
Step 5: Bake the Bombs
Place your stuffed bombs on a baking sheet lined with parchment paper. Brush the tops with the beaten egg for that beautiful golden finish. Bake them in the preheated oven for 15-20 minutes. Keep an eye on them; they’re done when they’re golden brown and puffed up. Let them cool slightly before serving, and get ready for the compliments!
Tips for Success
- Make sure your crab meat is well-drained to avoid a soggy filling.
- For extra flavor, let the filling chill in the fridge for 30 minutes before using.
- Use a silicone baking mat for easy cleanup and to prevent sticking.
- Experiment with different cheeses like pepper jack for a spicy twist.
- Don’t skip the egg wash; it makes a big difference in appearance!
Equipment Needed
- Baking sheet: A standard baking sheet works great, but a stoneware pan can give you an even bake.
- Parchment paper: This helps prevent sticking; aluminum foil can be a substitute.
- Mixing bowl: Any large bowl will do; a stand mixer can save time.
- Spoon: Use a regular spoon for filling; a cookie scoop makes it easier.
Variations of Cheesy Crab Stuffed Bombs
- Spicy Jalapeño: Add diced jalapeños to the filling for a zesty kick that will wake up your taste buds!
- Herbed Delight: Mix in fresh herbs like dill or parsley for a burst of freshness that complements the crab beautifully.
- Low-Carb Option: Swap the crescent roll dough for almond flour dough or zucchini slices for a healthier, low-carb version.
- Seafood Medley: Combine crab with shrimp or lobster for a luxurious twist that seafood lovers will adore.
- Cheese Lovers: Experiment with different cheeses like gouda or mozzarella for a unique flavor profile.
Serving Suggestions for Cheesy Crab Stuffed Bombs
- Dipping sauces: Serve with cocktail sauce, ranch dressing, or a zesty aioli for added flavor.
- Fresh salad: Pair with a light green salad to balance the richness of the bombs.
- Wine pairing: A chilled white wine, like Sauvignon Blanc, complements the seafood beautifully.
- Presentation: Arrange on a colorful platter with lemon wedges and fresh herbs for a stunning display.
FAQs about Cheesy Crab Stuffed Bombs
As you embark on your journey to create these delightful Cheesy Crab Stuffed Bombs, you might have a few questions. Here are some common queries that can help you along the way:
Can I use imitation crab meat instead of real crab?
Absolutely! Imitation crab meat works well and is often more budget-friendly. Just make sure to chop it finely for the best texture.
How do I store leftovers?
Store any leftover Cheesy Crab Stuffed Bombs in an airtight container in the fridge for up to three days. Reheat them in the oven for a few minutes to regain their crispiness.
Can I freeze these bombs before baking?
Yes! You can prepare them ahead of time and freeze them. Just place them on a baking sheet to freeze individually, then transfer to a freezer bag. Bake from frozen, adding a few extra minutes to the cooking time.
What can I serve with these bombs?
These tasty bites pair wonderfully with a variety of dipping sauces like cocktail sauce or ranch dressing. A fresh salad or some crispy veggies on the side can also complement the richness.
Are these Cheesy Crab Stuffed Bombs gluten-free?
Yes, if you use gluten-free crescent roll dough, these bombs can be a delicious gluten-free option. Just check the packaging to ensure it meets your dietary needs!
Final Thoughts
Creating these Cheesy Crab Stuffed Bombs is more than just cooking; it’s about bringing joy to your table. The delightful aroma wafting through your kitchen will have everyone gathering around, eager to dig in. Each bite is a burst of creamy, cheesy goodness that makes any occasion feel special. Whether it’s a family movie night or a festive gathering, these bombs are sure to be a hit. So roll up your sleeves, embrace the mess, and enjoy the smiles that come with sharing these delicious treats. Trust me, you’ll be the star of the show!
Print
Cheesy Crab Stuffed Bombs That Will Delight Your Taste Buds!
- Total Time: 35 minutes
- Yield: 12 servings 1x
- Diet: Gluten Free
Description
Cheesy Crab Stuffed Bombs are delicious bite-sized treats filled with creamy crab and cheese, perfect for parties or as a savory snack.
Ingredients
- 1 cup crab meat
- 1 cup cream cheese
- 1/2 cup shredded cheddar cheese
- 1/4 cup green onions, chopped
- 1 teaspoon garlic powder
- 1 teaspoon Old Bay seasoning
- 1 package of crescent roll dough
- 1 egg, beaten (for egg wash)
Instructions
- Preheat the oven to 375°F (190°C).
- In a mixing bowl, combine crab meat, cream cheese, cheddar cheese, green onions, garlic powder, and Old Bay seasoning.
- Unroll the crescent roll dough and separate it into triangles.
- Place a spoonful of the crab mixture at the wide end of each triangle.
- Roll the dough around the filling, starting from the wide end, and pinch the edges to seal.
- Place the stuffed bombs on a baking sheet lined with parchment paper.
- Brush the tops with the beaten egg.
- Bake for 15-20 minutes or until golden brown.
- Let cool slightly before serving.
Notes
- For a spicier kick, add some diced jalapeños to the filling.
- These can be made ahead of time and frozen before baking.
- Serve with a dipping sauce like cocktail sauce or ranch dressing.
- Prep Time: 15 minutes
- Cook Time: 20 minutes
- Category: Appetizer
- Method: Baking
- Cuisine: American
Nutrition
- Serving Size: 1 bomb
- Calories: 150
- Sugar: 1g
- Sodium: 300mg
- Fat: 10g
- Saturated Fat: 5g
- Unsaturated Fat: 3g
- Trans Fat: 0g
- Carbohydrates: 10g
- Fiber: 0g
- Protein: 6g
- Cholesterol: 30mg
Keywords: Cheesy Crab Stuffed Bombs, Crab Appetizer, Party Snacks