
Cinnamon Roll Dump Cake
Cinnamon Roll Dump Cake: The Easiest, Gooiest Dessert You’ll Ever Make
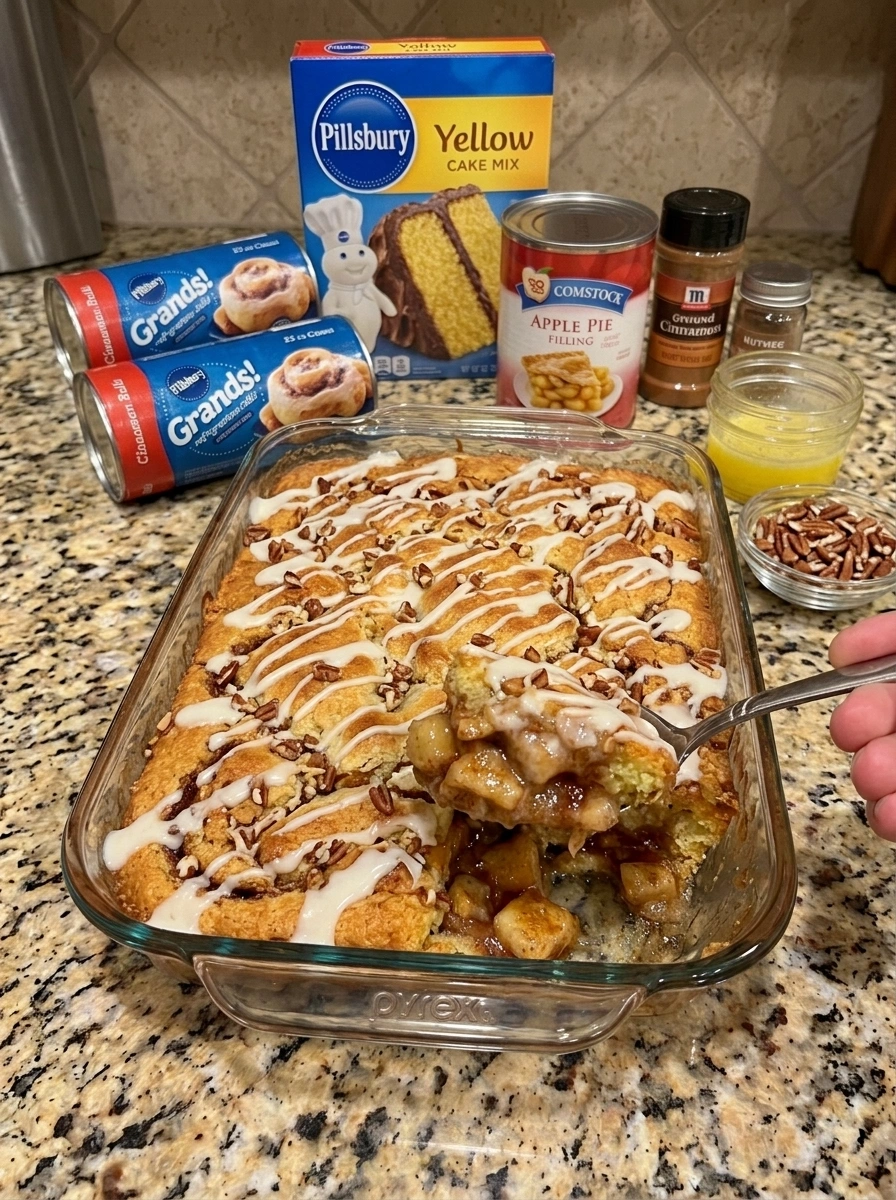
There’s a reason this dessert has been stopping people in their scrolling tracks: Cinnamon Roll Dump Cake is pure comfort in every single bite. Imagine gooey cinnamon rolls, buttery golden cake, warm cinnamon sugar, and a sweet vanilla glaze all baked together into one irresistible dish. It tastes exactly like biting into a giant, oversized cinnamon roll, except it’s even easier to make than the real thing.
This is the kind of recipe that looks and tastes like it took hours of careful baking, but the truth is it comes together with almost no effort at all. There’s no kneading, no proofing, no rolling out dough. You simply layer a few ingredients into a baking dish, pop it in the oven, and let the magic happen. It’s the definition of a “dump cake,” a beloved category of desserts where you literally dump the ingredients into the pan and let the oven do the rest.
In this complete guide, you’ll find everything you need to make the perfect Cinnamon Roll Dump Cake, including a full ingredient breakdown, detailed step-by-step instructions, expert tips for getting that gooey-yet-set texture just right, delicious variations to try, serving suggestions, storage information, and answers to the most frequently asked questions about this crowd-pleasing dessert.
What Is Cinnamon Roll Dump Cake?
Cinnamon Roll Dump Cake is a hybrid dessert that combines refrigerated cinnamon roll dough, yellow cake mix, melted butter, warm spices, and a sweet glaze into one baked casserole-style treat. It belongs to the popular “dump cake” family of desserts, which typically involve layering canned or boxed ingredients into a baking dish without much mixing, then baking until everything melds together into a rich, gooey, cake-like dessert.
What makes this particular version so special is the use of cinnamon rolls as the base layer. As they bake, the cinnamon rolls puff up, soften, and blend with the buttery cake topping, creating pockets of gooey cinnamon filling throughout the dish. The cake mix on top bakes into a golden, slightly crisp layer, while the butter drizzled over everything keeps the whole thing moist and rich. Finish it off with the reserved cinnamon roll icing warmed and drizzled over the top, and you have a dessert that tastes like a cinnamon roll, a coffee cake, and a buttery crumble all rolled into one.
Why This Recipe Works So Well
There are several reasons this dessert has become such a favorite, and understanding them will help you make it perfectly every single time.
It uses convenient, pre-made ingredients smartly. By starting with refrigerated cinnamon roll dough and a boxed cake mix, this recipe skips the most time-consuming parts of baking from scratch while still delivering a homemade, from-the-oven taste and aroma.
The layering method creates incredible texture variety. Because the ingredients are added in layers rather than mixed together, the finished dessert has distinct textural zones: soft, doughy cinnamon roll pieces on the bottom, a golden buttery cake layer on top, and gooey pockets of icing and glaze throughout.
Butter is the secret to that irresistible richness. Rather than mixing the cake mix into a batter with eggs and oil, this recipe simply drizzles melted butter over the dry cake mix. As it bakes, the butter soaks into the cake mix, creating a texture similar to a cobbler or coffee cake topping — crisp in some spots, gooey in others.
The apple pie filling adds moisture and flavor complexity. While optional, the addition of chopped apple pie filling introduces little pockets of warm, spiced fruit throughout the dish, echoing the flavors of a cinnamon apple coffee cake.
The double dose of icing seals the deal. Not only do the cinnamon rolls bring their own icing, but that icing is reserved and drizzled fresh over the finished cake, creating a beautiful glossy topping that melts slightly into the warm dessert.
Ingredients You’ll Need
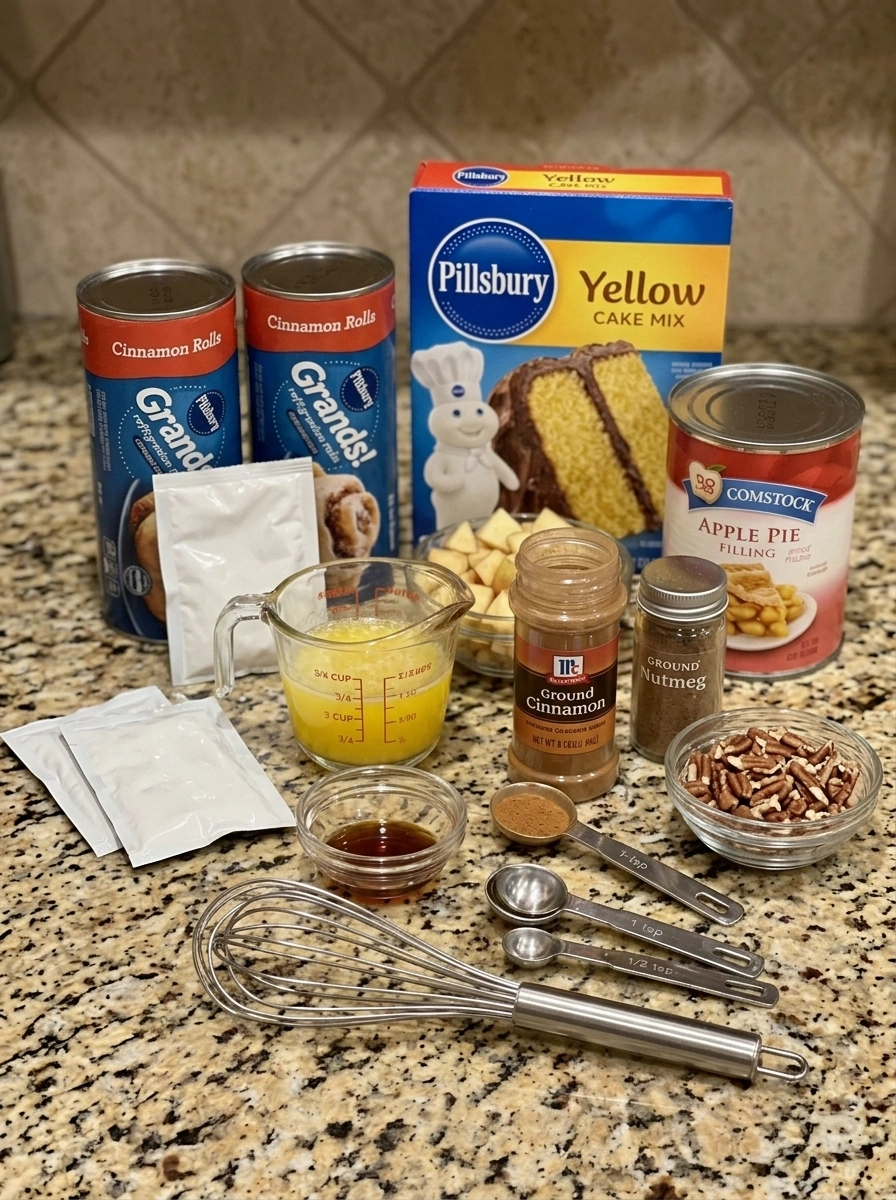
Here’s everything required to make this dessert from start to finish.
Base and topping:
- 2 cans (12.4 oz each) refrigerated cinnamon rolls with icing (reserve the icing packets)
- 1 can (21 oz) apple pie filling, chopped (optional but delicious)
- 1 box (15.25 oz) yellow cake mix
- 3/4 cup unsalted butter, melted
Flavorings and mix-ins:
- 1 teaspoon ground cinnamon
- 1/2 teaspoon ground nutmeg (optional)
- 1 teaspoon vanilla extract
- 1/2 cup chopped pecans or walnuts (optional)
A Closer Look at the Key Ingredients
Refrigerated cinnamon rolls are the heart and soul of this recipe. Cutting them into quarters before baking allows them to spread out and puff up more evenly across the dish, so every bite gets a bit of that classic cinnamon roll flavor and texture, rather than having a few whole rolls concentrated in certain spots.
Apple pie filling is technically optional, but it adds so much in terms of moisture, natural sweetness, and warm spiced flavor that it’s well worth including. Chopping it before adding it to the dish helps distribute the apple pieces more evenly so you get a bit in every bite rather than large chunks concentrated in one area.
Yellow cake mix forms the golden, slightly crisp top layer of the dessert. Because it isn’t mixed into a batter first, it bakes up more like a crumble topping, similar to what you’d find on a classic dump cake or cobbler.
Unsalted butter is essential for achieving that rich, gooey texture throughout the dessert. Using unsalted butter allows you to control the overall sweetness and saltiness of the dish, since cinnamon rolls and cake mix are both already fairly sweet.
Ground cinnamon and nutmeg amplify the warm, cozy spice flavor that’s already present in the cinnamon rolls, tying the entire dessert together with that classic cinnamon-sugar aroma.
Vanilla extract rounds out the flavor with a warm, sweet undertone that complements both the cinnamon rolls and the buttery cake topping.
Chopped pecans or walnuts are an optional but delicious addition, providing a satisfying crunch that contrasts beautifully with the soft, gooey layers below.
Step-by-Step Instructions
This recipe comes together quickly, but following these steps closely will help you achieve the best possible texture and flavor.
Step 1: Preheat and Prep Your Dish
Preheat your oven to 350°F (175°C) and lightly grease a 9×13-inch baking dish. Greasing the dish thoroughly helps prevent the gooey cinnamon roll pieces from sticking as they bake and expand.
Step 2: Prep and Layer the Cinnamon Rolls
Open both cans of refrigerated cinnamon rolls, setting the icing packets aside for later. Cut each cinnamon roll into quarters, then spread the pieces evenly across the bottom of the prepared baking dish. Try to distribute them in a single, even layer so every bite of the finished dessert includes some cinnamon roll.
Step 3: Add the Apple Pie Filling
If using, spoon the chopped apple pie filling evenly over the cinnamon roll pieces. Distributing it across the entire dish, rather than concentrating it in the center, ensures every serving gets a bit of that warm, spiced apple flavor.
Step 4: Add the Cake Mix
Sprinkle the dry yellow cake mix evenly over the top of the cinnamon rolls and apple pie filling. This is an important step to get right: do not stir or mix it in. The cake mix needs to stay in a loose, even layer on top so it can bake into that signature golden, slightly crisp dump cake topping.
Step 5: Drizzle with Butter
In a small bowl, mix the melted butter with the vanilla extract. Drizzle this mixture evenly over the entire surface of the cake mix, trying to cover as much of the dry cake mix as possible. Any spots left completely dry may not bake evenly, so take your time with this step.
Step 6: Add Spices and Nuts
Sprinkle the ground cinnamon, nutmeg (if using), and chopped pecans or walnuts (if using) evenly over the top of the dish.
Step 7: Bake
Place the dish in the preheated oven and bake for 40 to 45 minutes, or until the top is golden brown and the center is set. You’re looking for a top layer that has turned a deep golden color, with the cinnamon roll pieces below bubbling slightly at the edges.
Step 8: Cool Slightly
Remove the dish from the oven and let it cool for about 10 minutes. This resting time allows the layers to set slightly, making the dessert easier to serve while still warm and gooey.
Step 9: Add the Icing
While the cake is cooling, warm the reserved icing packets for a few seconds, either in the microwave or by running them briefly under warm water, until the icing becomes pourable. Drizzle the warmed icing generously over the top of the dump cake.
Step 10: Serve
Serve the Cinnamon Roll Dump Cake warm, either on its own or topped with a scoop of vanilla ice cream for an extra indulgent finish.
Tips for the Best Cinnamon Roll Dump Cake
Don’t skip the “don’t stir” step. It might feel counterintuitive to sprinkle dry cake mix over the dish and simply leave it, but this is exactly what creates the classic dump cake texture: a crisp, slightly crumbly top layer over a gooey, moist base. Stirring everything together will result in a denser, more uniform cake rather than the distinct layered texture this dessert is known for.
Cover as much cake mix with butter as you can. Any dry pockets of cake mix that don’t get any butter drizzled over them can turn out powdery or chalky after baking. Take an extra moment to make sure the butter mixture reaches every corner of the dish.
Use a light hand when spreading the apple pie filling. If you add too much filling or don’t chop it enough, the dish can become overly wet in certain spots, preventing the top layer from crisping up properly. Chopping the apples into smaller pieces and spreading the filling in a thin, even layer helps avoid this.
Check for doneness in the center, not just the edges. The edges of a dump cake will often look done before the center is fully set. Gently press or insert a toothpick near the middle of the dish to check that it’s baked through before removing it from the oven.
Let it rest before serving. While it’s tempting to dig in right away, letting the dessert rest for about 10 minutes allows the gooey layers to firm up slightly, making it much easier to scoop and serve neat portions.
Warm the icing just enough to pour, not to liquefy completely. Overheating the icing can cause it to become too thin and soak entirely into the cake rather than sitting attractively on top. A few seconds of gentle warming is usually all that’s needed.
Flavor Variations to Try
Once you’ve mastered the classic version, here are a few fun ways to switch things up.
Caramel Apple Version: Drizzle warm caramel sauce over the top along with the icing for a caramel apple-inspired twist that pairs beautifully with the cinnamon and apple flavors already in the dish.
Pumpkin Spice Version: Swap the apple pie filling for canned pumpkin puree mixed with a teaspoon of pumpkin pie spice for a cozy, fall-inspired take on the classic recipe.
Berry Cinnamon Roll Version: Replace the apple pie filling with blueberry or cherry pie filling for a fruity twist that adds a pop of color and a different flavor profile.
Extra Nutty Version: Increase the pecans or walnuts, or add a streusel-style topping made with extra brown sugar, flour, and butter for added crunch and sweetness.
Cream Cheese Drizzle Version: In addition to the reserved cinnamon roll icing, whisk together softened cream cheese, powdered sugar, and a splash of milk for an extra-rich, tangy glaze to drizzle over the top.
How to Serve Cinnamon Roll Dump Cake
This dessert is wonderfully versatile and works for all kinds of occasions.
- Warm with vanilla ice cream: The classic pairing, where the melting ice cream mingles with the warm cinnamon and butter flavors for an unbeatable combination.
- As a brunch centerpiece: Served alongside coffee, this dessert doubles beautifully as an indulgent brunch dish for holidays or weekend gatherings.
- Topped with whipped cream: A lighter alternative to ice cream that still adds a creamy, cooling contrast to the warm cake.
- With a drizzle of extra caramel or cream cheese glaze: For those who want to take the sweetness up another notch.
- As a potluck or party dessert: Because it’s baked in a 9×13-inch dish, it’s easy to transport and serves a crowd, making it a natural choice for potlucks, holiday parties, and family gatherings.
Storage Information
Proper storage will help you enjoy every last bite of this dessert over the following days.
- Refrigerate leftovers. Store any leftover Cinnamon Roll Dump Cake in an airtight container in the refrigerator for up to 4 days.
- Reheat individual servings in the microwave. Warm a single portion in the microwave for 20 to 30 seconds, or until heated through and gooey again.
- Reheat larger portions in the oven. For a larger amount, warm the dish in a 300°F (150°C) oven until heated through, which helps maintain the texture of the top layer better than microwaving.
- Cover tightly to prevent drying out. Whether stored in the original baking dish or transferred to a container, make sure it’s tightly covered to keep the cake from drying out in the refrigerator.
Recipe Overview
- Prep Time: 10 minutes
- Cook Time: 45 minutes
- Total Time: 55 minutes
- Servings: 10
- Calories: Approximately 460 per serving
Frequently Asked Questions
Do I have to use apple pie filling? No, the apple pie filling is optional, though it adds wonderful moisture and warm spiced flavor to the finished dessert. If you prefer, you can leave it out entirely or substitute another pie filling of your choice.
Why shouldn’t I stir the cake mix into the other ingredients? Leaving the cake mix unstirred and simply sprinkled on top is exactly what creates the signature dump cake texture: a crisp, golden top layer over a soft, gooey base. Stirring everything together would result in a completely different, more uniform texture.
Can I use a different flavor of cake mix? Yes. While yellow cake mix is classic for this recipe and pairs well with the cinnamon roll flavor, you can experiment with spice cake mix, butter pecan cake mix, or even a vanilla cake mix for slightly different results.
What if my cinnamon rolls don’t come with icing packets? If your cinnamon rolls don’t include icing, you can make a quick homemade glaze by whisking together powdered sugar, a splash of milk, and a touch of vanilla extract until pourable.
Can I make this dessert ahead of time? This dessert is best enjoyed fresh out of the oven, when the top is crisp and the center is warm and gooey. However, you can prepare the layered, unbaked dish ahead of time, cover, and refrigerate for a few hours before baking, then bake as directed when ready to serve.
How do I know when it’s fully baked? The top should be golden brown, and the center should look set rather than wet or jiggly. Because dump cakes can vary based on your oven and dish size, it’s a good idea to check the center around the 40-minute mark and continue baking in a few-minute increments if needed.
Can I freeze Cinnamon Roll Dump Cake? While this dessert is best enjoyed fresh or within a few days from the refrigerator, you can freeze leftovers in an airtight, freezer-safe container for up to 1 month. Thaw in the refrigerator overnight and reheat in the oven for the best texture.
Is this the same as a cinnamon roll casserole? Cinnamon Roll Dump Cake and cinnamon roll casserole are similar in spirit but differ in method. Casseroles typically involve mixing cinnamon roll pieces with an egg-and-milk custard base, similar to a bread pudding, while this dump cake method layers cinnamon rolls with a buttery cake mix topping for a completely different, cake-like texture.
Final Thoughts
Cinnamon Roll Dump Cake is everything you want in a comfort dessert: warm, gooey, buttery, and packed with cozy cinnamon flavor, all without requiring any advanced baking skills or complicated techniques. By layering a few convenient ingredients into a baking dish and letting the oven do the work, you end up with a dessert that tastes like it came straight from a bakery, complete with a golden crisp top, a soft doughy base, and a generous drizzle of sweet icing over everything.
Whether you’re making it for a holiday brunch, a potluck, or simply because you’re craving something warm and sweet, this dump cake is guaranteed to become a regular request in your household. Preheat that oven, grab your ingredients, and get ready to enjoy one of the easiest and most satisfying desserts you’ll ever make.
Print
Cinnamon Roll Dump Cake
- Total Time: 55 minutes
Ingredients
Here’s everything required to make this dessert from start to finish.
Base and topping:
- 2 cans (12.4 oz each) refrigerated cinnamon rolls with icing (reserve the icing packets)
- 1 can (21 oz) apple pie filling, chopped (optional but delicious)
- 1 box (15.25 oz) yellow cake mix
- 3/4 cup unsalted butter, melted
Flavorings and mix-ins:
- 1 teaspoon ground cinnamon
- 1/2 teaspoon ground nutmeg (optional)
- 1 teaspoon vanilla extract
- 1/2 cup chopped pecans or walnuts (optional)
Instructions
This recipe comes together quickly, but following these steps closely will help you achieve the best possible texture and flavor.
Preheat your oven to 350°F (175°C) and lightly grease a 9×13-inch baking dish. Greasing the dish thoroughly helps prevent the gooey cinnamon roll pieces from sticking as they bake and expand.
Open both cans of refrigerated cinnamon rolls, setting the icing packets aside for later. Cut each cinnamon roll into quarters, then spread the pieces evenly across the bottom of the prepared baking dish. Try to distribute them in a single, even layer so every bite of the finished dessert includes some cinnamon roll.
If using, spoon the chopped apple pie filling evenly over the cinnamon roll pieces. Distributing it across the entire dish, rather than concentrating it in the center, ensures every serving gets a bit of that warm, spiced apple flavor.
Sprinkle the dry yellow cake mix evenly over the top of the cinnamon rolls and apple pie filling. This is an important step to get right: do not stir or mix it in. The cake mix needs to stay in a loose, even layer on top so it can bake into that signature golden, slightly crisp dump cake topping.
In a small bowl, mix the melted butter with the vanilla extract. Drizzle this mixture evenly over the entire surface of the cake mix, trying to cover as much of the dry cake mix as possible. Any spots left completely dry may not bake evenly, so take your time with this step.
Sprinkle the ground cinnamon, nutmeg (if using), and chopped pecans or walnuts (if using) evenly over the top of the dish.
Place the dish in the preheated oven and bake for 40 to 45 minutes, or until the top is golden brown and the center is set. You’re looking for a top layer that has turned a deep golden color, with the cinnamon roll pieces below bubbling slightly at the edges.
Remove the dish from the oven and let it cool for about 10 minutes. This resting time allows the layers to set slightly, making the dessert easier to serve while still warm and gooey.
While the cake is cooling, warm the reserved icing packets for a few seconds, either in the microwave or by running them briefly under warm water, until the icing becomes pourable. Drizzle the warmed icing generously over the top of the dump cake.
Serve the Cinnamon Roll Dump Cake warm, either on its own or topped with a scoop of vanilla ice cream for an extra indulgent finish.
- Prep Time: 10 minutes
- Cook Time: 45 minutes
Nutrition
- Serving Size: 10
- Calories: Approximately 460 per serving