
Red Velvet Cake with Cream Cheese Frosting
Introduction to Red Velvet Cake with Cream Cheese Frosting
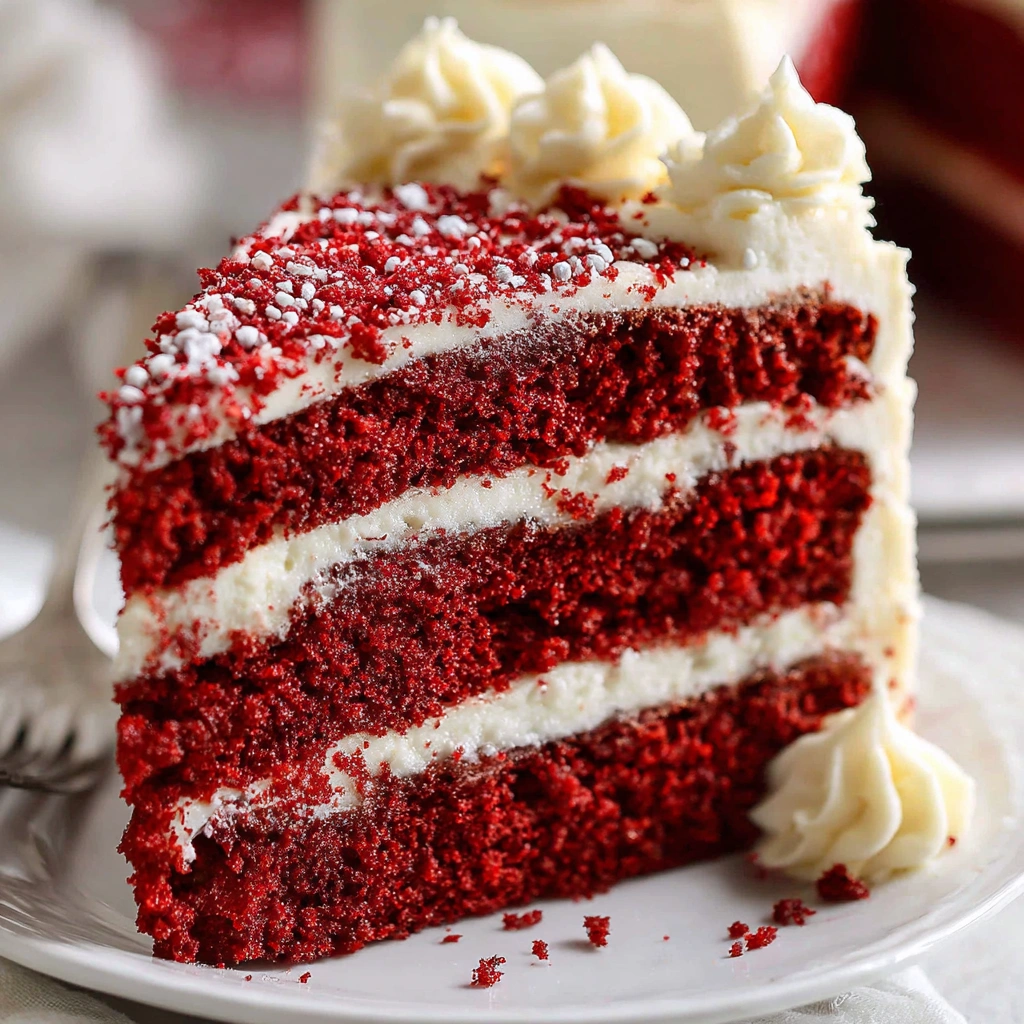
There’s something magical about a slice of Red Velvet Cake with Cream Cheese Frosting. It’s not just a dessert; it’s a celebration on a plate! Whether you’re hosting a birthday bash or simply want to treat your family after a long week, this cake is your go-to. I remember the first time I made it; the vibrant color and rich flavor left everyone in awe. Plus, it’s surprisingly easy to whip up, making it perfect for busy moms like us. Let’s dive into this delightful recipe that’s sure to impress your loved ones!
Why You’ll Love This Red Velvet Cake with Cream Cheese Frosting
This Red Velvet Cake with Cream Cheese Frosting is a true crowd-pleaser! It’s not only quick to make, but it also delivers a rich, moist texture that melts in your mouth. The tangy cream cheese frosting perfectly balances the sweetness of the cake, creating a flavor explosion. Plus, it’s visually stunning, making it an impressive centerpiece for any gathering. Trust me, your family will be asking for seconds!
Ingredients for Red Velvet Cake with Cream Cheese Frosting
Gathering the right ingredients is the first step to creating your masterpiece. Here’s what you’ll need for this delightful Red Velvet Cake with Cream Cheese Frosting:
- All-purpose flour: This is the backbone of your cake, providing structure and texture.
- Granulated sugar: Sweetness is key! It helps create that moist, tender crumb.
- Baking soda: This leavening agent gives your cake the lift it needs to rise beautifully.
- Salt: A pinch enhances the flavors, balancing the sweetness.
- Cocoa powder: Just a hint of cocoa adds depth to the flavor without overpowering the red hue.
- Vegetable oil: This keeps the cake moist and tender, making each bite melt in your mouth.
- Buttermilk: The acidity in buttermilk reacts with the baking soda, creating a light texture and rich flavor.
- Eggs: They bind everything together and add richness to the cake.
- Red food coloring: This is what gives the cake its signature vibrant color. Don’t skimp on this!
- Vanilla extract: A splash of vanilla adds warmth and enhances the overall flavor.
- White vinegar: This helps to activate the baking soda and adds a subtle tang.
For those looking to make substitutions, you can use whole wheat flour for a healthier twist or swap out the buttermilk for a dairy-free alternative like almond milk mixed with a bit of vinegar. Remember, the exact quantities for these ingredients are at the bottom of the article, ready for you to print out and take to the kitchen!
How to Make Red Velvet Cake with Cream Cheese Frosting
Step 1: Preheat and Prepare
First things first, preheat your oven to 350°F (175°C). This step is crucial because it ensures your cake bakes evenly. While the oven warms up, grab your two 9-inch round cake pans. Grease them with butter or cooking spray, then dust with flour. This will help the cake release easily after baking. Trust me, there’s nothing worse than a cake that sticks to the pan! With everything prepped, you’re ready to dive into the mixing.
Step 2: Mix Dry Ingredients
In a large bowl, sift together the all-purpose flour, granulated sugar, baking soda, salt, and cocoa powder. Sifting is key here; it aerates the flour and removes any lumps. This step is essential for achieving that light, fluffy texture we all love in a cake. Once combined, give it a gentle stir to ensure everything is evenly mixed. This is the foundation of your Red Velvet Cake with Cream Cheese Frosting, so let’s make it count!
Step 3: Combine Wet Ingredients
In another bowl, mix together the vegetable oil, buttermilk, eggs, red food coloring, vanilla extract, and white vinegar. Each ingredient plays a vital role. The oil keeps the cake moist, while the buttermilk adds a rich flavor. The red food coloring? That’s what gives our cake its signature hue! Whisk everything together until it’s smooth and well combined. This mixture is where the magic begins, so don’t rush it!
Step 4: Combine Wet and Dry Mixtures
Now, it’s time to bring the wet and dry ingredients together. Gradually pour the wet mixture into the dry ingredients, stirring gently. Be careful not to overmix; a few lumps are perfectly fine! Overmixing can lead to a dense cake, and we want it light and airy. Just mix until you see no dry flour. This is where the beautiful red batter comes to life, and it’s so satisfying to see!
Step 5: Bake the Cake
Divide the batter evenly between the prepared cake pans. Pop them in the preheated oven and bake for 25-30 minutes. To check for doneness, insert a toothpick into the center of the cakes. If it comes out clean or with a few crumbs, they’re ready! Once baked, let the cakes cool in the pans for about 10 minutes. Then, transfer them to wire racks to cool completely. Cooling is essential for a perfect frosting later!
Step 6: Make the Cream Cheese Frosting
While the cakes cool, let’s whip up that luscious cream cheese frosting! In a mixing bowl, beat together the cream cheese and butter until smooth and creamy. Gradually add in the powdered sugar and a splash of vanilla extract. Keep mixing until you achieve a fluffy consistency. If it’s too thick, add a tiny splash of milk. This frosting is the perfect balance of tangy and sweet, and it’s what makes this cake truly irresistible!
Step 7: Frost the Cake
Once your cakes are completely cool, it’s time to frost! Place one layer on a serving plate and spread a generous amount of frosting on top. Carefully place the second layer on top and frost the top and sides of the cake. For a beautiful finish, you can use a spatula to create swirls or even add some sprinkles for a pop of color. Get creative with your decorations; this is your moment to shine!
Tips for Success
- Always use room temperature ingredients for a smoother batter.
- Don’t skip the sifting step; it makes a big difference in texture.
- Keep an eye on your cakes while baking; ovens can vary.
- Let the cakes cool completely before frosting to prevent melting.
- For a fun twist, add chocolate chips or nuts to the batter!
Equipment Needed
- Two 9-inch round cake pans (or use one 9×13-inch pan for a single layer).
- Mixing bowls (a large one for dry ingredients and a medium one for wet).
- Whisk and spatula (or an electric mixer for quicker mixing).
- Measuring cups and spoons for accuracy.
- Cooling racks to let your cakes breathe.
Variations
- Chocolate Red Velvet: Add an extra tablespoon of cocoa powder for a richer chocolate flavor.
- Gluten-Free Option: Substitute all-purpose flour with a gluten-free blend for a delicious gluten-free cake.
- Vegan Version: Replace eggs with flaxseed meal and use a plant-based butter for the frosting.
- Spiced Red Velvet: Add a teaspoon of cinnamon or nutmeg for a warm, spiced twist.
- Layered Delight: Create a multi-layer cake by baking additional layers and alternating frosting between them.
Serving Suggestions
- Pair with a scoop of vanilla ice cream for a delightful contrast.
- Serve alongside fresh berries for a pop of color and freshness.
- Complement with a cup of coffee or a glass of cold milk.
- For a festive touch, garnish with edible flowers or chocolate shavings.
FAQs about Red Velvet Cake with Cream Cheese Frosting
Can I make Red Velvet Cake with Cream Cheese Frosting ahead of time?
Absolutely! You can bake the cake a day in advance. Just store the layers wrapped in plastic wrap at room temperature. Frost it the day you plan to serve for the freshest taste.
What can I substitute for buttermilk in this recipe?
If you don’t have buttermilk, you can easily make a substitute. Just mix one cup of milk with a tablespoon of vinegar or lemon juice. Let it sit for about 5 minutes, and you’re good to go!
How do I store leftover Red Velvet Cake?
Store any leftover cake in an airtight container in the refrigerator. It will stay fresh for about 3-4 days. Just remember to let it come to room temperature before serving for the best flavor!
Can I freeze Red Velvet Cake with Cream Cheese Frosting?
Yes, you can freeze the cake! Wrap it tightly in plastic wrap and then in aluminum foil. It can be frozen for up to 3 months. Just thaw it in the fridge overnight before serving.
What’s the best way to decorate my Red Velvet Cake?
Get creative! You can use fresh berries, chocolate shavings, or even edible flowers for a beautiful presentation. A simple swirl pattern with the frosting can also add a lovely touch!
Final Thoughts
Making a Red Velvet Cake with Cream Cheese Frosting is more than just baking; it’s about creating memories. The joy of watching your loved ones savor each slice is truly priceless. This cake brings a splash of color and a burst of flavor to any occasion, making it a perfect choice for celebrations or cozy family dinners. I hope you find as much happiness in baking this cake as I do. So, roll up your sleeves, gather your ingredients, and let the magic unfold in your kitchen. Happy baking, my friends!
Print
Red Velvet Cake with Cream Cheese Frosting: A Must-Try Delight!
- Total Time: 1 hour
- Yield: 12 servings 1x
- Diet: Vegetarian
Description
A rich and moist red velvet cake topped with creamy and tangy cream cheese frosting, perfect for any celebration.
Ingredients
- 2 1/2 cups all-purpose flour
- 1 1/2 cups granulated sugar
- 1 teaspoon baking soda
- 1 teaspoon salt
- 1 teaspoon cocoa powder
- 1 1/2 cups vegetable oil
- 1 cup buttermilk, room temperature
- 2 large eggs, room temperature
- 2 tablespoons red food coloring
- 1 teaspoon vanilla extract
- 1 teaspoon white vinegar
Instructions
- Preheat the oven to 350°F (175°C). Grease and flour two 9-inch round cake pans.
- In a large bowl, sift together the flour, sugar, baking soda, salt, and cocoa powder.
- In another bowl, mix the oil, buttermilk, eggs, food coloring, vanilla extract, and vinegar until well combined.
- Gradually add the wet ingredients to the dry ingredients, mixing until just combined.
- Divide the batter evenly between the prepared cake pans.
- Bake for 25-30 minutes or until a toothpick inserted in the center comes out clean.
- Let the cakes cool in the pans for 10 minutes, then transfer to wire racks to cool completely.
- For the frosting, beat together cream cheese and butter until smooth, then gradually add powdered sugar and vanilla extract.
- Once the cakes are completely cool, frost the top of one layer, place the second layer on top, and frost the top and sides of the cake.
- Decorate as desired and serve.
Notes
- Ensure all ingredients are at room temperature for best results.
- Store leftover cake in an airtight container in the refrigerator.
- For a richer flavor, let the cake sit overnight before serving.
- Prep Time: 30 minutes
- Cook Time: 30 minutes
- Category: Dessert
- Method: Baking
- Cuisine: American
Nutrition
- Serving Size: 1 slice
- Calories: 350
- Sugar: 30g
- Sodium: 300mg
- Fat: 18g
- Saturated Fat: 8g
- Unsaturated Fat: 10g
- Trans Fat: 0g
- Carbohydrates: 45g
- Fiber: 1g
- Protein: 4g
- Cholesterol: 50mg
Keywords: Red Velvet Cake, Cream Cheese Frosting, Dessert, Celebration Cake