
Homemade Mini Sourdough Loaves
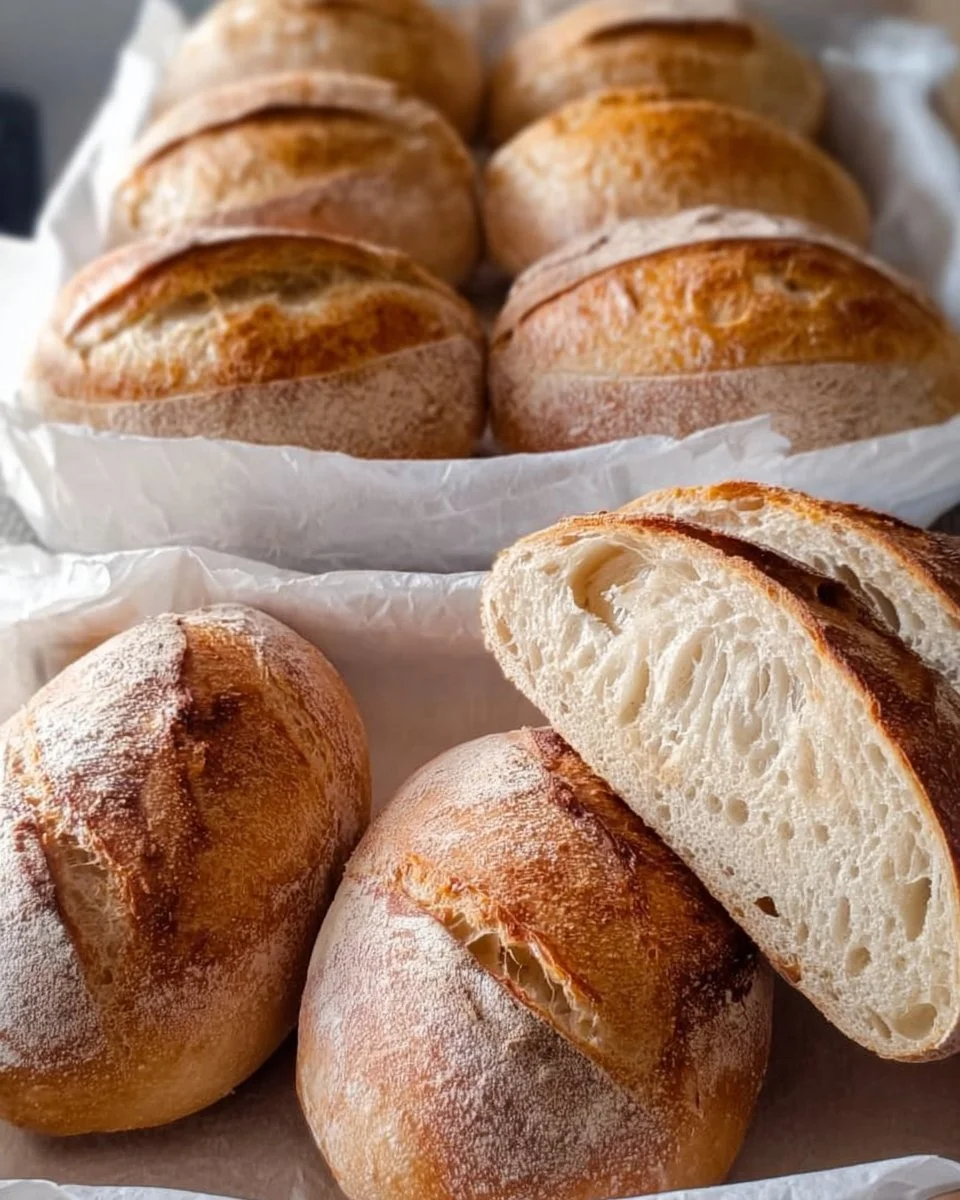
The aroma of freshly baked bread wafts through the kitchen, wrapping around you like a warm, comforting hug. Each breath fills your senses with the earthy, tangy notes of sourdough, promising a symphony of flavors that you can hardly wait to partake in. Picture petite loaves, their golden crusts crackling as they cool, glossy and inviting, each crack a tiny promise of the soft, chewy interior waiting to be discovered. You reach for one, the crust yielding slightly against your fingers, and as you break it apart, the warm steam escapes, carrying with it the scent of nostalgia and home.
You’ve created something extraordinary—a delightful batch of homemade mini sourdough loaves. Each bite provides a tantalizing crunch, leading to a tender, airy crumb that dances on your palate with just the right amount of tang. Perfectly sized for sharing or indulging all on your own, these little wonders celebrate the rustic charm of sourdough bread-making while inviting you to savor the simple pleasure of baking at home. The joy of pulling these beauties from the oven transcends mere nourishment; it’s an experience, an act of love.
Why You’ll Love This Homemade Mini Sourdough Loaves
Imagine setting the table for a cozy gathering, where the centerpiece is a basket of your homemade mini sourdough loaves, their beautiful golden crusts glistening under the soft light. These delightful bite-sized treasures stand out not only for their artisanal appearance but also for their incredible taste and texture. Crunchy on the outside, warm and fluffy within, they practically beg to be slathered with creamy butter or dipped into a hearty soup.
Baking these mini loaves offers several delicious benefits. Not only do they allow you to practice the art of sourdough fermentation, but they also yield a satisfying reward; the joy of sharing warm bread with family or friends becomes a memorable occasion. Each loaf embodies the essence of homemade, encouraging connection through food, nostalgia for simpler times, and the thrill of creation. Plus, you can easily customize your recipe with herbs, seeds, or spices, adapting it to your tastes or the occasion at hand.
Preparation Phase & Tools to Use
To embark on your sourdough adventure, gather a few essential tools that transform an ordinary baking experience into a delightful journey.
- Mixing Bowl: A large, sturdy bowl serves as your dough’s home, allowing room for growth as the yeast works its magic.
- Wooden Spoon or Spatula: This tool becomes your trusty sidekick for folding and mixing, ensuring each ingredient combines harmoniously.
- Clean Surface for Kneading: A spacious counter or table is ideal for kneading—giving you the room to work your dough into submission until it sings under your hands.
- Kitchen Towel: This simple item serves multiple purposes; use it to cover your dough as it rises and to ensure it stays warm and cozy.
- Baking Sheet: A trusty baking sheet lined with parchment allows the loaves to bake evenly, creating that golden crust that makes sourdough so delectable.
- Wire Rack: Always cool your loaves on a wire rack to preserve their crunchy exterior—no one wants soggy bread!
Preparation Tips:
As you set up, measure your ingredients meticulously for the best results. And remember, patience is key; allow the dough ample time to rise and develop that distinctive sourdough flavor that sings in every mouthful.
Ingredients for Homemade Mini Sourdough Loaves
-
1 cup active sourdough starter: Your starter is the magic behind sourdough. It’s a living culture of flour and water, rich in wild yeast and beneficial bacteria. If you don’t have a starter, you can make one or look for a friend who has a thriving batch.
-
1 cup warm water: The warmth awakens the yeast in your starter, helping the dough rise beautifully.
-
3 cups all-purpose flour: This forms the base of your loaves. Offer a blend of strength and tenderness. You can substitute a portion with whole wheat for a nuttier flavor or add specialty flours for unique textures.
-
1 teaspoon salt: This humble ingredient enhances flavor and strengthens gluten structure in your dough.
How to Make Homemade Mini Sourdough Loaves
-
Whisk the Starter and Water: In a large bowl, combine the active sourdough starter with warm water, whisking until fully mixed. The starter thrives in this welcoming environment, excited to get started on its mission.
-
Incorporate Flour and Salt: Gradually add the flour and salt to the starter mixture, using a spatula or wooden spoon to stir. Continue until the dough forms a shaggy appearance, a hint of the magic to come.
-
Knead the Dough: Dust your clean surface with flour and knead the dough for about 8-10 minutes. Feel the texture change from rough to smooth and elastic, a tactile reminder of your hard work.
-
First Rise: Transfer your kneaded dough to a lightly oiled bowl. Cover it with a kitchen towel and allow it to rise in a warm area for 4-6 hours, or until it’s doubled in size. An aromatic warmth fills your kitchen as the dough comes to life.
-
Preheat Oven: About 30 minutes before baking, preheat your oven to 450°F (230°C), ensuring it’s hot enough to create that coveted crust.
-
Shape the Loaves: Gently deflate your risen dough, divide it into smaller sections, and shape each into a mini loaf. Each loaf should feel light and airy, a testament to the perfect rise.
-
Second Rise: Place the shaped loaves on a baking sheet lined with parchment paper, leaving space for them to expand. Let them rise, uncovered, in a warm spot for an additional 30 minutes, encouraging them to puff up.
-
Bake: With eager anticipation, bake the loaves in your preheated oven for 20-25 minutes, until they turn golden and emit a hollow sound when tapped. The sight of each mini loaf blooming in the oven becomes irresistible.
-
Cool Before Slicing: Once baked, allow your loaves to cool on a wire rack. Resisting the urge to slice into them too soon ensures that your bread maintains its crunch.
Chef’s Notes & Helpful Tips
-
Make-Ahead Tips: You can prepare your dough the night before and let it rise in the fridge, creating a richer flavor the next day. Just remember to take it out to warm up before shaping.
-
Cooking Alternatives: If you’re pressed for time, try using an air fryer! Bake at 350°F for about 15-20 minutes—your mini loaves will turn out just as delightful.
-
Customization Ideas: Feel free to incorporate herbs like rosemary or thyme, add seeds for a crunch, or mix in cheese for a savory treat.
Common Mistakes to Avoid
-
Under-hydrating the Dough: Ensure your dough is adequately moist. If too dry, your loaves may end up dense instead of airy.
-
Skipping the Kneading: Insufficient kneading leads to weak gluten structure, resulting in flat loaves. Engage with your dough for the best possible outcome.
-
Not Allowing Enough Rise Time: Don’t rush the fermentation process. Your sourdough needs time to develop flavor and structure.
What to Serve With Homemade Mini Sourdough Loaves
The beauty of these mini loaves lies in their versatility when it comes to pairings. Here are some delightful collaborations:
-
Creamy Butter: Making your bread ritual a bit indulgent—nothing beats fresh bread with a pat of fresh, creamy butter.
-
Soups: Serve alongside a steaming bowl of butternut squash or tomato soup—the contrast of the warm bread and savory soup makes for a cozy pairing.
-
Olive Oil and Balsamic Vinegar: Set out a small dish of quality olive oil and balsamic for dipping, enhancing that beautiful crust with a rich experience.
-
Cheese Platter: Build a stunning cheese board with artisanal cheeses. The tang of the sourdough harmonizes perfectly with both soft and hard varieties.
-
Charcuterie: Your loaves elevate a charcuterie spread, complementing cured meats and pickles wonderfully.
-
Salads: Pair with a fresh arugula salad to balance the bread’s richness with crisp greens.
-
Avocado Toast: Get creative by topping slices with smashed avocado, a sprinkle of salt, and perhaps a few chili flakes.
-
Bruschetta: Use the loaves as a base for classic bruschetta, adding tomatoes, basil, and a drizzle of olive oil as a delightful appetizer.
Storage & Reheating Instructions
To maximize freshness, store your mini sourdough loaves in a paper bag at room temperature for about 2-3 days. If you want to keep them longer, wrap them tightly in plastic wrap and freeze for up to 3 months. When you’re ready to enjoy again, simply thaw at room temperature and reheat in the oven at 350°F (175°C) for about 10 minutes. The bread will regain its crisp crust, and your home will again fill with that enticing aroma.
Estimated Nutrition Information
Please note that nutritional values can vary based on specific ingredients and their quantities. On average, each mini sourdough loaf contains approximately:
- Calories: 150-200
- Carbohydrates: 30g
- Protein: 5g
- Fat: 1g
- Fiber: 1g
FAQs
1. Can I use a store-bought sourdough starter?
Absolutely! Just make sure it’s active and bubbly before you use it.
2. What if my dough doesn’t rise?
If your dough sits without rising, it could be due to an inactive starter. Make sure your starter is bubbly and active. Yeast thrives in warmth, so consider a warmer environment for your dough to ferment.
3. How do I know when my loaves are done?
Perfectly baked loaves sound hollow when tapped on the bottom. They should be golden brown.
4. Can I add ingredients like nuts or fruits?
Yes! Feel free to fold in appropriate ingredients such as walnuts, olives, or even dried fruits. Be aware that this may slightly alter the rise time.
5. How does sourdough get its flavor?
The fascinating tang of sourdough develops from the fermentation process, where wild yeast and bacteria in the starter break down flour sugars and produce lactic acid, creating that unique flavor profile.
Conclusion
This homemade mini sourdough loaves recipe invites you to experience the joys of artisan baking right in your kitchen. Imagine the comforting warmth of freshly baked bread tantalizing both your senses and your spirit. Whether shared among friends or savored solo, these mini loaves provide a heartfelt connection to the age-old practice of breadmaking. So, roll up your sleeves, embrace the process, and let the magic of sourdough take over your kitchen. You won’t just be baking; you’ll be creating love in the shape of perfect little loaves. Enjoy every bite!
Print
Homemade Mini Sourdough Loaves
- Total Time: 90 minutes
- Yield: 8 mini loaves 1x
- Diet: Vegetarian
Description
Delightfully small, crunchy on the outside and fluffy on the inside, these mini sourdough loaves are perfect for sharing or indulging alone.
Ingredients
- 1 cup active sourdough starter
- 1 cup warm water
- 3 cups all-purpose flour
- 1 teaspoon salt
Instructions
- Whisk the starter and water in a large bowl until fully combined.
- Incorporate flour and salt, stirring until the dough is shaggy.
- Knead the dough on a floured surface for about 8-10 minutes.
- Transfer the kneaded dough to an oiled bowl, cover with a towel, and allow it to rise for 4-6 hours.
- Preheat the oven to 450°F (230°C) about 30 minutes before baking.
- Shape the loaves by deflating and dividing the risen dough.
- Place shaped loaves on a baking sheet, allowing them to rise uncovered for 30 minutes.
- Bake for 20-25 minutes until golden and hollow sounding when tapped.
- Cool loaves on a wire rack before slicing.
Notes
For added flavor, allow the dough to rise in the fridge overnight. They can also be made in an air fryer at 350°F for a quicker bake.
- Prep Time: 15 minutes
- Cook Time: 25 minutes
- Category: Bakery
- Method: Baking
- Cuisine: Italian
Nutrition
- Serving Size: 1 loaf
- Calories: 175
- Sugar: 0g
- Sodium: 200mg
- Fat: 1g
- Saturated Fat: 0g
- Unsaturated Fat: 0g
- Trans Fat: 0g
- Carbohydrates: 35g
- Fiber: 1g
- Protein: 5g
- Cholesterol: 0mg
Keywords: sourdough, bread, homemade, baking, artisan