Ingredients
This recipe makes four small dessert servings.
For the Jello Whips
-
1 package (0.3 oz) sugar-free flavored gelatin, any flavor
-
1/2 cup boiling water
-
1/2 cup cold water
-
1 cup plain nonfat Greek yogurt
-
1 scoop vanilla protein powder, approximately 25–30 g
-
1/2 teaspoon vanilla extract, optional
-
1–2 tablespoons zero-calorie powdered sweetener, optional
-
1/2 cup ice cubes
Optional Toppings
-
Additional plain Greek yogurt
-
Fresh strawberries
-
Fresh raspberries
-
Fresh blueberries
-
A light dusting of vanilla protein powder
-
A small amount of sugar-free whipped topping
Instructions
These Jello whips are simple to prepare, but temperature and blending technique are important for achieving a smooth, fluffy texture.
Step 1: Prepare the Gelatin
Place the sugar-free gelatin powder in a medium heatproof mixing bowl.
Bring water to a boil.
Measure 1/2 cup of boiling water and pour it over the gelatin powder.
Whisk continuously for approximately 1–2 minutes.
Continue stirring until the gelatin is completely dissolved.
There should be no visible granules remaining at the bottom of the bowl.
Fully dissolving the gelatin is important because undissolved particles can create a grainy texture and prevent the dessert from setting evenly.
Step 2: Add the Cold Water
Pour 1/2 cup of cold water into the dissolved gelatin mixture.
Stir until evenly combined.
Allow the mixture to cool for approximately 10–15 minutes.
It should no longer feel hot, but it should still be liquid.
Avoid refrigerating it until it begins to set because partially solidified gelatin can form lumps when blended with the yogurt.
The goal is a cooled, pourable gelatin mixture.
Step 3: Prepare the Greek Yogurt Base
Add 1 cup of plain nonfat Greek yogurt to a blender.
Add the vanilla protein powder.
If using vanilla extract, add 1/2 teaspoon.
Add the optional powdered sweetener only if desired.
Blend until smooth and creamy.
Stop the blender and scrape down the sides if necessary.
The mixture should have an even consistency without visible pockets of protein powder.
Step 4: Taste and Adjust the Sweetness
Before adding the gelatin, taste a small amount of the yogurt and protein mixture.
Keep in mind that the flavored gelatin will add additional sweetness.
If your protein powder is already quite sweet, you may not need any extra sweetener.
If the yogurt mixture tastes too tart, add a little powdered sweetener and blend again.
Avoid adding too much at once.
Step 5: Add the Cooled Gelatin
Make sure the gelatin mixture has cooled and remains liquid.
With the blender stopped, pour the gelatin into the yogurt mixture.
Blend briefly until the ingredients are evenly combined.
The mixture should become thinner and take on the color of the flavored gelatin.
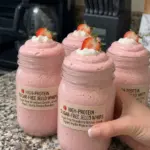
For strawberry gelatin, it will usually develop a light pink color.
Raspberry and cherry flavors may produce a deeper pink shade, while orange gelatin creates a pale orange mixture.
Step 6: Add the Ice Cubes
Add 1/2 cup of ice cubes to the blender.
Secure the lid.
Blend until the ice is completely crushed and incorporated.
The mixture should become frothy, creamy, and slightly thicker.
Depending on your blender and the size of the ice cubes, this may take approximately 30–60 seconds.
Avoid blending for an unnecessarily long time because excessive blending can warm the mixture and reduce some of the foam.
Use a blender designed to crush ice safely.
Step 7: Check the Texture
Stop the blender and inspect the mixture.
It should look smooth, lightly foamy, and evenly colored.
There should be no large ice pieces or visible lumps of protein powder.
If necessary, blend briefly again.
The mixture will still be pourable at this stage.
It will become firmer after refrigeration as the gelatin sets.
Step 8: Divide Into Dessert Cups
Pour the mixture evenly into four small dessert cups, ramekins, or glasses.
Use a spatula to scrape the remaining mixture from the blender.
Try to divide the portions evenly so each serving has a similar amount of protein and dessert.
For an attractive presentation, use clear glasses to show the soft, creamy color.
Step 9: Refrigerate Until Set
Place the dessert cups in the refrigerator.
Chill for approximately 1–2 hours, or until the mixture has set.
The finished texture should be light, creamy, and softly structured.
It should hold its shape when scooped with a spoon.
Chilling time can vary depending on the gelatin brand, the temperature of the mixture, and the size of the serving cups.
If the dessert is still too soft after 2 hours, allow it to chill longer.
Step 10: Add Optional Toppings
Once the Jello whips have set, remove them from the refrigerator.
Top each cup with a small spoonful of Greek yogurt if desired.
Add a few fresh berries for color and flavor.
You can also use a little sugar-free whipped topping for a more dessert-like presentation.
Keep toppings light so they don’t overwhelm the airy texture.
Step 11: Serve and Enjoy
Serve the Jello whips cold, directly from the refrigerator.
The texture should be creamy, fruity, and mousse-like.
For the best experience, enjoy them chilled rather than allowing them to sit at room temperature for an extended period.