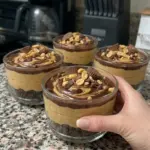
Description
- Preparation: Approximately 20–25 minutes
- Baking: None
- Chilling: At least 30–60 minutes; longer for a firmer filling
- Total time: Approximately 50–85 minutes
- Yield: 4 generous dessert bowls, or 6–8 smaller portions
- Method: Mixing, brief microwave melting, and refrigeration
- Texture: Thick, creamy cheesecake filling with a soft chocolate topping
This dessert is inspired by the chocolate-peanut butter combination associated with Reese’s candy. It is a homemade recipe, not an official product formulation. The optional candy garnish is separate from the protein-containing ingredients in the filling.
Ingredients
Chocolate Cookie Crumb Base
- ½ cup finely crushed chocolate protein cookies or chocolate graham crackers
- 1 tablespoon unsweetened cocoa powder
- 1½ tablespoons melted coconut oil or unsalted butter
Peanut Butter Cheesecake Filling
- 1¼ cups thick plain nonfat Greek yogurt
- 6 ounces reduced-fat block cream cheese, softened
- ½ cup creamy natural peanut butter, thoroughly stirred
- ⅓ cup powdered peanut butter
- 1 scoop protein powder, approximately 30 grams, vanilla or peanut butter flavor
- Up to ¼ cup powdered monk fruit sweetener blend, adjusted to its labeled sweetness
- 1 teaspoon vanilla extract
- Small pinch of salt
Maple syrup option: Up to ¼ cup maple syrup may replace the powdered sweetener, but begin with less and add to taste. Syrup adds liquid and sugar, producing a softer filling and different nutrition.
Chocolate-Peanut Butter Topping
- ½ cup sugar-free or dark chocolate chips
- Up to ¼ cup unsweetened almond milk or light cream, added gradually as needed
- 1 tablespoon creamy peanut butter, gently warmed until pourable, for swirling
Optional Garnishes
- 4 miniature dark chocolate peanut butter cups, halved
- 2 tablespoons chopped roasted peanuts
- 1 tablespoon mini chocolate chips
The full garnish quantity is intended for the whole batch, not for each bowl. If dividing among more containers, cut the candy pieces smaller or garnish only the servings you plan to eat soon.
Instructions
1. Prepare the Containers
Set out four generous dessert bowls or six to eight smaller containers. Make sure they are clean and dry. Arrange them on a tray if you want to move all the portions to the refrigerator together.
Decide the serving count now so the crumb base and filling can be divided evenly. A smaller serving count does not make the mixture lighter; it simply produces larger portions.
2. Mix the Crumb Base
Combine the crushed cookies, cocoa powder, and melted butter or coconut oil. Stir until evenly moistened. Cookie texture varies, so the mixture may look looser with graham crackers than with a softer protein cookie.
Divide among the containers and press lightly into a thin base. Do not compact it into a dense, hard disk, especially if using coconut oil, which firms when refrigerated. The base should remain easy to scoop with a spoon.
3. Beat the Cream Cheese and Peanut Butter
Beat the softened cream cheese and well-stirred peanut butter until smooth, scraping down the bowl as needed. Start at a moderate speed to avoid scattering ingredients, then mix until the cream cheese lumps disappear.
This step is easier before adding cold yogurt. If the base still has visible lumps, work them out now rather than expecting later high-speed whipping to fix them after protein powder is added.
4. Add the Dairy and Flavorings
Add the yogurt, vanilla, and a small pinch of salt. Mix until evenly combined. Add powdered peanut butter and protein powder, then begin with part of the sweetener.
Mix on low first so the powders do not fly out of the bowl. Increase speed briefly once incorporated, stopping when the filling is smooth. Prolonged beating is unnecessary and does not create the same structure as folding in whipped cream.
5. Rest and Adjust
Let the filling stand for three to five minutes so the powders hydrate, then check the texture. It should be thick and spoonable, with no large dry pockets. Taste and add sweetener gradually if needed.
If very stiff, add a teaspoon of milk at a time, mixing briefly after each addition. If loose, refrigerate briefly before deciding whether it needs correction. Adding substantial extra protein powder can change the flavor and make the result chalky.
6. Fill the Bowls
Divide the filling evenly over the crumb bases. Smooth with the back of a spoon, leaving room for chocolate. Refrigerate while preparing the topping.
If piping, use a wide opening without a narrow decorative tip. A thick protein filling can be difficult to push through small tips, and spooning is simpler when texture varies by powder brand.
7. Melt the Chocolate Gently
Place the chocolate chips in a microwave-safe bowl. Warm about two tablespoons of the chosen milk or cream separately until warm but not boiling. Add to the chocolate and microwave in short ten- to fifteen-second intervals, stirring thoroughly between each.
Stop heating when stirring finishes melting the remaining pieces. Add more warm liquid in small amounts only if necessary, up to the listed quarter cup. A single long microwave burst can overheat the edges before the middle melts.
8. Cool to a Spreadable Consistency
Let the chocolate stand briefly until no longer hot but still easy to spread. If it is very thin, allow more cooling rather than pouring a watery layer over the filling.
If the mixture thickens too much, stir gently or warm very briefly. Different sugar-free chips respond differently, so follow any melting guidance on the package. Avoid repeatedly adding cold liquid, which can make smoothing the mixture harder.
9. Add the Topping and Swirl
Spoon a thin layer of chocolate over each chilled portion. Spread gently without digging into the filling. Warm the separate tablespoon of peanut butter only enough to make it fluid.
Drizzle small lines or dots of peanut butter over the chocolate, then draw a toothpick through the surface a few times. Stop while the pattern is still visible. Repeated stirring blends the colors into one layer rather than producing distinct ribbons.
10. Chill and Garnish
Refrigerate for at least thirty to sixty minutes, or longer if you want a firmer filling. Cover once the topping has cooled enough that condensation is less likely to collect on the surface.
Add peanut butter cup pieces, peanuts, and mini chips near serving for the freshest texture. Garnishing before the initial chill is also possible, but crunchy ingredients may soften during longer storage. Serve chilled with a spoon.