Ingredients
For the Ice Cream
- 1 1/2 cups plain or vanilla Greek yogurt
- 4 oz cream cheese, softened
- 1 cup fresh or frozen blueberries
- 1 scoop vanilla protein powder
- 1/3 cup unsweetened almond milk
- 2–3 tbsp powdered sugar substitute, or to taste
- 1 tsp vanilla extract
- 1 tbsp fresh lemon juice
- Pinch of salt
For the Cheesecake Crumble
- 1/3 cup crushed sugar-free graham crackers
- 1 tbsp melted butter
- 1 tbsp powdered sugar substitute
- Pinch of cinnamon
Optional Toppings
- Fresh blueberries
- Additional cheesecake crumble
- A small spoonful of Greek yogurt
- Lemon zest
Instructions
Step 1: Cook the Blueberries 🫐
Add 1 cup blueberries and 1 tablespoon fresh lemon juice to a small saucepan.
Place the saucepan over medium-low heat.
Cook for approximately 4–5 minutes, stirring occasionally.
As the berries heat, they’ll begin to soften and release their juices.
Gently press a few berries with the back of your spoon while leaving others partially intact.
You want a juicy blueberry mixture with plenty of fruit texture rather than a completely smooth sauce.
Step 2: Cool the Blueberries Completely
Remove the saucepan from the heat.
Transfer the blueberry mixture to a small bowl and allow it to cool completely.
This is important.
Adding hot blueberry sauce directly to the yogurt and cream cheese base can thin the mixture and warm ingredients that should remain cold.
For faster cooling, place the blueberry mixture in the refrigerator once it has stopped steaming.
Step 3: Soften the Cream Cheese
Make sure your 4 ounces of cream cheese are softened before blending.
Cold, firm cream cheese can leave small lumps in the finished base.
Softened cream cheese blends much more easily with Greek yogurt and almond milk.
Step 4: Make the Cheesecake Base 🍰
Add the following ingredients to a blender or food processor:
- 1 1/2 cups Greek yogurt
- 4 ounces softened cream cheese
- 1 scoop vanilla protein powder
- 1/3 cup unsweetened almond milk
- 2–3 tablespoons powdered sugar substitute
- 1 teaspoon vanilla extract
- Pinch of salt
Blend until completely smooth and creamy.
Stop and scrape down the sides if necessary.
The finished mixture should look thick, silky, and uniform without visible cream cheese lumps.
Step 5: Adjust the Sweetness
Taste the base before freezing.
Cold temperatures reduce our perception of sweetness, so the unfrozen mixture should taste slightly sweeter than you ultimately want the frozen ice cream to taste.
Add additional powdered sugar substitute if necessary.
Keep in mind that some protein powders and vanilla Greek yogurts are already sweetened.
Step 6: Add the Blueberry Flavor
Reserve approximately one-quarter of the cooled blueberry mixture for swirling later.
Add the remaining three-quarters to the blender.
Pulse just a few times.
You want the blueberries incorporated without necessarily turning the entire base completely uniform.
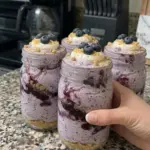
A slightly streaky purple-and-cream appearance works particularly well for blueberry cheesecake ice cream.
Step 7: Make the Cheesecake Crumble
In a small bowl, combine:
- 1/3 cup crushed sugar-free graham crackers
- 1 tablespoon melted butter
- 1 tablespoon powdered sugar substitute
- Pinch of cinnamon
Stir until the crumbs are evenly coated.
The mixture should resemble loose, buttery cheesecake crust crumbs.
Set aside.
Step 8: Chill the Ice Cream Base ❄️
Transfer the blueberry cheesecake mixture to a shallow freezer-safe container or bowl.
Refrigerate for approximately 30 minutes.
Chilling the mixture thoroughly before freezing helps it freeze more evenly.
If you’re using an ice cream maker, this step is especially useful because colder bases generally churn more effectively.
Step 9: Create the Blueberry Cheesecake Layers
Spoon part of the chilled ice cream base into your freezer-safe container.
Add small spoonfuls of the reserved blueberry mixture.
Sprinkle over some of the cheesecake crumble.
Repeat with the remaining ice cream base, blueberries, and crumble.
Step 10: Swirl Gently 🫐🍰
Insert a butter knife or thin spatula into the mixture.
Make a few gentle swirling motions through the container.
Don’t aggressively stir.
The goal is to preserve visible ribbons of blueberries and pockets of cheesecake crumble rather than completely blending everything together.
Step 11: Freeze
Cover the container securely.
Freeze for approximately 2–3 hours.
During the first 90 minutes, stir the ice cream once or twice.
This helps break up larger ice crystals and creates a creamier texture when you’re making the recipe without an ice cream maker.
After stirring, smooth the surface again and return it to the freezer.
Step 12: Check the Texture
After approximately two hours, check the consistency.
For soft-serve-style ice cream, it may already be ready.
For firmer scoops, allow it to freeze closer to three hours or until it reaches your preferred consistency.
Step 13: Soften Before Scooping 🍦
If the ice cream freezes completely solid, remove the container from the freezer approximately 10–15 minutes before serving.
Letting it soften slightly makes scooping much easier and restores a creamier texture.
Step 14: Serve
Scoop into bowls.
Top with additional fresh blueberries or a small sprinkle of reserved cheesecake crumble if desired.
Serve immediately.