
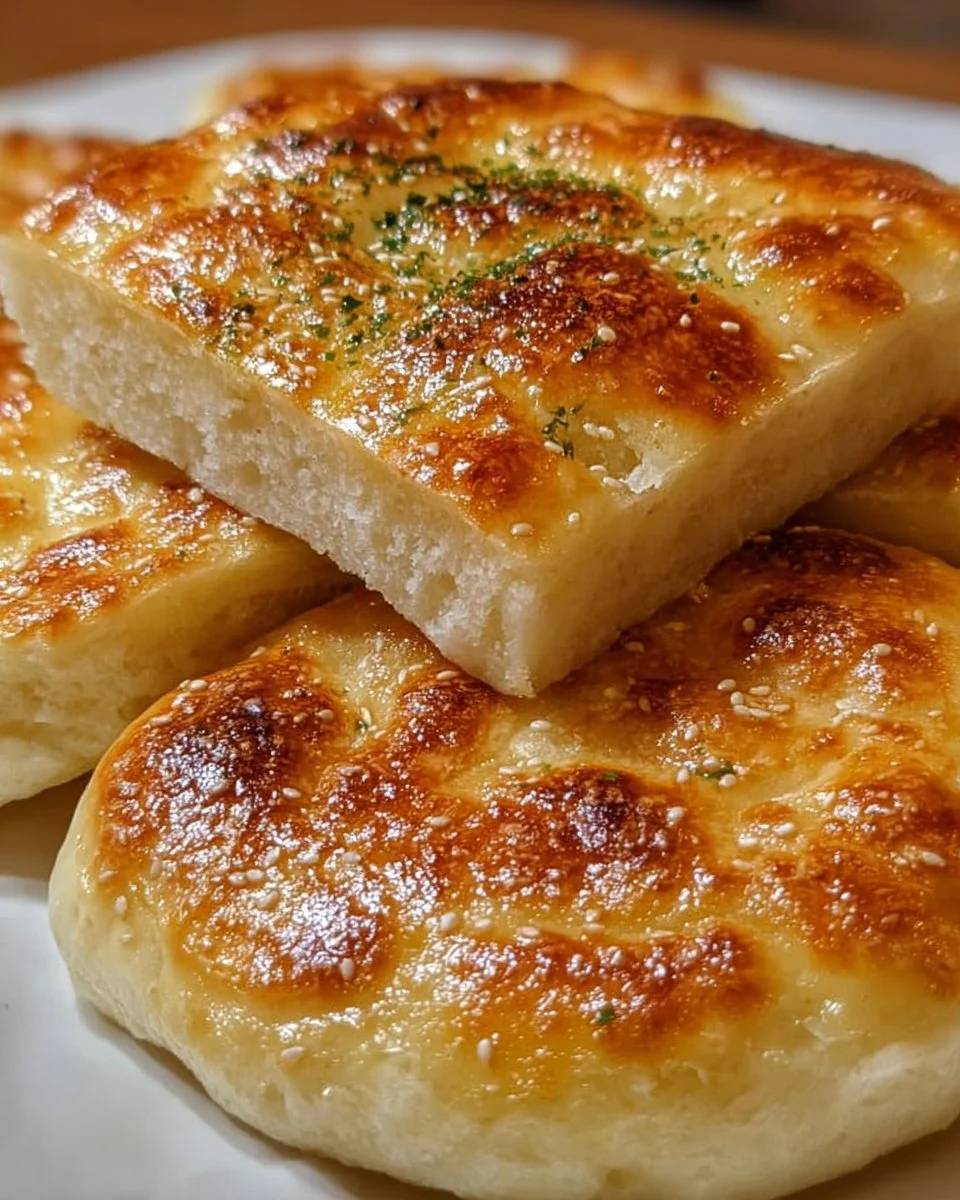
Easy No-Oven Turkish Bread
The allure of bread, with its warm, inviting aroma wafting through the kitchen, creates a sensory experience unlike any other. Now, imagine biting into a soft, pillowy piece of freshly baked bread that practically melts in your mouth; the subtle hint of olive oil mingling perfectly with the comforting softness. Every chew tantalizes your taste buds, while the crispy outer layer beckons you for just one more piece. This dreamy indulgence requires no oven, allowing you to create a delightful variation of Turkish bread straight from the stovetop—a simple yet heavenly experience that warrants its own spotlight.
As you roll out the dough, the texture feels incredibly silky between your fingertips, the dough gently yielding to your touch in anticipation. The flatbreads sear in the skillet, their surface bubbling and blistering in the heat, transforming into warm, golden discs that promise to elevate every meal. Whether you serve them alongside a vibrant salad, slathered with creamy dips, or stuffed with your favorite fillings, this Easy No-Oven Turkish Bread becomes more than just food; it becomes a vessel of connection, culture, and sheer bliss.
Why You’ll Love This Easy No-Oven Turkish Bread
The beauty of this recipe lies in its simplicity and versatility. This Easy No-Oven Turkish Bread delivers a satisfying experience filled with delightful flavors and textures while saving you time and effort. Imagine a warm piece of bread, effortlessly crafted as a sturdy companion to your meals. It’s perfect for breakfast, lunch, or dinner—unified by its astonishing adaptability, this bread can rise to any occasion.
The flavor of homemade Turkish bread is rich with the depth of olive oil and a hint of sweetness from the sugar, giving it a subtle warmth that makes your taste buds sing. Whether you dip it in hummus for a delightful snack or use it as a wrap for fresh salads and grilled meats, this bread transforms any ordinary meal into something extraordinary. Best of all, the straightforward technique allows even novice bakers to shine, ensuring you’ll enjoy this experience without the stress of traditional baking methods.
Preparation Phase & Tools to Use
Before embarking on this dough-making adventure, gather a few essential tools that make this experience seamless.
-
Mixing Bowl: A large bowl is crucial for blending your ingredients and kneading your dough. Choose one that’s easy to clean, as things may get a bit sticky!
-
Rolling Pin: While not mandatory, a rolling pin simplifies the flattening process, helping you achieve that perfectly round shape with minimal effort.
-
Skillet: A non-stick skillet makes cooking the flatbreads effortless, as they easily release and achieve that golden-brown crust without sticking.
Preparation Tips:
- Ensure your warm water is neither too hot nor too cold, as extreme temperatures can hinder yeast activity.
- Keep flour on hand while rolling, as it prevents sticking and promotes a smooth dough manipulation.
Ingredients for Easy No-Oven Turkish Bread
A handful of simple ingredients come together to create something spectacular:
-
2 cups all-purpose flour: This forms the base of our dough, providing structure and chewiness.
-
1 cup warm water: Essential for activating the yeast, warm water helps the dough rise beautifully.
-
1 teaspoon salt: This brings out the flavors and balances the sweetness of the bread.
-
1 teaspoon sugar: A small amount of sweetness that nourishes the yeast, helping it flourish.
-
1 tablespoon olive oil: Infusing the bread with richness and flavor, olive oil also contributes to its tenderness.
-
1 teaspoon baking powder: Offering a little lift, baking powder enhances the texture of our lovely flatbreads.
Feel free to substitute whole wheat flour for all-purpose for a healthier twist or use herbs to give your bread a unique flavor profile.
How to Make Easy No-Oven Turkish Bread
-
Activate the Yeast: In a medium bowl, mix the warm water with sugar and yeast. Let it sit for 5-10 minutes until it transforms into a frothy mixture—this step ensures your bread rises beautifully.
-
Combine Dry Ingredients: In a separate large mixing bowl, whisk together the flour, salt, and baking powder. This blend brings all flavors together before introducing the wet part.
-
Create the Dough: Gradually pour the yeast mixture and olive oil into the dry ingredients, stirring until a shaggy dough forms.
-
Knead the Dough: Lightly flour your work surface and turn the dough out, kneading it gently for about 5-7 minutes until it becomes smooth and elastic.
-
Shape and Flatten: Divide the dough into small balls, about the size of a golf ball. Roll each ball into a flat disc, roughly ¼-inch thick for the optimal cooking experience.
-
Cook Over Heat: Heat your skillet over medium heat. Place a flatbread in the skillet, cooking each side for about 2-3 minutes. Keep an eye on it; you’ll know it’s ready when it turns a lovely golden hue with tiny blisters forming.
-
Serve Hot: Once cooked, serve your warm flatbreads immediately. They’re incredible for wrapping, dipping, or simply enjoying on their own!
Chef’s Notes & Helpful Tips
-
Make-Ahead Tips: You can prepare the dough ahead of time and store it in the fridge for up to 24 hours. Allow it to come to room temperature before shaping and cooking.
-
Cooking Alternatives: If you have an air fryer, you can also cook these flatbreads in it, adjusting the time and temperature according to your device’s settings to achieve that golden perfection.
-
Customization Ideas: Feel free to mix in herbs like oregano or rosemary, or even garlic powder for an additional kick. You might also experiment with whole wheat flour or add a sprinkle of za’atar for a Turkish twist.
Common Mistakes to Avoid
-
Too Hot Water: Using water that’s too hot can kill the yeast, preventing your bread from rising. Test it beforehand to ensure it’s warm but not scalding.
-
Under-Kneading: Skipping the kneading stage leads to dense bread. Knead until smooth to achieve a delightful texture.
-
Over-Cooking: Cooking flatbreads for too long can dry them out. Aim for that golden-brown surface without overdoing it.
What to Serve With Easy No-Oven Turkish Bread
This delectable bread pairs beautifully with a variety of dishes. Here are some delightful options:
-
Hummus: The creamy texture complements the warm bread beautifully, perfect for dipping.
-
Tabbouleh Salad: A fresh, zesty salad that provides a refreshing contrast to the warm bread.
-
Grilled Chicken: The bread wraps around juicy, spiced chicken for a fulfilling meal.
-
Egg Salad: Slather some creamy egg salad on this bread for a satisfying breakfast or brunch experience.
-
Dairy-Free Cheese Spreads: These add a rich and exciting flavor profile to your bread without the heaviness of traditional cheese.
-
Roasted Vegetables: Fill your bread with earthy, roasted veggies for a delicious vegetarian option.
-
Tzatziki Sauce: The cool and tangy yogurt sauce is a heavenly dip that enhances the experience.
-
Soups and Stews: Dipping this bread into a warm bowl of hearty soup yields a comforting meal.
Storage & Reheating Instructions
Store any leftover flatbreads in an airtight container at room temperature for up to two days. If you want to keep them longer, freeze them in a zipped plastic bag for up to a month. Reheat them in a skillet over low heat or in the microwave wrapped in a damp paper towel for a few seconds to retain moisture and warmth.
Estimated Nutrition Information
- Serving Size: 1 flatbread
- Calories: Approx. 150
- Fat: 3g
- Carbohydrates: 27g
- Protein: 4g
- Disclaimer: Nutritional values are estimates and can vary based on specific ingredients and preparation methods.
FAQs
1. Can I make this bread gluten-free?
Absolutely! You can substitute all-purpose flour with a gluten-free blend. Ensure your yeast is also certified gluten-free for flawless results.
2. How do I know if my yeast is good?
If after mixing yeast with warm water and sugar, it remains inactive and doesn’t foam, then it’s probably expired. Always check the expiration date beforehand.
3. My dough is too sticky, what can I do?
If the dough sticks excessively, add flour gradually until it is workable. Keep in mind that some stickiness is normal, and it ensures a soft bread!
4. Can I add spices or herbs directly to the dough?
Certainly! Feel free to incorporate herbs and spices directly into the flour mixture for increased flavor; just make sure not to overload it.
5. How do I store leftover Turkish bread?
Keep any uneaten bread in an airtight container for a couple of days at room temperature. For long-term storage, freeze it to maintain freshness.
Conclusion
As you savor each warm bite of your Easy No-Oven Turkish Bread, allow yourself to be transported to a cozy kitchen in Turkey, where the flavors burst with authenticity and love. This recipe isn’t merely about baking; it signifies hospitality, comfort, and joy shared around the table. With its simple ingredients and steps, you can create something extraordinary that brings people together. Whether piled high with fillings or used to scoop up your favorite dips, each piece tells a story as rich and vibrant as the culture it comes from. So, roll up those sleeves and step into the kitchen — a delectable culinary adventure awaits you!
Print
Easy No-Oven Turkish Bread
- Total Time: 25 minutes
- Yield: 4 servings 1x
- Diet: Vegetarian
Description
A simple and versatile stovetop bread that’s soft, chewy, and perfect for wrapping or dipping.
Ingredients
- 2 cups all-purpose flour
- 1 cup warm water
- 1 teaspoon salt
- 1 teaspoon sugar
- 1 tablespoon olive oil
- 1 teaspoon baking powder
Instructions
- Activate the yeast: In a medium bowl, mix the warm water with sugar and yeast. Let it sit for 5-10 minutes until it transforms into a frothy mixture.
- Combine dry ingredients: In a separate large mixing bowl, whisk together the flour, salt, and baking powder.
- Create the dough: Gradually pour the yeast mixture and olive oil into the dry ingredients, stirring until a shaggy dough forms.
- Knead the dough: Lightly flour your work surface and turn the dough out, kneading it gently for about 5-7 minutes until it becomes smooth and elastic.
- Shape and flatten: Divide the dough into small balls, roughly the size of a golf ball, and roll each into a flat disc about ¼-inch thick.
- Cook over heat: Heat your skillet over medium heat. Cook each flatbread for about 2-3 minutes on each side until golden with tiny blisters.
- Serve hot: Enjoy warm with your favorite dips or fillings.
Notes
Store any leftovers in an airtight container at room temperature for up to two days or freeze for longer storage.
- Prep Time: 10 minutes
- Cook Time: 15 minutes
- Category: Bread
- Method: Stovetop
- Cuisine: Turkish
Nutrition
- Serving Size: 1 flatbread
- Calories: 150
- Sugar: 1g
- Sodium: 400mg
- Fat: 3g
- Saturated Fat: 0g
- Unsaturated Fat: 3g
- Trans Fat: 0g
- Carbohydrates: 27g
- Fiber: 1g
- Protein: 4g
- Cholesterol: 0mg
Keywords: Turkish bread, easy bread recipe, no-oven bread, stovetop bread, flatbread