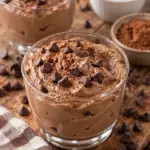
Ingredients
- 1 box (1 oz) sugar-free chocolate instant pudding mix
- 1 cup plain or vanilla Greek yogurt
- 1 cup zero-sugar whipped topping, such as Cool Whip
- 1/2 cup unsweetened almond milk or milk
- 1 tbsp unsweetened cocoa powder
- 1–2 tbsp powdered sweetener, optional
- 1/2 tsp vanilla extract
- Pinch of salt
Optional Toppings
- Extra zero-sugar whipped topping
- Shaved dark chocolate
- Unsweetened cocoa powder
- Fresh strawberries
- Fresh raspberries
- Sugar-free chocolate chips
Instructions
Step 1: Make the Chocolate Pudding Base
Add the sugar-free chocolate instant pudding mix to a medium mixing bowl.
Pour in 1/2 cup unsweetened almond milk or milk.
Whisk until smooth.
The mixture should begin thickening fairly quickly.
Don’t worry if it looks considerably thicker than ordinary prepared pudding.
You’re intentionally using a relatively small amount of liquid because the Greek yogurt will provide additional moisture.
Step 2: Add the Greek Yogurt
Add 1 cup Greek yogurt to the pudding mixture.
Whisk until completely combined.
Scrape around the sides and bottom of the bowl so there are no pockets of unmixed pudding.
Step 3: Add the Cocoa and Vanilla
Add:
- 1 tablespoon unsweetened cocoa powder
- 1/2 teaspoon vanilla extract
- A pinch of salt
Mix until the chocolate base becomes smooth and uniform.
At this stage, it should look thick and creamy.
Step 4: Taste for Sweetness
Taste a small spoonful.
If you’d like it sweeter, add 1–2 tablespoons powdered sweetener, or simply sweeten to taste.
The amount you need depends heavily on your Greek yogurt and pudding mix.
If you’re using sweetened vanilla Greek yogurt, you may not need additional sweetener at all.
Step 5: Fold in the Whipped Topping
Add 1 cup zero-sugar whipped topping.
Using a silicone spatula, gently fold it into the chocolate mixture.
Avoid vigorously beating it.
Fold until no large white streaks remain.
The mixture should become noticeably lighter and fluffier.
Why Fold Instead of Whisk?
Whipped topping already contains incorporated air.
If you vigorously whisk or beat it into the yogurt mixture, you can knock out some of that air.
Gentle folding helps maintain a more mousse-like consistency.
Use broad strokes with your spatula:
Cut through the center, scoop underneath, fold over the top, rotate the bowl, and repeat.
Stop once the mixture is evenly chocolate-colored.
Step 6: Portion the Mousse
Spoon the mousse into individual dessert bowls, ramekins, jars, or meal-prep containers.
Depending on your preferred serving size, you can make several smaller portions or fewer larger desserts.
Step 7: Chill
Refrigerate for 30–60 minutes.
The mousse will become thicker and more cohesive as it chills.
For an even firmer texture, you can refrigerate it longer.
Step 8: Garnish and Serve
Immediately before serving, add your favorite toppings.
Try:
- A swirl of whipped topping
- Shaved dark chocolate
- Cocoa powder
- Fresh raspberries
- Sliced strawberries
- A few sugar-free chocolate chips
Serve chilled.