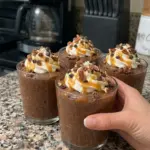
Ingredients
For the Chocolate Protein Fluff
- 1 cup plain or vanilla Greek yogurt
- 1/2 cup low-fat cottage cheese
- 1 scoop chocolate protein powder
- 1 tbsp unsweetened cocoa powder
- 2 tbsp sugar-free caramel sauce
- 1/2 tsp vanilla extract
- 1–2 tbsp unsweetened almond milk, as needed
- Pinch of salt
For the Crunch
- 1/2 cup low-sugar chocolate granola or crispy rice cereal
- 1 tbsp chopped pecans
- 1 tbsp mini sugar-free or dark chocolate chips
For Topping
- 2 tbsp sugar-free or regular caramel sauce
- 1 tbsp chopped pecans
- 1 tbsp mini chocolate chips
- Optional: whipped cream
- Optional: pinch of flaky sea salt
Instructions
Step 1: Add the Creamy Ingredients to the Blender
Add to a blender or food processor:
- 1 cup Greek yogurt
- 1/2 cup low-fat cottage cheese
- 1 scoop chocolate protein powder
- 1 tablespoon unsweetened cocoa powder
- 2 tablespoons caramel sauce
- 1/2 teaspoon vanilla extract
- Pinch of salt
Don’t add all of the almond milk immediately.
It’s easier to thin an overly thick mixture than to fix one that has become too runny.
Step 2: Blend Until Completely Smooth
Process the mixture until smooth and creamy.
Stop the blender and scrape down the sides as necessary.
Continue blending until you no longer see obvious cottage cheese curds.
Depending on your blender, this may require several blending cycles.
How to Get Cottage Cheese Completely Smooth
The secret is simply giving the blender enough time.
Stopping too early can leave tiny curds throughout the fluff.
A food processor can also work, although a high-powered blender often produces an especially silky consistency.
Scrape the sides and bottom of the container at least once to make sure everything is incorporated.
If the mixture is too thick for the blades to move properly, add a small amount of almond milk.
Step 3: Adjust the Consistency
Check the texture.
The mixture should be thick, creamy, and spoonable, similar to a thick mousse or pudding.
If it’s too thick, add 1 tablespoon unsweetened almond milk and blend again.
Add the second tablespoon only if necessary.
Avoid adding too much liquid.
The mixture will also firm slightly during refrigeration.
Protein Powder Makes a Difference
Not every chocolate protein powder behaves the same way.
Some powders absorb considerably more moisture than others.
Whey-based, casein-containing, plant-based, and blended protein powders can all create somewhat different textures.
For that reason, use the almond milk measurement as a consistency adjustment rather than an automatic addition.
Start thick and thin gradually.
Step 4: Prepare the Crunch 🥜
In a small bowl, combine:
- 1/2 cup low-sugar chocolate granola or crispy rice cereal
- 1 tablespoon chopped pecans
- 1 tablespoon mini chocolate chips
Stir until evenly mixed.
Set aside.
Step 5: Add the First Chocolate Layer
Set out 4 small dessert cups or jars.
Divide approximately half of the chocolate protein fluff between them.
Smooth the surface gently with the back of a spoon.
Step 6: Add the Crunchy Layer
Divide the crunchy mixture among the four cups.
Try to keep most of it concentrated in the center rather than directly against the glass if you want clearly defined layers.
Step 7: Add the Remaining Fluff
Spoon the remaining chocolate protein fluff over the crunchy layer.
Divide it evenly among all four cups.
Smooth or swirl the tops.
Step 8: Chill ❄️
Cover the cups and refrigerate for at least 30 minutes.
This gives the dessert time to become thoroughly cold and allows the protein fluff to firm slightly.
Should You Add the Crunch Before Chilling?
You can, but there’s an important texture tradeoff.
Granola and cereal gradually absorb moisture from the surrounding fluff.
If you eat the cups shortly after assembly, the center layer should retain more crunch.
If you’re preparing them several days ahead, the crunchy layer will soften.
For the crispiest possible texture, keep the crunch mixture separate and add it immediately before serving.
You can still create a layered appearance by adding fresh crunch to the top.
Step 9: Add the Caramel Topping 🍮
Just before serving, drizzle the four cups with 2 tablespoons caramel sauce.
Divide the caramel evenly.
Step 10: Add Pecans and Chocolate
Sprinkle with:
- 1 tablespoon chopped pecans
- 1 tablespoon mini chocolate chips
For a salted-chocolate-caramel finish, add a tiny pinch of flaky sea salt.
Step 11: Serve
Serve the cups chilled.
Add a small swirl of whipped cream if desired.
- Prep Time: 15 minutes
- Cook Time: 30 minutes
Nutrition
- Calories: approximately 225 calories per cup
- Protein: approximately 20–23g per cup